Quantcast
Channel: VMware Arena
Viewing all 326 articles
Browse latest View live

vCenter 5.5 – “Configuration Issue: Quick stats is not up-to-date”

$
0
0

It’s been so cool after you have  upgraded your vSphere environment to vSphere 5.5. You might be enjoying all the new features and able to run a big monster VM’s with your vSphere 5.5 environment. I just noticed a new error after we have upgraded our environment to vSphere 5.5.  It displays warning message of  Configuration issues. “Quick stats on hostname is not up-to-date” on the summary tab of  ESXi host, when you connected to your vCenter server 5.5 using vSphere client or vSphere Web client. You will not see this warning message when you connected to your ESXi host directly using vSphere Client.

quickstats

This is a known issue on vCenter Server 5.5 and It will be fixed in the VMware vCenter Server 5.5.0b release. There is a workaround for this issue, If you don’t have idea to upgrade your vCenter Server 5.5 to 5.5.0b. Workaround will be adding the below 2  advanced configuration parameters at your vCenter Server.

vpxd.quickStats.HostStatsCheck
vpxd.quickStats.ConfigIssues

Procedure to Add the Advanced Configuration parameter to the vCenter Server:

1. Log in to your vCenter Server using vSphere  client

2. Under Administration tab, Click on vCenter Settings and Select Advanced Settings

3. Add the below 2 configuration parameter

vpxd.quickStats.HostStatsCheck = False

vpxd.quickStats.ConfigIssues = False

vCenter 5.5 - Quick Stats Not up-to date

4. Click on Ok and Restart the vCenter Server services. Once it is restarted, Warning message will get disappear. I hope this is informative for you. Thanks for reading!!!


vSphere 5.5 Update 1 Download Links and Release Notes

$
0
0

Today, It’s been a great news to all the Virtualization enthusiast that VSAN is announced as Generally available  and which will included as part of  vSphere 5.5 Update 1.  This update includes most of the vCloud Suite products, including VMware Virtual SAN (VSAN). VMware Virtual SAN – Virtual SAN 5.5 is a new hypervisor-converged storage tier that extends the vSphere Hypervisor to pool server-side magnetic disks (HDDs) and solid-state drives (SSDs). By clustering server-side HDDs and SSDs, Virtual SAN creates a distributed shared datastore designed and optimized for virtual environments.Virtual SAN is a standalone product that is sold separate from vSphere and requires its own license key

Virtual SAN does not support clusters that are configured with ESXi hosts earlier than 5.5 Update 1. Make sure all hosts in the Virtual SAN cluster are upgraded to ESXi 5.5 Update 1 before enabling Virtual SAN.

Below are the Direct download links the products which are updated with  vSphere 5.5 Update 1

Download VMware Virtual SAN – Download

Download VMware vCenter Server Update 5.5 Update 1 – Download

Download VMware ESXi 5.5 Update 1  - Download

Download VMware Horizon Workspace – Download

VMware vSphere Replication 5.5  – Download

VMware vCenter Orchestrator appliance 5.5.1 – Download

VMware vCloud Director 5.5.1 – Download 

VMware vCenter Operataions Manager Advanced 5.8.1 – Download

VMware vCenter Site recovery manager 5.5.1 – Download

VMware vCentere Hyperic 5.8.1 Server  - Download

vSphere Data Protection 5.5.6 – Download


What’s New with vCenter Server 5.5 Update 1

  • vCloud Hybrid Service vSphere Client Plug-in, is now available in vSphere Web Client.
  • vCenter Server is now supported on Windows Server 2012 R2.
  • There are many issues which are reported on the previous versions is fixed on vCenter server 5.5 Update 1. Read the release notes.

What’s New with ESXi 5.5 Update 1

  • VMware Virtual SAN – Virtual SAN 5.5 is a new hypervisor-converged storage tier that extends the vSphere Hypervisor to pool server-side magnetic disks (HDDs) and solid-state drives (SSDs). By clustering server-side HDDs and SSDs, Virtual SAN creates a distributed shared datastore designed and optimized for virtual environments. Virtual SAN is a standalone product that is sold separate from vSphere and requires its own license key
  • Read the release notes for resolved issues

What’s new with VMware vSphere Replication 5.5.1

  • VMware Virtual SAN is a fully supported feature of vSphere 5.5u1. You can use Virtual SAN in production environments with vSphere Replication 5.5.1 and vSphere 5.5u1.
  • Configure vSphere Replication on virtual machines that reside on VMware vSphere Flash Read Cache storage. vSphere Flash Read Cache is disabled on virtual machines after recovery. Read the release notes for more info.

I hope this is informative for you. We will talk much about new features and upgrades. Thanks for reading !!!!. Be Social and share it in social media , if you feel worth sharing it.

Veeam Free Visio Stencils for VMware and Hyper-V

$
0
0

Veeam Backup ,Market leader in Virtualization backup and e #1 backup software for Virtualization products like VMware and Hyper-v. Veeam is so famous for their contribution to the virtualization community in means of sponsoring lot of virtualization related events , free study materials and giveaways to the virtualization community.

Veeam Software provides a free collection of VMware and Hyper-V virtualization Visio stencils that can be used by ESX administrators, system integrators and datacenter managers to create their own diagrams in Microsoft Visio 2003, 2007, 2010 or 2013 as part of your Hyper-V or VMware deployment planning.

Create detailed diagrams and gain valuable business insights.Use the free Veeam Stencils for Microsoft Visio to create detailed diagrams in reports and gain valuable business insights, improve business process efficiency and customer experience as well as workflow and monitoring capabilities.


Veeam_Vision Stencils for VMware

Veeam Stencils contains:

  • ESX and Hyper-V hosts
  • Datacenters
  • SCVMM
  • Local storage, shared storage
  • LUN
  • VMs with status sign
  • NICs
  • Networks and more!

Download the Veeam Stencils for VMware and Hyper-V and create their own diagrams in Microsoft Visio 2003, 2007, 2010 or 2013 as part of your Hyper-V or VMware deployment planning.

icons-for-stencils-2D-preview-larger

I hope this is informative for you. Thanks for reading !!!. Be Social and share it in social media, if you feel worth sharing it.

Upgrade ESXi 5.5 to ESXi 5.5 Update 1

$
0
0

VMware announced the update for vSphere 5.5 which is vSphere 5.5 update 1.  This update includes most of the vCloud Suite products, including VMware Virtual SAN (VSAN). It is time to upgrade your vSphere 5.5 to vSphere 5.5 update 1 to utilize the new features and also to fix the issues reported on the vSphere 5.5. It’s again the task for VMware admins to make their hands dirty with updating your vSphere 5.5. This post going to explain the procedure to upgrade the ESXi 5.5 host to ESXi 5.5 update 1.

This can be easily achieved using Update Manager but even though this post is going to explain the manual process to upgrade your ESXi host using esxcli command. Download ESXi 5.5 Update 1 from the VMware patch download page and download the ESXi 5.s update 1 zip file. Take a look at post Search and Download VMware Patches.

ESXi 5.5 update1_upgrade1

Once ESXi 5.5 update 1 is downloaded, upload the update-from-esxi5.5-5.5_update01. zip file to your datastore of the ESXi host and verify the file is visible in the directory inside the datastore .ESXi 5.5 update1_upgrade2Before upgrading to ESXi 5.5 update 1, verify the build version of our ESXi host. which is VMware ESXi 5.5.0 (VMKernel Release Build 1331820) ESXi 5.5 update1_upgrade3

You can verify the build version of ESXi 5.5 from the command line using the below command:

vmware -v

Execute the below command to install the ESXi 5.5 update 1 :

esxcli software vib install -d /datastore/directory/update-from-esxi5.5-5.5_update01. zip

ESXi 5.5 update1_upgrade4

Once ESXi 5.5 update 1 is installed on the ESXi host, You can see the message “The update completed successfully, but the system needs to be rebooted for the changes to be effective”.  Reboot the ESXi host. Once ESXi host is back after the reboot, verify the ESXi version after upgrade to ESXi 5.5 update 1.

Build version for the ESXi 5.5 update  1 is VMware ESXi 5.5.0 (VMkernel Release Build 1623387)

ESXi 5.5 update1_upgrade5


That’s it. We are done with the upgrade to ESXi 5.5 to ESXi 5.5 update 1. I hope this is informative for you. Thanks for reading!!!. Be social and share it in social media, if you feel worth sharing it.

VMware Virtual SAN : Basics of VSAN

$
0
0

With the release of VSAN, VMware fulfills the true software-defined data center with the combination of virtualized compute, network and storage. After VSAN release, I will definitely say that buying storage for your infrastructure is not only limited to the storage vendors but also VSAN will play a major role because which is part of hypervisor after vSphere 5.5 Update 1 onwards.  Virtual SAN 5.5 is a new hypervisor-converged storage tier that extends the vSphere hypervisor to pool server-side magnetic disks (HDDs) and solid-state drives (SSDs). By clustering server-side HDDs and SSDs, Virtual SAN creates a distributed shared datastore designed and optimized for virtual environments.Virtual SAN is a standalone product that is sold separate from vSphere and requires its own license key.

VSAN-2Minimum Requirements for VSAN:

  • Minimum of 3 ESXi 5.5 hosts with all contributing local disks (1 SSD and 1 HDD) to VSAN cluster
  • Minimum 4 GB of RAM for ESXi host
  • ESXi host should be managed by vCenter Server 5.5 and It should be configured as Virtual SAN cluster
  • Each ESXi host must have minimum of single 1 Gb Ethernet adapter available solely for the use of virtual SAN
  • At least 1 SAS or SATA solid state Drive (SSD) should be part of each ESXi host with SSD is not claimed by vSphere Flash Read Cache

VSAN-5

VSAN Scalability:

VSAN with GA release, It supports around 32 Hosts, 3200 Virtual Machines, 2M Iops and 4.4 petabytes. It is really scalable and provides the scalability as like an enterprise storage.

VSAN-3

How to Download VSAN:

As already explained, VSAN is included with he hypervisor form vSphere 5.5 Update 1. So  download ESXi 5.5 Update 1 and vCenter server 5.5 Update 1 to use the VSAN. Log in or sign-up with your VMware account and download.

Download VSAN

How to Build VSAN:

VMware provides the choice for the customers and partners  to define  a VSAN solution either building your own node via components on our VMware compatibility guide for VSAN or Selecting VSAN read node. A Virtual SAN Ready Node is a predefined combination of server hardware while a Ready Block is a predefined set of servers for use with VMware Virtual SAN. Configurations are based on server vendor validated configurations that include specific HDD, Flash and IO Controller components certified for Virtual SAN, and available on the VMware Compatibility Guide.

VSAN-4

VSAN License and Prizing:

Below is the details about VSAN Prizing and Packaging.  Below are the list of VSAN editions and bundles

  • VMware Virtual SAN Standalone
  • VMware Virtual SAN for Desktops
  • VMware Virtual SAN with Data Protection
  • VSA Upgrade Bundle + vSAN with Data Protection (End Date: 9/15/2014)
  • Beta Promo (End Date : 6/15/2014)

Virtual-SAN-5.5-Pricing-Packaging1


VSAN – Launch Promotions (Bundle Promos & Beta Promo)


Virtual-SAN-Launch-Promotions1

How to Setup VSAN in your Environment:

We will explain step by step VSAN configuration in upcoming posts but I would like bring here the excellent demo walkthrough for VSAN from VMware. It gives the step by Step walkthrough for the each below mentioned configuration items.

VSAN-walktrough

Configuring VSAN

Deploying VMs using VM Storage Policies

Changing VM Storage Policies

Virtual SAN – Failure Resilience & Availability

Interoperability – VSAN & vSphere HA

Scaling Up a VSAN Cluster

Scaling Out a VSAN Cluster

Configuring a VSAN Cluster with VDS

Migrating VMs Across Virtual SAN Clusters

I hope this is informative for you. Thanks for Reading!!! Stay tuned for step by step VSAN series posts. Be Social and share it in social media, if you feel worth sharing it.

Upgrade vCenter Server Appliance 5.5 to 5.5 Update 1

$
0
0

As we already discussed about vSphere 5.5 update 1 in our previous post vSphere 5.5 Update 1 download links and Release Notes ,  VSAN is available as part of vSphere 5.5 Update 1. It is the most important task of the VMware Administrators as now of is  to upgrade your vCenter server and ESXi host from 5.5 to 5.5 update 1 to utilize the VSAN in your environment. Want to know the basics of VSAN, take a look at the post Basics of VSAN.  First task in upgrading your vSphere 5.5 to 5.5 update 1 is to upgrade your vCenter Server. Upgrading vCenter Server is a straight forward process. So i am going to explain the procedure to upgrade your vCenter Server Appliance 5.5 to 5.5 Update 1. Ensure that your vCenter Server Appliance is connected to the internet to update to vCSA 5.5 Update 1 using this method.

Access your vCenter Server Appliance admin page using the below url format

https://<ip or host of vCSA>:5480

Click on Update tab on the vCenter server appliance home page.

VCSA 5.5 Update _1

Under Status tab option, Click on Check Updates option. You can see the Available Updates which are available to update your vCenter Server Appliance. Current Version  of vCSA appliance is 5.5.0.5201 Build 1476389 (which is vCSA 5.5 0.b) and the available update is vCSA 5.5.0.1000 Build 1624811 (Which is vCenter Server Appliance 5.5 Update 1). You can see the details by clicking on the Details option.

VCSA 5.5 Update _2Once you have validated the available updates (i.e vCenter Server Appliance 5.5 Update 1), Click on Install Updates.

VCSA 5.5 Update _3Click on Ok to confirm the Update to vCenter Server Appliance 5.5 Update 1.

VCSA 5.5 Update _4


It will take  few minutes to complete the installation of the vCSA 5.5 Update 1.

VCSA 5.5 Update _5

Once the upgrade from vCSA 5.5 to vCSA 5.5 update 1 is completed. Reboot the vCenter Server Appliance for the changes to take effect. After reboot, Verify the current version of your vCenter Server Appliance . It should be 5.5.0.10000 Build 1624811 for vCenter Server Appliance 5.5 Update 1.

VCSA 5.5 Update _7That’s it, We are done with upgrading our vCenter Server Appliance 5.5 Update 1. Next step will be upgrading your ESXi host  5.5 to 5.5 Update 1 to prepare it for VSAN.  Take a look at the Post “Upgrading ESXi 5.5 to ESXi 5.5 Update 1″.  I hope this is informative for you. Thanks for Reading !!!. Be Social and share it in social media, if you feel worth sharing it

VSAN Setup in VMware Workstation Part 1 – Initial Lab preparation

$
0
0

With the release of VSAN, VMware fulfills the true software-defined data center with the combination of virtualized compute, network and storage. After VSAN release, I will definitely say that buying storage for your infrastructure is not only limited to the storage vendors but also VSAN will play a major role because which is part of hypervisor after vSphere 5.5 Update 1 onwards.  Virtual SAN 5.5 is a new hypervisor-converged storage tier that extends the vSphere hypervisor to pool server-side magnetic disks (HDDs) and solid-state drives (SSDs). By clustering server-side HDDs and SSDs, Virtual SAN creates a distributed shared datastore designed and optimized for virtual environments.Virtual SAN is a standalone product that is sold separate from vSphere and requires its own license key.

VSAN setup requires minimum of 3 ESXi hosts with minimum of 2 local disks  (1 SSD and 1 HDD) to participate in the VSAN cluster. Not all VMware Admins are feasible to  buy and setup a lab for VSAN with 3 physical servers along with multiple disks and SSD. This post going to explain you detailed step by step procedure to Configure Virtual SAN (VSAN) using VMware Workstation.

VSAN home Lab Configuration and Specifications using VMware Workstation

VMware VSAN Lab on Workstation_1

vCenter Server Appliance 5.5 Update 1 (vCSA 5.5 u1)

3 No’s of ESXi 5.5 update 1 hosts with below configuration:

  • 2 vCpu
  • 4 GB RAM
  • 4 Local Disks

Disk 1 – 40 GB (Local Datastore)
Disk 2 – 10 GB (Going to fake this disk as SSD)
Disk 3 – 40 GB
Disk 4 – 20 GB

  • 4 Network Adapters

VMware VSAN Lab on Workstation_2

Install vCenter Server Appliance on VMware Workstation:

Download vCenter Server Appliance 5.5 Update 1 0va file and Double click on downloaded OVA file. Modify the name and location of virtual machine if required and click on  Import

VMware VSAN Lab on Workstation_3

VMware VSAN Lab on Workstation_4

Power on the vCSA virtual machine once import has been completed. Configure vCenter Server appliance as per the post “Configure vCenter Server Appliance with default settings or use custom settings with custom SSO and Database.

Install ESXi 5.5 on VMware Workstation:

Download ESXi 5.5 Update 1

To know how to install ESXi hosts on VMware Workstation, take a look at my posts

Install ESX/ESXi Server on VMware Workstation – Part 1

Install ESX/ESXi Server on VMware Workstation – Part 2

By completing all the above steps , we are ready with basic lab for VSAN on the VMware Workstation. We will detailed step by step procedure to configure VSAN and other tasks related to VSAN using VMware Workstation. I hope this post is informative for you. Thanks for reading !!!!

VSAN Setup in VMware Workstation Part 1 – Initial Lab preparation
VSAN Setup in VMware Workstation Part 2 – Create VSAN VMkernel Network
VSAN Setup in VMware Workstation Part 3 – Fake ESXi Local Disk as SSD
VSAN Setup in VMware Workstation Part 4 – Create VSAN Cluster
VSAN Setup in VMware Workstation Part 5 – Create VSAN Disk Groups


VSAN Setup in VMware Workstation Part 2 – Create VSAN VMkernel Network

$
0
0

In the Previous post “VSAN Setup in VMware Workstation Part 1 – Initial Lab preparation” , We have explained about the detailed step to setup procedure to build basic VSAN lab using vCenter Server Appliance and ESXi hosts along with the configurations of VMware Workstation. This lab configuration is not a best practice or recommendation but it is model lab setup using VMware Workstation to the VMware Administrators who want to setup and test the VSAN future in their home lab or on laptop or desktop.

Once the initial setup has been completed as per the previous post and Configure the initial  network settings for ESXi host and vCenter Server Appliance.

Connect to your vCenter Server using vSphere web client and add all the 3 ESXi hosts into your vCenter Server inventory.

VMware VSAN Lab on Workstation_part2_1


Once All the 3 hosts has been Added into vCenter server inventory. You need to configure the vMkernel network for vSAN.

Configuring VSAN VMkernel Network

You can either use Standard switch or distributed switch to configure the VSAN VMkernel network for your ESXi host. Below step needs to be configured on all your 3 ESXi hosts.

1. Connect to vCenter server using vSphere web client. VSAN VMkernel network will be available only to configure when you connect to your vCenter using vSphere Web Client.

2. Browse towards your ESXi host in Host and Clusters View

3. Select the ESXi host to configure network ad click on Manage Tab

4. Select Networking option and click on Add host networking

If have an existing vSwitch called vSwitch0 with VMkernel network “Management Network” used for the Management purposes and one Virtual Machine network called “VM Traffic”.

VMware VSAN Lab on Workstation_part2_2

I am not going to disrupt the existing vSwitch “vSwitch0″ and network adapters configured for Management network. It is always recommended to separate the traffic for different networks such as vMotion, Mgmt Network, iSCSI and VSAN network. So i am going to create a VMkernel network for VSAN called “VSAN_Net” on the new vSwitch “vSwicth 1″ with dedicated 2 vmnic (vmnic2 & vmnic3).

5. Select VMKernel Network Adapter and click on Next

VMware VSAN Lab on Workstation_part2_3

6. Select New Standard Switch and click on Next

VMware VSAN Lab on Workstation_part2_4

7.Click on + symbol to  assign the network adapters to the vSwitch “vSwitch1″. I have assigned 2 Network adapters(vmnic2 and vmnic3) for the vSwitch1. Click on Next.

VMware VSAN Lab on Workstation_part2_5

8.Enter the Network Label for VMkernel network and Select “Virtual SAN traffic” option under enabled services. It is very important to enable the Virtual SAN traffic in the VMkernel adapter for the VSAN. It is one of the very important pre-requisite of the VSAN configuration.  Click on Next.

VMware VSAN Lab on Workstation_part2_6

9.Select “Use IPv4 Setting” and assign IP address and Subnet mask. Click on Next.

VMware VSAN Lab on Workstation_part2_7

10.Review the options selected and Click on Finish to complete the creation of VSAN VMkernel network.

VMware VSAN Lab on Workstation_part2_8

Configure the Virtual SAN VMkernel network on all the 3 ESXi host exactly as same configuration other than IP address.

VMware VSAN Lab on Workstation_part2_9

That’s it . We are done  with configuring VMKernel network for VSAN traffic. We will look at other preparation tasks related to disk and cluster in the upcoming posts. I hope this is informative for you. Thanks for reading!!!.

VSAN Setup in VMware Workstation Part 1 – Initial Lab preparation
VSAN Setup in VMware Workstation Part 2 – Create VSAN VMkernel Network
VSAN Setup in VMware Workstation Part 3 – Fake ESXi Local Disk as SSD
VSAN Setup in VMware Workstation Part 4 – Create VSAN Cluster
VSAN Setup in VMware Workstation Part 5 – Create VSAN Disk Groups


VSAN Setup in VMware Workstation Part 3 – Fake ESXi Local Disk as SSD

$
0
0

One of the most import prerequisite for VSAN configuration is local disk and SSD. Minimum of 3 ESXi 5.5 hosts with all contributing local disks (1 SSD and 1 HDD) to VSAN cluster and atleast 1 SAS or SATA solid state Drive (SSD) should be part of each ESXi host with SSD is not claimed by vSphere Flash Read Cache. This posts explains you with the procedure to setup VSAN using VMware Workstation but how do you use SSD. This complete post series talk about setting up VSAN lab feasible for everyone. All my ESXi hosts are running on top of the VMware Workstation. So i don’t have SSD for that. Will it stop me to setup my VSAN lab on workstation. Definetly No. Ohh.. Then  how do i use SSD (important pre-requisite for VSAN configuration). Don’t worry. There is a option to fake your ESXi hosts local disk as SSD. Thanks and all credit goes to William Lam for his excellent post about faking the ESXi local disks as SSD. Let’s see the detailed step by step procedure to configure this bypass.

Below is the disk configuration of all the 3 ESXi hosts running on VMware Workstation.

4 Local Disks created on the VMware Workstation

Disk 1 – 40 GB (Local Datastore and ESXi install disk)
Disk 2 – 10 GB (Going to fake this disk as SSD)
Disk 3 – 40 GB
Disk 4 – 20 GB

VSAN_Disk_1

Below is the disk layout of my ESXi host. You can notice that none of the below disks are SSD. So it is not yet eligible for VSAN cluster.

VSAN_Disk_2From the above list of 4 disks, None of them are SSD and all are local disks created using VMware Workstation. I am going fake one of the  local disk “mpx.vmhba1:C0:T1:L0″ with the capacity of 10.00 GB as SSD. Let’s take the detailed procedure to configure it. This step needs to configured on all the 3 ESXi hosts since minimum one SSD disk from each ESXi host is the pre-requisite for VSAN cluster.

Connect to your ESXi host using SSH connection such as Putty.  You can list the disks in your ESXi host using the below command

ls -l /vmfs/devices/disks

VSAN_Disk_3You can use the below command to display the properties of the disk  ”mpx.vmhba1:c0:T1:L0″

esxcli storage core device list –device=mpx.vmhba1:C0:T1:L0

VSAN_Disk_4You can see from the above output that your disk “ ”mpx.vmhba1:c0:T1:L0″ is local and Is SSD: flase. So it stats that it is not the SSD disk as per the ESXi host. We are going to fake this local disk as SSD using the below command

esxcli storage nmp satp rule add –satp VMW_SATP_LOCAL –device mpx.vmhba1:C0:T1:L0 –option “enabled_local enable_ssd”

You need to reclaim the device using the below command so that added rule  will apply.

esxcli storage core claiming reclaim -d mpx.vmhba1:C0:T1:L0

VSAN_Disk_5After you faked the local disk as SSD. Verify the properties of the disk “mpx.vmhba1:C0:T1:L0″ using the below command

esxcli storage core device list –device=mpx.vmhba1:C0:T1:L0

VSAN_Disk_6

Same can be verified from your vSphere Web client -> ESXi Host -> Manage Tab -> Storage -> Storage devices. You can notice the disk “mpx.vmhba1:c0:T1:L0″ now listed as SSD after the above configuration.

VSAN_Disk_7


Above step needs to configured on all the 3 ESXi hosts to fake the one of the local disk as SSD to eligible for VSAN. That’s it. We are done with disk preparation for VSAN. I hope this will be informative for you. Thanks for reading !!!.

VSAN Setup in VMware Workstation Part 1 – Initial Lab preparation
VSAN Setup in VMware Workstation Part 2 – Create VSAN VMkernel Network
VSAN Setup in VMware Workstation Part 3 – Fake ESXi Local Disk as SSD
VSAN Setup in VMware Workstation Part 4 – Create VSAN Cluster
VSAN Setup in VMware Workstation Part 5 – Create VSAN Disk Groups

VSAN Setup in VMware Workstation Part 4 – Create VSAN Cluster

$
0
0

With our previous posts, We have setup the vCSA and ESXi hosts using VMware Workstation. Followed that we have prepared Network and local disks (fake local disk to SSD) as the pre configuration step for VSAN. Once you have satisfied all the below prerequisites , you are ready to create the VSAN cluster.

  • Minimum of 3 ESXi 5.5 hosts with all contributing local disks (1 SSD and 1 HDD) to VSAN cluster
  • Minimum 4 GB of RAM for ESXi host
  • ESXi host should be managed by vCenter Server 5.5
  • At least 1 SAS or SATA solid state Drive (SSD) should be part of each ESXi host with SSD is not claimed by vSphere Flash Read Cache
  • VMkernel network should be configured with Virtual SAN Traffic enable.

Create VSAN Cluster

Ensure that all your ESXi hosts has been added to vCenter server under data center not into the Cluster.

VSAN Cluster _1To create a VSAN cluster, Right click on the Datacenter and Select New Cluster.

VSAN Cluster _1_1Enter the Name for the New cluster. My cluster is “Arena-Cluster” and Select the Checkbox for Turn on Virtual SAN. There are 2 options in adding disk to the cluster which is Automatic and Manual. Do Not enable DRS and HA on the cluster as of now. It can be enabled later.

Automatic: All empty disks on the included hosts will be automatically claimed by Virtual SAN

Manual: Requires Manual claiming of any new disks on the included hosts to the shared storage

I have selected Manual as the add disk to storage type because i want to manually add disks to the VSAN cluster. If you don’t want all your disks to participate in the VSAN cluster, you can select the type as Manual to control the disk addition to the VSAN cluster.

VSAN Cluster_2As we already discussed, VSAN is part of vSphere 5.5 update 1 hypervsior and vCenter server. However VSAN requires a separate license. You must assign a license key to the cluster before the evaluation period of Virtual SAN expires. Click on Ok to create the VSAN cluster.

Add ESXi hosts into VSAN Cluster

As similar to adding ESXi hosts into DRS and HA cluster, Host can be added to VSAN cluster by simply drag and drop the ESXi hosts into the cluster.  Once Hosts has been added to VSAN cluster, Select the Cluster -> Manage  ->Settings  -> Select Virtual SAN and click on  General to see the properties of Virtual SAN. Since we have configured Virtual SAN VMKernel network properly on all the 3 ESXi hosts, Network status is showing as  Normal with green tick mark.

VSAN Cluster_3

That’s it , We are done with enabling VSAN on the cluster. Let’s take a look at creating and configuring disk groups in VSAN in upcoming posts. I hope this is informative for you. Thanks for reading !!!!

VSAN Setup in VMware Workstation Part 1 – Initial Lab preparation
VSAN Setup in VMware Workstation Part 2 – Create VSAN VMkernel Network
VSAN Setup in VMware Workstation Part 3 – Fake ESXi Local Disk as SSD
VSAN Setup in VMware Workstation Part 4 – Create VSAN Cluster
VSAN Setup in VMware Workstation Part 5 – Create VSAN Disk Groups

VSAN Setup in VMware Workstation Part 5 – Create VSAN Disk Groups

$
0
0

This is almost the final part of the series VSAN setup in VMware Workstation. We have already prepared all the prerequistes for VSAN setup on VMware workstation and also we have created VSAN cluster. Next and final step will be creating VSAN disk groups.Disk groups can contain at most one SSD. If you have multiple SSDs in an ESXi host and also you want all the SSDs to participate in a VSAN cluster, multiple disk groups would have to be created. One can then decide the ratio of SSD to HDD if performance was a requirement (the more SSD to magnetic disks, the greater the size of the cache available to virtual machines). Alternatively a vSphere administrator may decide to keep a constant SSD to magnetic disks ratio across all disk groups for consistent VM performance. If a flash-based device fails, all the magnetic disks within that particular disk group become unusable and the total storage capacity provided by the affected disk group becomes unavailable to the cluster.Let’s take a look at the step by step procedure to create VSAN disk groups.

Select your VSAN cluster and click on Manage tab -> Settings ->Virtual SAN -> Disk Management.  you can create Disk groups manually for each host by click on Create Disk group option or create disk group for all the 3 hosts in single attempt by click on Claim Disks option as mentioned in the below screenshot.

VSAN_Diskgroup _1

Click on Select all eligible disks if you want to select all the listed disks or if you want to manually select the Disks, Select the disks (1 SSD and 1 or more HDDs). If have selected 1 SSD and 1 HDD from each hosts. Click on Ok to create the disk group.

VSAN_Diskgroup _2Each disk group created contain only one SSD and one or more HDDs. SSD is used for write cache/read buffer and HDDs are used for disk capacity. VMware best practice to keep to ratio of 1:10 for SSD:HDD. Once disk group is created, you can see the disk groups under each hosts. In our case, total of 3 disk groups for 3 ESXi host. 1 disk group per ESXi host. you can create multiple disks groups per ESXi host if you have multiple SSD disks on your ESXi hosts.VSAN_Diskgroup _3

Once disk groups has been created. you will be able to see the VSAN Datastore called “vsanDatastore” created and connected to all the ESXi hosts participating in the vSAN cluster.

VSAN_Diskgroup _4

That’ s it. We have done with setup our VSAN lab using VMware Workstation. You have VSAN Datastore with you. Create VM & storage profiles and play around with your VM provision. I hope this is informative for you. Thanks for Reading !!!. Be Social and Share it in social media, if you feel worth share it.

VSAN Setup in VMware Workstation Part 1 – Initial Lab preparation
VSAN Setup in VMware Workstation Part 2 – Create VSAN VMkernel Network
VSAN Setup in VMware Workstation Part 3 – Fake ESXi Local Disk as SSD
VSAN Setup in VMware Workstation Part 4 – Create VSAN Cluster
VSAN Setup in VMware Workstation Part 5 – Create VSAN Disk Groups

Upgrade vCenter Server Appliance 5.1 to 5.5

$
0
0

This post is really a special post for me because it is my 250th post. We have already discussed about the upgrade from vCenter server appliance 5.5 to 5.5 Update 1. So you may be thinking why again repeated upgrade procedure for vCSA 5.1 to 5.5. Believe me both are entirely different step. We have upgraded vCSA 5.5 to vCSA 5.5 update 1 with the update option available with the admin page of the vCenter Server appliance but upgrading from vCSA 5.1 to 5.5 will not like other upgrades. It is to deploy the new appliance and reconfigure. This process will automates the movement of the database and other settings including network settings from older version of vCSA appliance (5.1) to new version of vCSA appliance (vCSA 5.5).once this movement is completed, new version of vCSA will be powered on with all existing data and older version of vCSA will be powered off. You can decommission the old vCSA appliance.

Procedure to Upgrade from vCenter Server Appliance 5.1 to 5.5

1. We have vCenter Server appliance 5.1 with latest build in our environment. To upgrade this vCSA 5.1 to vCenter server appliance 5.5 Update 1, Download and deploy the vCenter Server Appliance 5.5 Update 1. Take a look at the post Download link for vSphere 5.5 update 1 and other softwares.

2. Once you have deployed the new vCenter Server appliance. Let it leave with the DHCP address. Connect to your new vCenter Server appliance admin page using the below format of URL

http://<ip of vCSA 5.5>:5480

At the first time when you access the  vCSA appliance , vCenter Setup wizard will start. Select the option “Upgrade from previous Version” and click on Next.VCSA Upgrade_1

3. During this step, We need to exchange the keys between both the new vCSA (5.5) and old vCSA (5.1) appliance. To do this, copy the key that is generated from vCSA 5.5 and paste it in the import dialog box of the old vCSA 5.1 appliance.

VCSA Upgrade_2

VCSA Upgrade_3

Again copy the key generated on old vCSA appliance (vCSA 5.1).

VCSA Upgrade_4VCSA Upgrade_54. Click Next, and choose to generate new SSL Certificates

VCSA Upgrade_65. Type the SSO admin password. You can use the same password which was used for early version.

VCSA Upgrade_77.Below page will displays the hosts which are managed by older vCSA 5.1. Select the hosts from the list which want to managed by the new appliance.

VCSA Upgrade_8 8. vCenter upgrade checker will report any host problems that may be preventing an upgrade.

VCSA Upgrade_9
9.It will always recommended to take backup or snapshot of your virtual machine before proceed with any upgrade. It will be helpful to recover your VCSA appliance if in case upgrade failed. Select the checkbox “I confirm that i have made a backup/snapshot of the source vCenter Server Appliance and the external database” and click on Next.VCSA Upgrade_10


VCSA Upgrade_11Once upgrade is completed. vCSA 5.1 appliance will shutdown and new appliance vCSA 5.5 will reboot and it will configured with the same IP address and data of old vCSA appliance (5.1). That’s it. We are done with the upgrade. I hope this is informative for you. Thanks for reading !!!

VSAN Error: Host is in a VSAN enabled cluster but does not have VSAN service enabled

$
0
0

This is a simple post which talks about the error received on your ESXi host which is part of VSAN cluster. It was head breaking issue. I tried lot of stuffs to troubleshoot this issue like removed hosts from VSAN cluster, enabled and disabled VSAN on the cluster, even rebuild the host but nothing helped me to fix this issue. Later come to know from william lam that is not exactly a problem with host or VSAN. In my scenario, I am running VSAN setup on VMware Workstation. I have 3 ESXi hosts each allocated 4 GB of RAM . I was getting the below error even after multiple reboots and troubleshooting attempts.

My ESXi host was assigned with 4 GB of Memory and which is running on top of the VMware Workstation. This post will also be applicable to the nested ESXi . As per VMware documentation, Minimum recommend memory for VSAN is 6 GB but it has been tested that it is working fine with 5 GB. To fix this issue,  increase the memory to 5 GB and above.

VSAN ErrorI have increased the I memory of my virtual ESXi host from 4 GB to 5 GB and rebooted the Host.  The Warning message “Host is in a VSAN enabled cluster but does not have VSAN service enabled” disappeared after ESXi host came up.

VSAN Error_2

That’s it. Simple solution to fix this issue. I hope this is informative for you. Thanks for Reading!!!! Be Social and share it in social media, If you feel worth sharing it.

Unable to Connect to MKS: Connection Terminated by server on HP hardware

$
0
0

This post going to explain you with the procedure to troubleshoot the issues you might have faced on the HP Gen 8 servers. When you are trying to connect to your virtual machine console for the Virtual Machines which is running on top of ESXi host installed on HP hardware (especially Gen 8 hardware). You might be facing either one of the below errors

Unable to Connect to MKS: Connection Terminated by server 

MKS error_1


Unable to Connect to MKS: Malformed response from server.

MKS error_2

These errors will not allow you access the virtual machine console neither with vSphere client nor with vSphere web client. This issue was due to excessive logging created by /var/log/hpHelper.log file. It can grow very large and fill the ESXi 5 ramdisk. This logs are generated by HP helper management agent (HP-ams). HP agentless Management Service (AMS) provides support for Agentless Management and Active Health. AMS provides a wider range of server information (e.g. OS type and version, installed applications, IP addresses) allowing customers to complement hardware management with OS information and alerting. Agentless Management provides iLO-based robust management without the complexity of OS-based agents. Active Health provides 24×7 mission control for servers, delivering maximum uptime through automated monitoring, diagnostics and alerting. The contents of the HP AMS offline bundle include the latest HP Common Information Model (CIM) Limited Providers, HP Integrated Lights Out (iLO) driver, and HP Agentless Management Service (AMS).

This issue can be fixed with 2 ways. Temporary fix is to stop the HP agentless management agent (HP-ams) agent and permanent fix will be installing the updated HP-ams offline bundle on your ESXi host.

Temporary Workaround

You can simply stop the HP Helper Management agent service on your ESXi host to temporarily fix this issue. It will be immediate solution to workaround and access your Virtual machine console. You can stop the service using the command

/etc/init.d/hp-ams.sh stop

Permanent Fix

Download the HP-ams offline bundle for your hardware model & ESXi version and install the updated hp-ams vib on your esxi host using the below command

esxcli software vib install -d /datastore/directory/hp-ams-esxi5.5-bundle-9.5.0-15.zip

Reboot is required for the changes to take effect. This updated hp-ams VIB stops the excessive logging to the hpHelper.log file. Once it done, you will be able to access your virtual machines console without any issues.I hope this is informative for you. Thanks for reading !!! Be social and share it in social media , if you feel worth sharing it.

Awarded as vExpert 2014 – Thank You VMware !!!!

$
0
0

It is one of the greatest occasion for me and I got honored by VMware as VMware vExpert. This is the first time I got awarded as vExpert.  I would like to thank VMware especially Correy and John. It’s been a real honor for me and It gives me more energy to contribute towards the virtual Community to retain the title for next year also.

VMware-vExpert-2014-400x57

When i saw the announcement during the Mid-night at around 4:30 AM IST. I just lost my sleep for the rest of the night and so much happy and proud when saw my name was listed in the vExpert lists.

vExpert results

I am not gonna down once I got achieved it. I wish myself to work more to  produce lot of quality contents for the upcoming years and more contribution towards the virtual community to retain this title for upcoming years. Thanks for Reading !!!!


Access ESXi host Direct Console User Interface (DCUI) using SSH

$
0
0

This post was real surprise for me. I never know that we can access the ESXi host Direct Console User Interface (DCUI) using SSH such as Putty. Today, I just come to know from the trainer on the vSphere Design Workshop training session. It was surprising for me but I was thinking what will be the use case of accessing DCUI using SSH. DCUI will be mostly useful when you are performing initial configuration after your ESXi host install and also during the situation when your ESXi host is not reachable in the network.  I found one main use case of accessing DCUI using SSH is to restart the management agents of ESXi host who are not aware to restart the management agents using command line and also to view the system logs.

Before accessing the DCUI via SSH session, it is important to note that making any changes to network settings may lead to management issues through vCenter Server, vSphere Client or SSH. Networking changes should only be made through a console session (for example through DRAC, iLO, KVM) to avoid host management issues. Changing network settings using this command may make the host unusable and can necessitate a reboot to recover.

How to Access the ESXi host DCUI using SSH

Connect to your ESXi host using Putty and type the below command

dcui

DCUI Using SSH_1

You will get the DCUI screen using putty as exactly as same as the DCUI accessed using your console connections such as ILO or DRAC.

DCUI Using SSH_2

DCUI Using SSH_3That’s it. I hope this is informative for you. Thanks for Reading!!!. Be Social and share it in social media ,if you feel worth sharing it.


VMware Memory Management Part 1 – Understanding ESXi Host Memory States

$
0
0

This post is going to be one of my favorite posts  this year because i have been asked by lot of my readers to write about the ESXi host memory management techniques. Fairly all VMware Administrators will be aware about the ESX memory management techniques to handle the over commitment of the memory. Over commitment means nothing but you can allocated more memory to your virtual machines than the actual available memory of the ESX host. Let’s assume,your ESXi host having total memory of 40 GB but you have 10 virtual machines and each configured with 4 GB with the total of 40 GB memory. But actually total memory available at your ESXi host is just 30 GB. This over commitment can be achieved with the help of memory management techniques and also not all the VM’s will be utilizing 100% of memory allocated at all the times. If it happens, ESXi host will actively use its memory reclamation techniques to handle this situation efficiently.

Below are the Memory Management techniques available as part of ESXi host

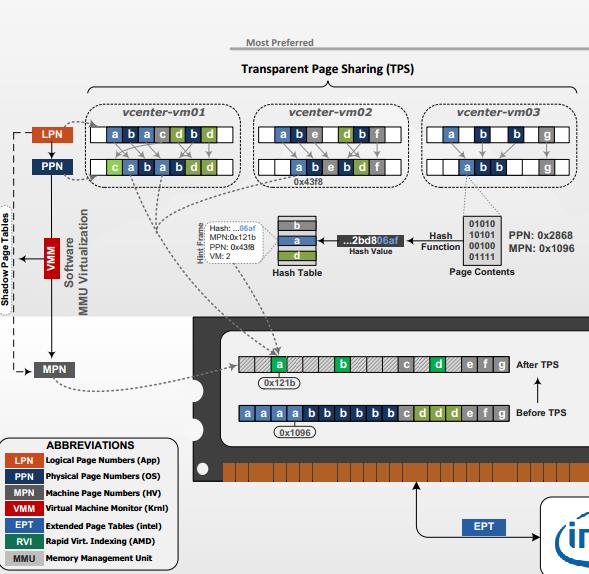
1. Transparent Page Sharing
2. Memory ballooning
3. Memory Compression
4. Hypervisor-level memory swapping

Most of the VMware administrators will be aware about these management techniques but do you know when and at what stage which technique will be used. Let’s discuss in detail about the various ESXi host Memory states. The ESXi host never attempts to reclaim the memory using memory management techniques until it is under memory contention. Memory reclamation techniques such as ( Memory ballooning, Compression or swapping) will come into action based on the amount of ESXi free host memory. There are 4 different ESXi host states

1. High
2. Soft
3. Hard
4. Low

High -> By default Transparent Page sharing will be always running

Soft -> Memory ballooning will be activate,when ESXi enters the soft state and remains active until ESXi is back to high state

Hard & Low -> Memory compression and hypervisor-level memory swapping are used by ESXi when ESX is in the hard or low state

Low -> If the host’s memory usage is above the Low state, ESXi host will stop creating the new pages for Virtual machines and continues compressing and swapping until free up more memory.

With prior to the vSphere 5, High was set by default at 6%, Soft at 4%, Hard at 2%, and Low at 1%. If the ESXi host free memory is less than the mentioned percentage , ESXi uses the respective memory-reclamation techniques to reclaim the memory but think about the Host configured with more memory. It is not necessary to protect that much free memory. Let’s take a example, ESXi 5.0 host can run with 2 TB of memory. Using these defined values as in the pre-vsphere 5.0, Host will start to reclaim the memory even if has 100 GB of free memory. This is really not a great option. So with vSphere 5.x, This predefined values has been changed to effectively handle the host reclamation techniques for the ESXi host configured with more memory.

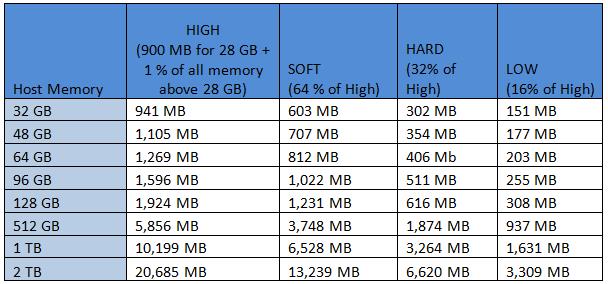
With vSphere 5, High state level will be adjusted according to the amount of memory in the host. Below is the calculation

High -> 900 MB for 28 GB + 1 % of all memory above 28 GB (If host is having more than 28 GB of memory)
Soft -> 2/3 of High (64% of High)
Hard -> 1/3 of High (32 % of High)
Low -> 1/6 of High (16 % of High)

Below are few of the example of Memory Reclamation Levels of ESXi host

ESXi Memory State_3


Verify the Current ESXi Host Memory State

We have understood the ESXi Memory state and How memory reclamation techniques will be used based on the ESXi host memory States. Now, Let’s learn How to verify the current memory state of the ESXi host.

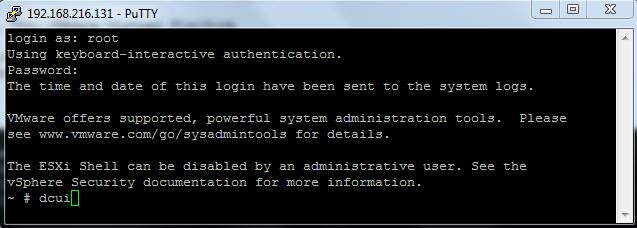
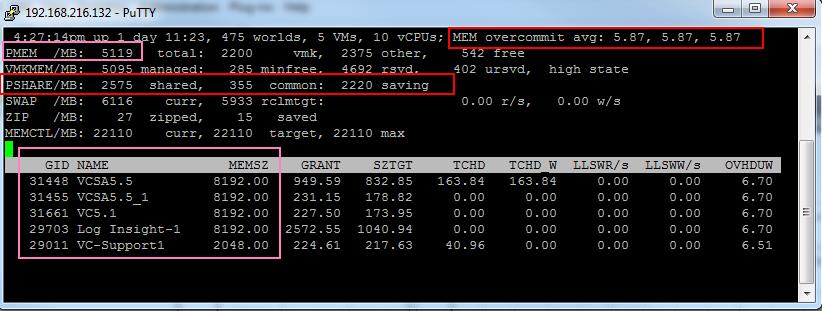
Login to your ESXi host using SSH and type the below command
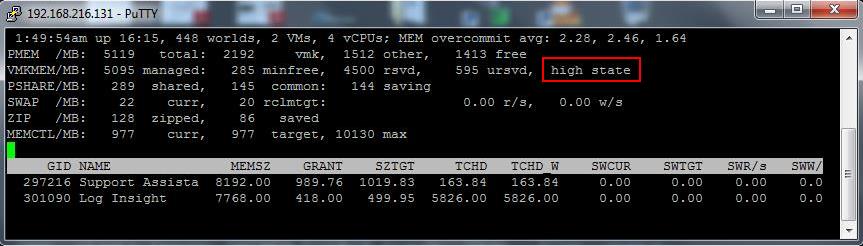
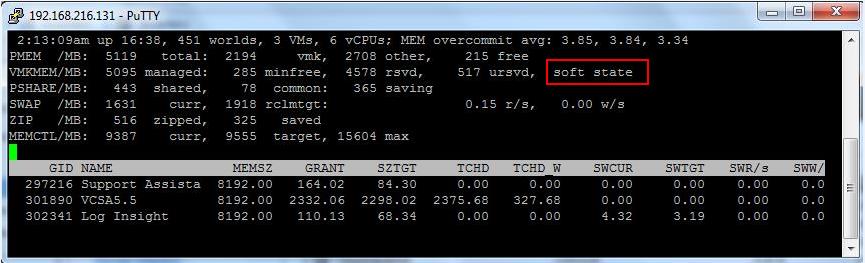
esxtop  and Press m

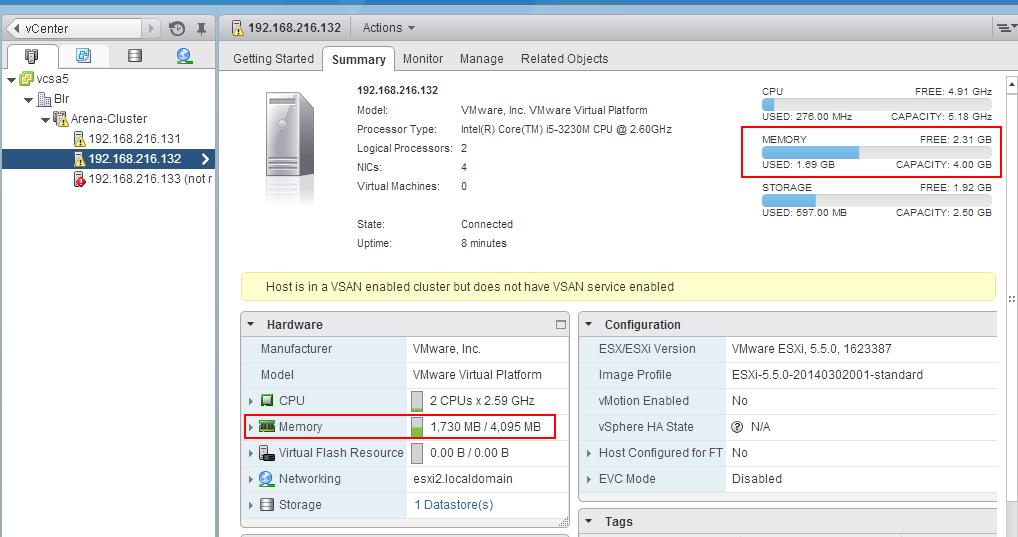
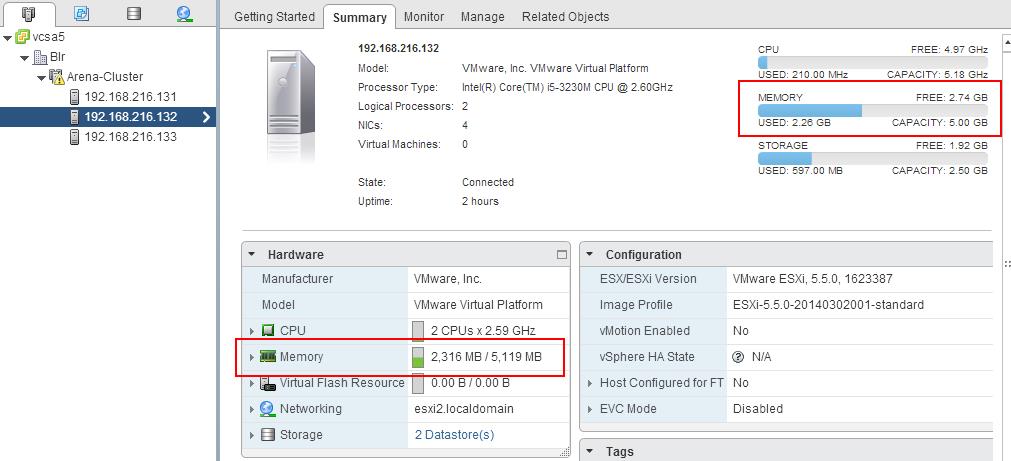
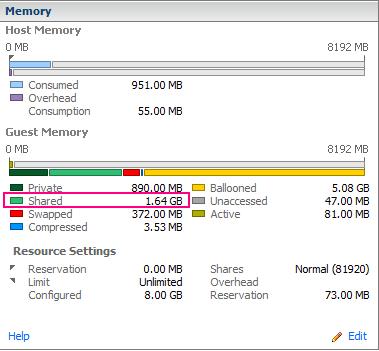
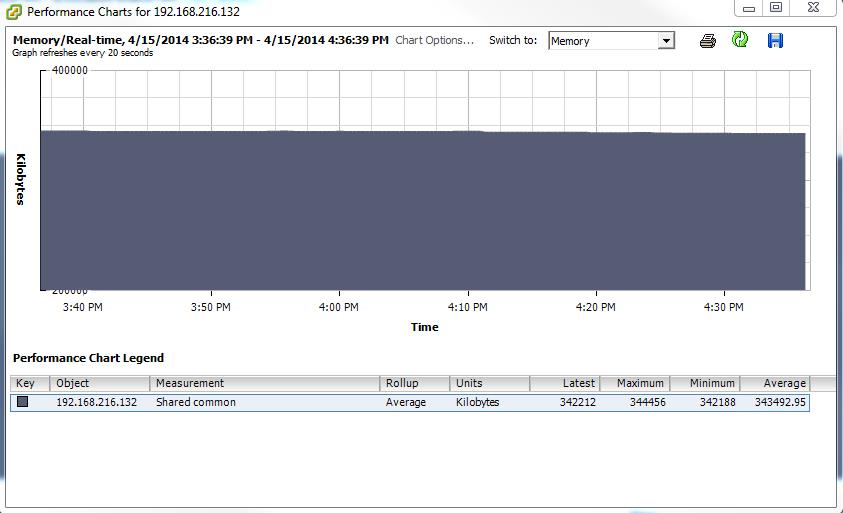
You can see the current memory state of the ESXi host as like the below screenshots.

ESXi Memory State_1

ESXi Memory State_2

That’s it. We will take a look at the various memory reclamation techniques in upcoming posts. I hope this is informative for you. Thanks for Reading. Be Social and share it in social media, if you feel worth sharing it.

VMware Virtual Center Service failed to start due the error “Failed to add LDAP entry”

$
0
0

This post is going to share a resolution for one of the issue which i have faced yesterday. My Virtual center server windows virtual machine was hung  but it was reachable via network with ping. Even RDP it is not accessible. We tried rebooting multiple times. Finally after uninstalling some of the security software, vCenter came up. I tried to start the VMware Virtual center server service but it was failed and throwing an general windows service start failed error. To troubleshoot the Virtual Center Service. You should always to use vpxd.log logfile stored on the below location

vCenter Server 5.x and windows server 2000, 2003: %ALLUSERSPROFILE%\Application Data\VMware\VMware VirtualCenter\Logs\
vCenter Server 5.x and earlier versions on Windows Vista, 7, 2008: C:\ProgramData\VMware\VMware VirtualCenter\Logs\

When i have analyzed the vpxd.log, I found the below error messages in the vpxd.log

 [03852 error 'win32vpxLdap_win32'] [LDAP Client] Failed to add LDAP entry cn=76c0e73g-0bd2-56ba-c706-g449de069520,ou=Instances,dc=virtualcenter,dc=vmware,dc=int: 0×68 (The object already exists.)
 [03852 error 'vpxservicesMoServiceDirectory'] [ServiceDirectory::AddService] Error while adding service-instance entry cn=76c0e73g-0bd2-56ba-c706-g449de069520,ou=Instances,dc=virtualcenter,dc=vmware,dc=int
 [03852 error 'vpxdvpxdMain'] [Vpxd::ServerApp::Init] Init failed: Ldap error
 [03852 error 'Default'] Failed to intialize VMware VirtualCenter. Shutting down..

How to Resolve this Failed to add LDAP entry issue.

This issue may occur due to a stale ADAM database entry. We need delete the stale ADAM entry using the below procedure. It is recommended to take a backup of your ADAM instance data before deleting the Stale ADAM database entry.

1. Login to your vCenter Server using Administrative Credentials

2.Click on Start -> Administrative Tools ->ADSIEdit

3. Right click the ADSiEdit and click on Connect To

4.For the Connection Point, Type the below Distinguished Name or Naming Context

dc=virtualcenter,dc=vmware,dc=int

5. Under Computer, Type the localhost in the below format and click on Ok.

 localhost:389

VCenter_LDAP issue

6. Expand the  OU=Instances, find the CN which is found in your vpxd.log which is CN=76c0e73g-0bd2-56ba-c706-g449de069520

Vcenter_LDAP_2

7. Right click on the above CN  and Select Delete to delete the Stale ADAM database entry.

After deleting the Stale ADAM database entry, I tried starting the VMware virtual center Service, It started like a gem. I found this troubleshooting solution from the VMware KB Article 1029864. That’s it, All up and life is smooth. I hope this is informative for you. Thanks for Reading!!!

VMware Memory Management Part 2 – Transparent Page Sharing (TPS)

$
0
0

This post going to explain detailed view about Transparent Page Sharing. In my Previous post, “VMware Memory Management Part 1 – Understanding ESXi Host Memory States”. I have explained the relation between ESXi host memory states and various memory management techniques.One of the important memory technique which always work towards to save the memory on the host is Transparent Page sharing. Also referred as TPS Which is similar to the storage deduplication technique but it works for memory instead of storage. Transparent page sharing runs by default regardless of ESXi host memory state. TPS will always run on the ESXi host even ESXi memory state is high. Transparent page sharing works with powered on Virtual machines. Transparent page sharing finds all the identical memory pages of the virtual machines running on the host and maps that all identical pages with a single page. ESXi hosts periodically scans the content of guest physical memory for sharing. Let’s consider, When multiple virtual machines are running same guest operating systems and similar applications. Using this transparent page sharing, hypervisor will eliminates the redundant memory pages and maps the identical contents in only one page in the physical memory.  with the use of TPS, Virtual machine memory consumption on the host will get reduced and allows higher level of memory over commitment.

This redundant copies are identified by their contents. TPS runs periodically and it scans all memory pages and calculates the hash value for each of them. Those hash values are saved in the global hash table and which are compared to each other by ESXi kernel. Every time VMkernel finds two identical hashes, It performs bit-by-bit comparison of corresponding memory pages. If pages are same, Kernel leaves only one copy of the page in the memory and removes the second copy. All the requests send to the removed page are redirected to the first single copy. when one of your Virtual machine requests to write to the page, VMkernel creates a new page and new page access will only be provided to that particular virtual machine. This terminology is called Copy-on Write (COW).

Memory Management -Transparent page sharing


Image Thanks to VMware.com

Above diagram is from the VMware’s official Memory Management diagram. It would like to explain using the same image.  3 VM’s (vCenter-vm01,vm02 & vm03) on the esxi host. You can see the  Logical Page number(a,b,d) which are common on all the 3 virtual machines. Using Transparent Page sharing, redundant memory pages (a,b,d) are mapped into single copy at physical memory by removing the redundant copies. You can compare the memory savings  before and after TPS. It uses the Hash table to compare the identical memory pages.

You can verify the memory which are shared using Transparent memory Sharing (TPS) from Esxtop ,Virtual Machine Resource Allocation tab and also using vCenter Performance Graphs.

esxtop -> Press m

You will be able to see how much % of memory is overcommited in your ESXi host using the Value MEM Overcommit avg. The MEM overcommit avg tells us that the average memory over commitment level averages in 1-min, 5-min and 15-min. A value of 0.50 is a 50% over commitment of memory. In our case it is 5.87 which is nothing but 587% memory over commitment on my host. My ESXi host is having 5 GB of memory with 5 Virtual Machines. Out 5, 4 VM’s are allocated with 8 GB and 1 VM alloacted with 2 GB of memory. My total ESXi memory is 5 Gb but allocated memory for Virtual machines is 34 GB. which is almost 7 times the available memory of my ESXi host. This over commitment becomes only possible because of this VMware Memory management techniques.

Detailed stats about Memory saving using Transparent page sharing can be found with PSHARE value. Take a look at PSHARE/MB 2575 MB which is shared between the Virtual machines out of which 355 MB is common. Which allows us to save 2220 MB of memory using Transparent Page sharing.

TPS

Memory which are shared at individual Virtual Machines can also be viewed using the resource allocation tab of each virtual machines. Below Virtual machine is having around shared memory of around 1.64 GB. which is the Amount of guest “physical” memory shared with other virtual machines using the transparent page-sharing mechanism.

TPS_1

You can also use vCenter Performance graphs to collect the Shared memory stats of each Virtual Machine on the ESXi host using the shared stats under Memory in vCenter Advanced chart options.

TPS_2Shared Common is the Amount of machine memory that is shared by all powered-on virtual machines and vSphere services on the host.

shared – sharedcommon = machine memory (host memory) savings (KB)

2575 Mb – 355MB = 2220 MB  host memory saving

TPS_4

Below is the Graph for the Shared Common stats on the ESXi host. This chart can be pulled at ESXi host level using Advanced chart options under Memory.TPS_3I hope this is informative for you. Thanks for Reading!!!. Be Social and share it in social media, If you feel worth share it .

Downgrade VMware Virtual Machine Hardware Version

$
0
0

This post is going to quickly explain you with the different procedures to downgrade your Virtual Machine Hardware Version from vmx-10 (VM Hardware Version 10) to vmx-9 (VM hardware version 9). You may ask me the question why do you want me to downgrade the Virtual Machine Hardware Version. Downgrading Virtual Machine Hardware version may required if you have come across one of the below situation:

1. You are migrating your Virtual Machine with Vmx-10 (VM Hardware version 10) from ESXi 5.5 host to ESXi 5.1 host or previous versions. You will not be able to manage the VM with higher Hw version in previous versions of Host.

2. Virtual Machine with Legacy operating system does not support the latest hardware devices supported by HW version 10. So you may downgrade the Virtual Machine hardware version to compatible with your legacy guest OS.

3. Another 3rd reason which you may not face frequently but i faced the issue. Let’s say your vSphere web client is crashed, You will not be able to edit the settings of Virtual Machine Hardware version 10 with vSphere client. In that situation, you may need to downgrade the Virtual Machine hardware version from 10 to 9 to get that managed by vSphere windows client However,You will be able to manage to perform almost most of tasks using PowerCLI scripting if you are familiar with powerCLi scripting.. You may receive the below warning if you try to edit Virtual Machine properties, if Hardware version is 10 or more.

” You cannot use the vSphere Client to edit the settings of virtual machines of version 10 or higher.  Use the vSphere Web client to edit the settings of this virtual machine”

VM-Hardware version-Downgrade-1

Methods to  achieve Downgrade of Virtual Machine Hardware Version

1. Use VMware Converter and perform V2V migration to downgrade the Virtual Machine Hardware version

VM-Hardware version-5

2. Revert to  previous snapshot, if you have taken snapshot before the VM hardware version upgrade

3. Create a New Virtual Machine with older hardware version and attach the disks from the existing Virtual Machine

4. Another method which is unsupported method. Simply editing the .VMX file of the virtual machine to downgrade the VM hardware version. Let me explain this procedure in detail. Note: This is unsupported by VMware.

Procedure To Downgrade Virtual Machine Hardware Version by editing the .VMX file:

1. Login to the ESXi hosts where that particular Virtual Machine running using SSH and browse towards the virtual machine location. Power off the Virtual Machine before editing the Configuration file of virtual machine

2. You can verify the current Virtual Machine hardware version from Virtual Machine configuration file (.vmx)

cat VC-1.vmx | grep virtualHW.version

VM-Hardware version-Downgrade-2
3. Edit the Virtual machine configuration file (Vmname.vmx) file using VI editor

Vi VC-1.vmx

4. Change the Value “virtualHW.version” in the .vmx file from “10″ to “9″ to downgrade the VM hardware versio form vmx-10 to vmx-9.

VM-Hardware version-Downgrade-3
5.Save the .vmx file using below command

Press ESC and type :wq!

6. Remove the Virtual Machine from vCenter inventory and register again. That’s it. Your Virtual Machine Hardware version will reflect as vmx-9 and you will be bale to edit the Virtual Machine Properties using vSphere Client.

VM-Hardware version-Downgrade-4

That’s it I hope this is informative for you. Thanks for Reading!!!. Be Social and Share it in social media, if you feel worth sharing it.

Viewing all 326 articles
Browse latest View live


Latest Images

<script src="https://jsc.adskeeper.com/r/s/rssing.com.1596347.js" async> </script>