Quantcast
Channel: VMware Arena
Viewing all 326 articles
Browse latest View live

vSphere Distributed Switch Part 6 - Manually Assign Uplink Adapters to Distributed switch

$
0
0
This post explains you the step by step procedure to manually assign network adapters of ESXi host as uplink adapters to your distributed switch. Network adapters can be assigned to distributed switch when adding ESXi host to dvswitch. However this post helps you to understand how manually assign the network adapters as uplinks for distributed switch.

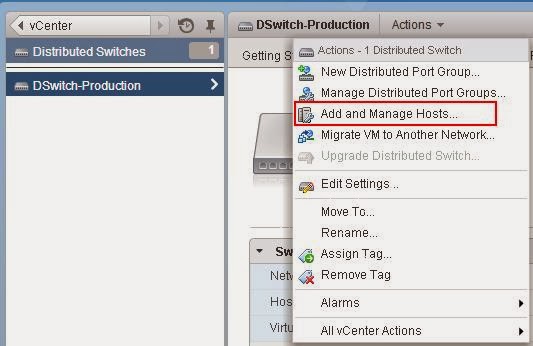
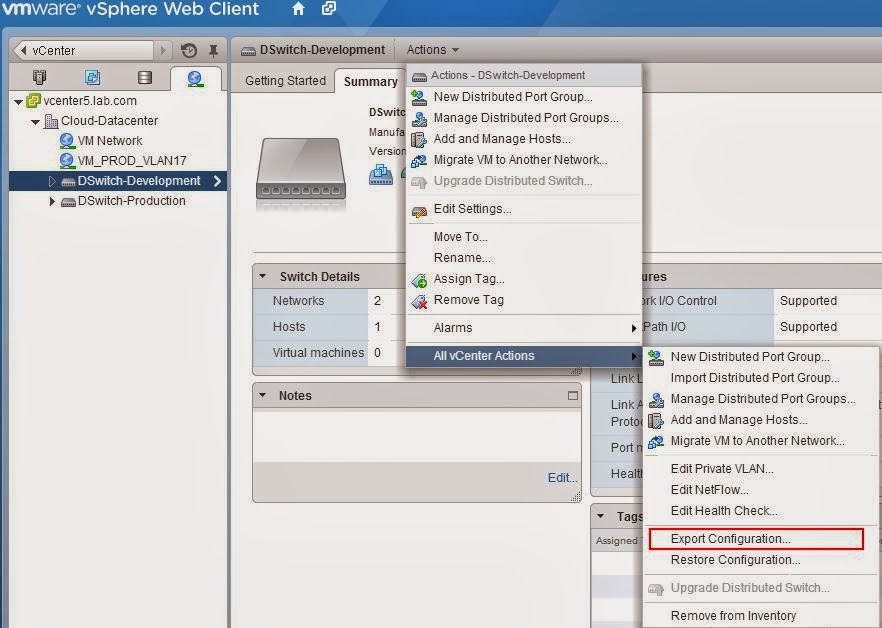
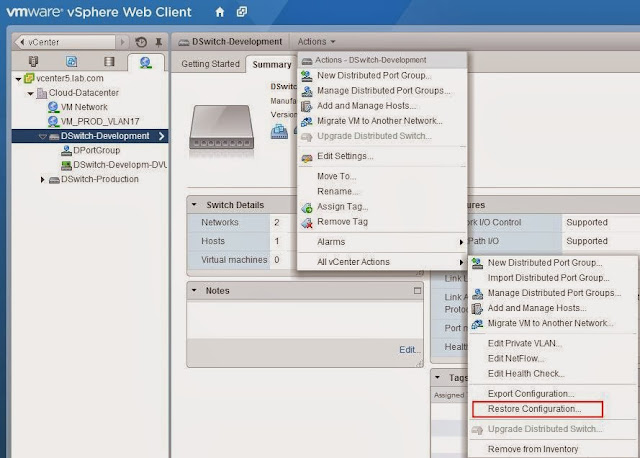
Select your distributed switch from vSphere web client and click on Actions tab, Select Add and Manage Hosts.


Under Select a task to perform on this distributed switch wizard, Select Manage host networking and click on Next


Select your ESX/ESXi host from the list to perform the action. I have selected the host (192.168.0.125) and click on Next


Select Manage Physical adapters checkbox and click on Next.


Select the physical network adapter of the ESXi host to assign and click on Assign Uplink and click on Next. I have selected vmnic3 of ESXi host (192.168.0.125) to assign it to dvswitch


Select the uplink from the below list for vmnic3 adapter and click on Ok.


vmnic3 is assigned state for the Uplink2 for the dvswitch (DSwitch-Production) and click on Next.


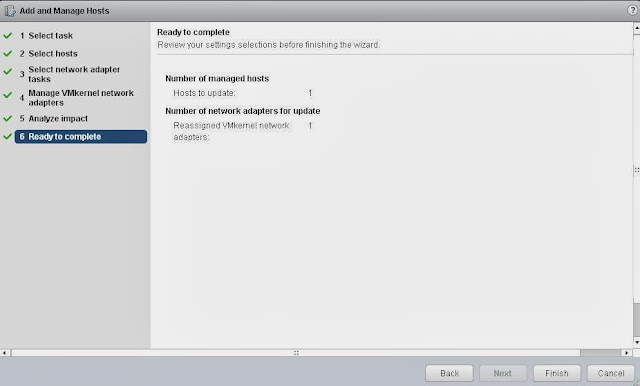
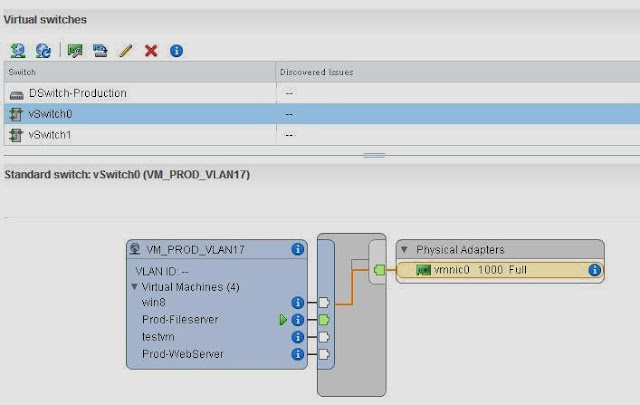
Now you can see the vmnic3 of the ESXi host (192.168.0.125) to the distributed switch DSwitch-Production.


I hope this is informative for you!!. Thanks for Reading. Be social and share it to social media if you feel worth sharing it.

vSphere Distributed Switch Part 7 - How to Create Distributed Port Group

$
0
0
Distributed Port group is also referred as dvportGroup which represents a group of dvports that can share the same configuration template. This configuration is inherited from the dvportgroup to the dvports. This post helps you to guide step by step procedure to create distributed port group (dvportgroup) on your distributed switch.

Select your distributed switch from vSphere web client and click on Actions tab, Select New Distributed Port Group


Provide the Name for your Distributed port Group. I have provided name as DVPG-Management Network and click on Next


This page will allow us to configure the distributed port group settings like Port Binding, Port allocation, Network resource Pool, VLAN type and also allow you to specify the number of ports for this port group. I will discuss in detailed about all the settings in upcoming posts. I have accepted all the default settings and to proceed with the next steps , click on Next.


Review your selections and click on finish to complete the creation of distributed port group.


In the below screen, You can see the Distributed port group " DVPG-Management Network" is created on our Distributed switch "DSwitch-Production:.


I hope this is informative for you. Thanks for Reading!!! Be Social and share it to social media if you feel worth sharing it.

vSphere Distributed Switch Part 8 - Migrate VMkernel Network from Standard Switch to Distributed Switch without downtime

$
0
0
This post is in my mind from the long time because lot of people asked me procedures about migrating your existing VMkernel or Service console network from the standard switch to your distributed switch. So I decided to place this migration  setps as part of this distributed switch series of posts. This post will help you to understand detailed step by step procedure to migrate your VMkernel network from standard switch to distributed switch. This step applies to your Service console network too.

In this post, I am going to migrate my VMkernel network (vmk0: 192.168.0.125) of my ESXi host from the standard switch called vSwitch0 to my distributed switch called DSwitch-Production.

In the below screenshot, You can see my the vmkernel network vmk0 is in the vSwitch0 of my ESXi host.


Prerequisites for the Migration without downtime

1. Ensure that your ESXi host has been added to dvswitch before initiating this migration. (My ESXi host called 192.168.0.125" is already added to dvswitch)

2.Ensure that you have network connectivity of your distributed switch uplink is having same or relevant VLANs trunked as same as your standard switch uplink. Compare the configuration of your destination dvswitch uplink with your existing uplink of standard switch and also ensure that they are configured identically on the physical switch also. (My dvswitch uplink vmnic1 and vmnic 3 is having same network connectivity as my standard switch uplink vmnic0)

3.It is best practice to have access to remote console of your ESX/ESXi host, when migrating the vmkernel or service console network. This will help to troubleshoot your host if any issues happened.

4.Ensure that the dvportGroups is going to be used for vmkernel or service console is configured to match with the existing port group configuration (VLAN,NIC Teaming) on the standard switch.

Procedure

Login to your vCenter server using vSphere web client and click on your distributed switch (DSwitch-Production). Click on Actions tab and Select Add and Manage Hosts from the options.


Select Manage Host Networking from the task and click on Next


Select your ESX/ESXi host form the list to manage its networking on this distributed switch and click on Next.


Select Manage VMkernel adapters. This option allows you to add or migrate VMkernel network adapters to dvswitch, assign them to dvportgroup, configure VMkernel adapter settings or remove the existing ones.  Click on Next.


Under On Other Switches Section, Select the VMkernel Network (vmk0) on vSwitch0, which is on the port group "Management Network" on the standard switch (vSwitch0) of my ESXi host. Select the VMkernel adapter from the below list and click on Assign Port Group


Select the destination dvportGroup (DVPG-Management Network) in dvswitch (DSwitch-Production)  where you want to migrate your existing VMkernel port group from your standard switch. Click on Ok.


Now Review the Migration options like Source Port group and Destination Port Group. As part of this Migration, ESXi host VMkernel Adapter vmk0 is going to migrate from the port group (Management network) on the Standard switch  vSwitch0 to dvportgroup (DVPG-Management Network) on the distributed switch (DSwitch-Production).  Click on Next to continue.


Analyze the impact of this migration or configuration. There is No impact since we have uplink assigned at the dvswitch. Click on Next.


Review the Selections and click on Finish to complete the migration


After the migration completed Successfully,  You can see the VMkernel adapter (192.168.0.125) is in the distributed switch (DSwitch-Production) and in dvportgroup called DVPG-Management network.


I hope this is informative for you. Thanks for Reading!!!. Be Social and share it in social media if you feel worth sharing it.

Free 2ND Attempt offer for VMware Professional and Advanced Certifications

$
0
0
This post will be boost for all the VMware Admin's who are planning to write VMware Certification this year. VMware  Education Services provided a "Free 2ND ATTEMPT" offer for the various VMware certifications. Clearing VMware Advance level certification by spending huge money is real a risky job. This offer will give you the strength to appear for VMware Professional and Advanced level certifications.

Read the below information regarding how to redeem your Free 2ND ATTEMPT

1. Pay and appear for your exam (1st attempt) at Pearson Vue test center between 1 OCT 2013 till 31 March 2014

2. If you failed, Register and schedule your 2ND attempt by 31 March 2014 by entering the below Promotion codes upon payment and your 2ND attempt will be free of cost.

3. This promotion is only applicable to Australia, India, New Zealand, Japan & Korea


I believe this is informative and money saving information for you. Thanks for Reading!!!. Be Social and share it in social media if you feel worth sharing it.

vSphere Distributed Switch Part 9 - Migrate Virtual Machine network from Standard Switch to Distributed Switch without downtime

$
0
0
Migrating the virtual Machine network from standard switch to distributed switch is one of interesting task in dvswitch administration. This is one of the task that VMware admin should be aware about. This post i am going to explain the step by step procedure to migrate your virtual machines from the standard switch to distributed switch.

In this post, I am going to migrate few of the virtual machines from the portgroup (VM_PROD_VLAN17) on my standard switch ( vSwitch0) to dvportgroup (DVPG_VM_PROD_VLAN17) on my distributed switch (DSwitch-Production)


Prerequisites for the Migration without downtime

1. Ensure that your ESXi host has been added to dvswitch before initiating this migration. (My ESXi host called 192.168.0.125" is already added to dvswitch)

2.Ensure that you have network connectivity of your distributed switch uplink is having same or relevant VLANs trunked as same as your standard switch uplink. Compare the configuration of your destination dvswitch uplink with your existing uplink of standard switch and also ensure that they are configured identically on the physical switch also. (My dvswitch uplink vmnic1 and vmnic 3 is having same network connectivity as my standard switch uplink vmnic0)

Procedure

Login to your vCenter Server using vSphere Web client. Select your Distributed switch and click on Actions. Select Add and Manage Hosts option


Select Manage Host Networking option and click on Next


Select the Hosts from the list and click on Next.


Select the checkbox Migrate Virtual machine networking task and click on Next. This task allows you to migrate VM network adapters by assigning them to distributed port groups on the distributed switch.


Select the Virtual machines or network adapters from the below list to migrate to the distributed switch and click on Assign Port Group


Select the  destination dvportgroup from the list for the virtual machines to migrate to and click on Ok.  I have selected DVPG_VM_PROD_VLAN17


Review the Destination Port Group information of the virtual machines and click on Next.


Review your settings selected and click on Finish.


Once the Migration is Completed, My 2 VM's (Prod-WebServer and Prod-Fileserver) is moved to my dvport group (DVPG_VM_PROD_VLAN17)


The above procedure is more suitable to perform migration of group of virtual machines networking. If you have one or few VM network need to migrated to dvswitch then, you can manually edit the virtual machine settings and Assign the portgroup from list in Network adapter settings to migrate it to dvswitch.


I hope this is informative for you. Thanks for Reading!!!. Be Social and share it in social media if you feel worth sharing it.

vSphere Distributed Switch Part 10 - Free Training "VMware Network Virtualization Fundamentals" from VMware

$
0
0
I would like bring everyone's attention that VMware has released a new free eLearning course " VMware Network Virtualization Fundamentals". This training is so relevant to our dvswitch series of posts. This training will definetly helps everyone to easily understand the concepts of virtual networking and also helps to understand the overview about  VMware networking virtualiation concepts.

This Course Provides the fundamental overview of VMware’s network virtualization products, components and features. It will match business, management, security and operations challenges with their respective VMware solutions.This eLearning consists of 3 Modules.

Module 1: Establish the Requirements for Network Virtualization (Duration: 45 Minutes)
Module 2: Compare and Contrast Virtual and Physical Networking Solutions (Duration: 60 Minutes)
Module 3: Describe Advanced VMware Network Virtualization Solutions (Duration: 70 Minutes)


Below are the detailed contents of each module

Module 1: Establish the Requirements for Network Virtualization

Module 1 will establish the requirements for network virtualization.

At the end of this module, you should be able to:
•  Explain the data center before virtualization
•  Trace the evolution of virtualization in the data center
•  Define network virtualization
•  Compare physical network components to virtual network components
•  Recognize why we need network virtualization
•  Identify the challenges customers face in a modern data center
•  Catalog how VMware network virtualization solves business challenges


Module 2: Compare and Contrast Virtual and Physical Networking Solutions

Module 2 will compare and contrast virtual and physical networking solutions.

At the end of this module, you should be able to:

•  Review a typical physical network
•  Distinguish a virtual network from a physical network
•  Explain how a virtual network is implemented with a vSphere Virtual Standard Switch
•  Discuss how a virtual network is implemented with a vSphere Virtual Distributed Switch
•  Correlate business, management, security, and operations challenges with the VMware virtual networking solutions

Module 3: Describe Advanced VMware Network Virtualization Solutions

Module 3 will describe advanced VMware network virtualization solutions.

At the end of this module, you will be able to:

•  Classify VMware advanced network virtualization solutions
•  Discuss VMware vCloud Networking and Security (vCNS)
•  Explain VXLAN
•  Discover VMware NSX
•  Distinguish between vCloud Networking and Security, and NSX
•  Correlate business, management, security, and operations challenges with their solutions


Click on Register. Login with your VMware account and start learning the VMware Network Virtaulization concepts. I hope this is informative for you. Thanks for Reading!!!

P2V ADMIN ISO : Bundle of Free Tools for your End to End P2V Migrations

$
0
0
P2V ADMIN ISO is an ISO image which has a bundle  of free tools which will help you to complete your end to end  P2V migrations and also helps to troubleshooting failed migrations. P2V Admin ISO helps you perform your P2V migration from the initial phase(Inventory collection scripts, Defragmentation, to till completion of the migrations(cleanup tools,disk alignment and disk expansion tools) . It also contains disk related tools which will help you to clone your physical disk, also perform manual data copy in case of failed p2v migration due to some bad disk blocks. Each folder contains Readme file about the procedure. This ISO image is just a bundle of various software's and all the credits goes to the vendor who developed the products. I have personally used all this tools to complete my P2V migrations.

You can simply attach the ISO image to your converted VM and use the tools whichever needed based on your requirement. 

Below are the tools which are packaged as part of  P2V-ADMIN ISO v1.0 (620 MB):

  • 01 – Disk Defragmentation Tools
    • Page Defrag
    • Smart Defrag
    • AusLogics Disk Defrag 
  • 02 – Disk Alignment Tools
    • Guest Reclaim
    • UBERAlign 
  • 03 – Controller Floppies & Drivers
    • VMtools
    • VMxnet Driver
    • BusLogic SCSI
    • LSI Logic 
  • 04 – Disk Clone Tools
    • Snapshot_2003
    • Snapshot_2008
    • Disk2vhd
    • RawCopy
    • XXClone 
  • 05 – Drive Expansion Tool
    • ExtPart 
  • 06 – File Copy Tools
    • RichCopy
    • FastCopy
    • RoboCopy
  • 07 – P2V Cleanup Tools
    • Devcon
    • HP Prolient Cleaner
    • Remove Non Present Devices 
  • 08 – P2V Inventory Scripts
    • DiskUsage_report.ps1
    • ServerInfo_Report.ps1 
  • 09 - Sysprep Files
    • Win2k
    • Win2k3_Sp1_x86
    • win2k3_sp2_x64 & winxp_x64
    • Win2k3_SP2_x86 & win2k3R2
    • WInxp_prowinxp_Pro_SP3_Sp2
    • winxp_Pro_SP3 
  • 10 - PSTools
    • PsExec, Psfile ,PSGetsid, PsInfo, Pskill, PsLoggedon , Psloglist, Pspasswd, Psping, PsService, Psshutdown and PsSuspend 
  • 11 – Admin Password Reset Tool
    •  Offline NT Windows Password & Registry Editor 
  • 12 – Folder to ISO Converters
    • AnytoISO
    • Folder2Iso
    • MagicISO 
  • 13 – SQL Management Studio
    • SQL Management Studio 2005
    • SQL Management Studio 2008 
  • 14 – USB_Bootable Tools
    • Unetbootin
    • Rufus 
  • 15 – vSphere Client (Thinapped)
    • VMware_vSphere_Client_4_1_u1
    • vSphere50_u1_Fling 
  • 16 –  Analysis & Troubleshooting
    • FileCompare
    • HD_Speed
    • PAL (Performance Analysis of Logs)
    • Process Explorer
    • TCPView
    • VMClient
    • VMPerfmon
    • VMTime
    • WireShark 
  • 17 –  Miscellaneous Tools
    • BGinfo
    • CHKCPU
    • NewSID
    • ShellRunas
    • Virtual Guest Console
    • WINSCP
    • Genuine Check
    • Putty
    • TreeSize
    • Uptime 
  • 18 –  Document Readers
    • Portable PDF Reader
    • Portable Office
  • 19–  VMware Converter Standalone (Shortcut for Download link)
    • VMware vCenter Converter Standalone_4.0 
    • VMware vCenter Converter Standalone_5.0
    • VMware vCenter Converter Standalone_5.1
    • VMware vCenter Converter Standalone_5.5
  • 20– Starwind v2v Converter (Shortcut for Download link)
    • Starwind v2v converter
Not all the tools are used at converted virtual machine. So i have included both ISO image and ZIP file for Users convenient. Click on Download to get this P2VADMIN ISO


    Download P2V Admin ISO File               Download  P2V Admin ZIP File


I hope P2V ADMIN ISO will definitely help you to complete your migrations successfully.  Thanks for Reading !!!. Be social and share it in social media if you feel worth sharing it.

Download Trackers

Download P2V Admin ISO File

Download P2V Admin ISO ZIP file

vSphere 5.5 - ESXi 5.5 Free version with no more 32 GB RAM hard limit

$
0
0
During VMworld 2013, VMware has introduced the new version of vSphere called vSphere 5.5 along with happy news for everyone by removing the hard limit of 32 GB of RAM with ESXi 5.5 free version. This is really a happy news for each and every IT administrators, IT enthusiasts and all users having home lab. With ESXi 5.1 Free version, There is a hard limit of 32 GB of RAM. Really it is like a lockup for the admins to setup some big home lab. So, VMware understands our concerns and now released the Free version of ESXi 5.5 with no physical RAM limit.

With this new ESXi 5.5 free version, We can play around with the Home lab by setup a lab by running more powerful virtual machines and install and play around with our nested virtual machines.

Download Now and Complete your End to End P2v Migrations using VMware Arena's "P2V ADMIN ISO"


With the Snapshot from the ESXi 5 host with free license with the hard limit of 32 GB  of Memory and 8-way Virtual SMP. But we are unlocked with physical RAM limit in ESXi 5.5 free edition. Let's grow our lab with more powerful virtual machines running on our vSphere Home lab along with new configuration maximums
  • vSphere 5.5 supports 320 Physical CPUs per ESXi host 
  • ESXi host supports 4 TB of Memory in vSphere 5.5 
  • 16 NUMA Nodes per host in vSphere 5.5 
  • 4096 Maximum vCPUs per host 
  • Support for 40 GBps Physical Network adapters
  • 62 TB VMDK virtual disk support 
  • Supports 16 GB FibreChannel end-to-end Support
  • Increased VMFS Heap, 64TB open VMDK per host max
  • Virtual Machine Hardware Version 10 in vSphere 5.5 
I hope this post is informative for you. Thanks for Reading !!!!

Click Through Demo's available for vCloud Suite 5.5 and VSAN

$
0
0
VMware's technical Marketing team has create a number of "Click-thru" demos for vCloud Suite 5.5 and also for other products liks VSAN. VMware vCloud suite is nothing but the combination of multiple VMware components to provide a complete set of cloud infrastructure capabilities in one package. Which includes Virtualization,software-defined datacenter services, disaster recovery, application management, Policy-based provisioning and operations management.


VMware vCloud suite includes the following components or subset of these components based on the edition you purchased.
  • VMware vSphere
  • VMware vCenter Site Recovery Manager
  • VMware vCloud Networking and Security
  • VMware vCloud Director
  • VMware vCloud Connector
  • VMware vCloud Automation Center
  • VMware vFabric Application Director
  • VMware vCenter Operations Management Suite

Thiis VMware walkthrough (Clickthrough) demos are available for the Products like VSAN, VDP, Application HA, vCloud Director,  vSphere Replication and Flash Read Cache. I hope more products will be added in the future.

vSphere Data Protection
  • Direct to Host
  • File Level Restore
  • Restoring Virtual Machine
  • Virtual Machine Backup Job
  • Replication to EMC Avamar
vSphere App HA
  • Configuring APP Protection
  • Planned and Unplanned App Downtime
vCloud Director
  • New Catalog Features
  • vApp Clone
  • App Lifecycle Management
  • Hot Add and Remove
vSphere Replication
  • Replication Status
  • Recovering a VM
  • Protecting a VM
vSphere Flash Read Cache
  • Configuring a VM to use a vFRC
  • Configuring Multiple vSPhere Hosts
  • Interoperability with HA & DRS
  • Interoperability with vMotion
Virtual SAN (VSAN)
  • Configuring VSAN
  • Deploying VMs using VM storage Policies
  • Changing VM Storage Policies
  • Failure Resilience & AVailability
  • Interoperability - VSAN & vSphere HA
Navigation for this wlkthrough is quite simple. When you click the upper left corner, It will give you a list of available demos. The Upper Right corner  will display Screen navigation tips.


Click on Each products and Module to walkthrough the demos by moving towards the slides.


I hope this is informative for you. Thanks for Reading !!!. Be Social and share it in social media's if you feel worth sharing it.

vSphere Distributed Switch Part 11 - Export Distributed Switch Configuration

$
0
0
Welcome back to Distributed Switch Series of posts. This post is to explain you the step by step procedure to export the vSphere distributed switch configuration using vSphere Web Client. With this option, your vSphere distributed switch configuration will be exported to compressed file. This file preserves the network configurations of your distributed switch. Which can be used as backup or can be used for other dvswitch deployments. This Export feature is only available with vSphere Web client 5.1 or later but you can export the settings of distributed switch of any version if you use the vSphere web client (5.1 or later).

Download Now and Complete your End to End P2v Migrations using VMware Arena's"P2V ADMIN ISO"

Login to your vCenter server using vSphere web client. and Browse towards your dvswitch. Select your dvswitch. Click on Actions tab->All vCenter Actions  and select Export Configuration


Select the option whether you want to export the configuration of "Distributed Switch and Port Groups" or only Distributed Switch only". Enter the description for this dvswitch configuration export and click on Ok.


In Confirm Configuration Export option, Click on Yes to save the exported file to your local disk.  Browse the location to save in your local disk and click on ok.


I have saved the exported file called "dvswitch-backup-9-jan-14". Which is a compressed file. Upon extraction, I can see 2 folders inside the exported file. 2 folders are "Data" and "META-INF".

Under Data folder, I can see 3 .bak files. one for my dvswitch (Dswitch-Development) , one file for my dv port groups (DportGroup) and one for my uplink group (DSwitch-Development-DVUplinks-522)


Another folder called META-INF. Which contains a file called data.xml file. 


Below is the content of data.xml file. If you try to reda the file. You can easily identify the details about about the configuration exort. This xml file contains details about the below items

  • Distributed switch name along with uuid (Universally Unique Identifier).The ID can be 48 alphanumeric characters.
  • Description about this dvswitch configuration export and date&time of creation
  • Version of dvswitch, dvswitch id,Uplink information,uuid, dvswitch name, vlan information and also pointer to backup file (d98a 1a 50 16 12 01 6e-12 1a 2f f1 77 9f 50 16.bak) of dvswitch in Data folder
  • dvport group id, name, vlan information, port binding and allocation information along with pointer to backup file(dvportgroup-523.bak & dvportgroup-524.bak) of dvport group in Data folder


I hope this is informative for you. Thanks for reading!!!. Be Social and share it in social media, If you feel worth sharing it.

vSphere Distributed Switch Part 12 - Upgrade Your dvSwitch to Latest Version

$
0
0
This post explains you the step by step procedure to upgrade your vSphere distributed switch to a later version. You can upgrade your dvswitch from version 4.0,4.1,5.0 or 5.1 to the latest version. The major purpose of the upgrade is to take advantage of networking features that are available as part of later version dvswitch.This upgrade operation is a non-disruptive so that there is no downtime to hosts and virtual machines attached to your distributed switch.

Download Now and Complete your End to End P2v Migrations using VMware Arena's "P2V ADMIN ISO"

Below are the features which are available as part of  various versions of distributed switch.

Distributed Switch 5.5.0 : This version of dvswitch is compatible with VMware ESXi version 5.5 and later. New features like Traffic filtering and Marking, and enhanced LACP support are available as part of this version.

Distributed Switch 5.1.0 : This version of dvswitch is compatible with VMware ESXi version 5.1 and later. New features like Management Network Rollback and Recovery, Health Check, Enhanced Port Mirroring and LACP are available as part of this version.

Distributed Switch 5.0.0 : This version of dvswitch is compatible with VMware ESXi version 5.0 and later. New features like User-defined network resource pools in Network I/O control, NetFlow, and Port Mirroring are available as part of this version.

Distributed Switch 4.1.0 : This version of dvswitch is compatible with VMware ESX version 4.1 and later. New features like Load-Based Teaming and Network I/O control are available as part of this version.

Distributed Switch 4.0 : This version of dvswitch is compatible with VMware ESX version 4.0 and later. The features supported by later distributed switch versions will not be available.

My distributed switch called "DSwitch-Development" is running with the version 5.1.0. So I am going to upgrade my dvswitch from version 5.1.0 to 5.5.0.  I would recommend to take a backup of your dvswitch before proceed with this upgrade as mentioned in the post "Export Distributed Switch Configuration"


Login to your vCenter Server using vSphere web client. Select your dvswitch and click on Actions. Select Upgrade Distributed Switch option.


Review the upgrade for version 5.5.0 and features available as part of this version. Click on Next.


Below are the Pre-requisites to upgrade your dvswitch to version 5.5

1. vCenter Server version should be 5.5 or later
2. All ESXi hosts connected dvswitch switch should be version 5.5 or later

Verify the compatibility for the dvswitch upgrade and click on Next


Once upgraded the dvswitch cannot be downgraded to a previous distributed switch version. You will not be able to add older VMware ESX/ESXi server members that are not compatible with the new dvswitch.

Current Distributed switch Version: 5.1.0
Upgraded Distributed switch Version : 5.5.0

Feature Conversion: Some of the new features like (Enhanced the LACP support) need an additional conversion setup. Select the Checkbox "Enhance the LACP support" and click on Finish


Backup your dvswitch configuration and  review the new features which are available a part of enhancing LACP support and click on Next

  • Support for Configuring multiple link aggregation group (LAGs)
  • LAGs are represented as uplinks in the teaming and failover policy
  • Multiple load balancing options for LAGs
  • Centralized switch-level configuration available under Manage-> Settings-> LACP


Ensure that the prerequisites to enhance the LACP support are met and click on Next


Review the settings selection and click on Finish. Once the process is completed, you can go to Manage -> Settings -> LACP of your dvswitch to add, remove and manage link aggregation group (LAGs).


That's it. Distributed Switch called" DSwitch-Development" is running with the version 5.5.0.It is upgraded from the previous version 5.1.0.


I hope this is informative for you. Thanks for reading !!!. Be Social and share it in social media if you feel worth sharing it.

vSphere Distributed Switch Part 13 - Restore dvSwitch Configuration

$
0
0
In this Post, I am going to explain you step by step procedure to restore the configuration of Distributed Virtual Switch from the backup file. Please take a look how to export dvswitch configuration. This restore option can be used to apply the settings saved in the backup configuration file to an different distributed switch or can be used Restore the distributed switch back to its original configuration from the backup  file incase of misconfiguration.

This Restore option can be used to restore policies and hosts associations on the distributed switch. You will not be able to restore the connection of physical uplinks ports. This restore option only available with vSphere web client 5.1 or later. This restore option will not re-create the dvswitch. You  need to manually recreate the dvswitch and restore the configuration from the backup file to restore its configuration

Download Now and Complete your End to End P2v Migrations using VMware Arena's "P2V ADMIN ISO"

Login to your vCenter server using vSphere Web client . Select your dvswitch and click on Actions -> All vCenter Actions -> Restore Configuration


In on Previous post "Export Distributed Switch Configuration" , We have saved the backup configuration file " DVswitch-backup-jan9.zip" on our local desktop. Click on Browse and browse towards the location of saved backup file. Select the either one of the checkbox " Restore distributed switch and all port groups" or "Restore distributed switch only". Click on Next


Review the import settings Selection. It will display backup file name (DVswitch-backup-jan9.zip) , switch name (dSwitch-Development) , Switch Version, Number of port groups, Number of uplinks, number of network resources, ports and notes (description which you have entered at the time of dvswitch configuration export). Click on Finish to complete the restore.


You can restore your dvswitch optionally  with the connected portgroups using powercli commands as below

Restore-dvSwConfig -Path D:\dvswitchdata.xml -IncludePortgroups

 IncludePortgroups switch allow to  restore the configuration of the portgroups on the dvSwitch as well.I hope this is informative for you. Thank for Reading !!! Be social and share it in social media, if you feel worth sharing it

Veeam Certified Engineer (VMCE) Certification - Go for It

$
0
0
Veeam Backup (#1 VM Backup) has its own certification called VMCE (The Veeam Certified Engineer). This certification is the documented proof that an engineer possesses the necessary level of expertise to correctly architect, implement and configure Veeam Software. This certification is a great investment for an IT professional looking to increase productivity, reduce operating costs, propel personal career advancement and achieve industry recognition.


Why get certified?

The VMCE certification gives Veeam experts knowledge that's highly sought-after for implementing Veeam solutions. As a VMCE, you can:

  • Identify and resolve issues more efficiently
  • Distinguish yourself from your peers
  • Get more functionality out of Veeam solutions

At Veeam, we reward professionals who invest in us. Engineers are VMCEs receive the following benefits:

  • “No queue for you” phone support: Direct access to support for critical down onsite issues
  • Expert designation within industry for professional services
  • Use of VMCE logo

As a convenience, there are two training options available:

Instructor Led Training: The core education offering is Instructor Led Training (ILT) that is delivered by Veeam Distribution partners worldwide. The 3-day course delivers the Veeam software information and includes Veeam’s interaction with core technologies that it works with. Every class includes a lecture and hands-on aspect, so students hear about the technology and its configuration and then experience the configuration in labs, which are based on real customer situations. ILT is held on pre-scheduled dates and scheduling is established by the Veeam Authorized Education Center.

Video On Demand Learning (VODL):This course distributes the recorded content from live online courses in 30-minute snippets delivered via web viewer. Hands on is achieved through the same remote labs as the ILT, however, labs are available 24x7 and executed by each student based on availability. With VODL, engineers have 30 calendar days to complete all video modules, module quizzes and labs.

I hope this is informative for you.!!! Thanks for Reading!!!

vSphere Distributed Switch Part 14 - Configuring dvPortGroup General Settings

$
0
0
Distributed Port Group (dvPortGroup) represents a group of dvPorts which shares the same configuration template. Applied configuration will be inherited from the dvPortGroup to the dvPorts. Port Group policies can be overridden on Per-dvport level. In vSphere standard switch, We will apply policy at vSwitch level and port Group level but on distributed switch, We will apply networking policies at dvPortGroup Level or at dvport level. In this post, I am going to explain you about how to configure Distributed Port Group General settings.

General Settings which are configured as part of Distributed port group includes portgroup name, Port binding options, Port allocation, Number of ports for the dvportgroup ,network resource pool and along with a description.

Under dvPortGroup General Settings, Enter the Name for dvPortGroup if you want to change it, Specify Number of Ports for this dvPortGroup and Description.Let's understand Port binding and Port allocation policy in detail.


Below are the 3 different Port binding options available as part of dvportgroup general settings

1. Static Binding
2. Dynamic Binding
3. Ephemeral -no binding


Below are the 2 port allocation policy which can be only applied if you have chosen Static Binding as your Port allocation policy. 

1. Fixed
2. Elastic

Static Port Binding with Fixed Port allocation

Static Binding : This is the default port binding option. It assigns a  port to a virtual machine when a VM is connected to distributed port group. It assigns a port to connected virtual machines regardless of whether the connected virtual machines are powered up or not. It is not possible to connect any new virtual machines on the port group, If all the ports are booked by existing virtual machines.

For example:  if the total number of ports on my dvportGroup(Production) is 20. You can attach 20 virtual machines to this port group (PortGroup) regardless whether VM's are powered on or off. If you try to connect a new virtual machines as 21st VM, It will not allow the VM to attach to the portgroup. Let's prove this in the below scenario.

I have a Port group called "DPortGroup" with Static Binding as Port binding option and Fixed as my Port allocation Policy. I have configured Number of Ports as "3".


I have connected 3 Virtual Machines to the portgroup "DPortGroup". You can see the usage Report in the Below screen:

Port Capacity : 3
Ports Used : 3
Ports Free: 0


When i am trying to connect my 4th Virtual machine to the PortGroup "DPortGroup", I am getting the below error Message:

"No Free Port is available in Distributed Port Group"

Static Port Binding with Elastic Port allocation

If all the ports are occupied by connected virtual machines, vDS will automatically expand the port allocation pool to accommodate the required number of dvport. If the port is no longer needed (in case VM's removed from the port group or VM deleted), ports will be reduced down to the numbers which was set at the time of creation.

Dynamic Port Binding

The Dynamic port binding type is deprecated. and it is no longer recommended. It is strongly recommended to choose the static port binding type for better performance. So I am not going to discuss about dynamic port binding policy.

Ephemeral-No Binding

Ephemeral binding behaves same as the standard vSwitch. If you have configured your dvPortgroup with ephemeral port binding then number of ports will be set to 0. Portgroup will allocate one port for each powered on virtual machine connected to that virtual machine upto the maximum number of ports available in the switch. If you choose your Port Binding as Ephemeral-No binding then, option to set number of ports will disappear.


In the below scenario, I have a dvport Group called "DportGroup" which is configured with Ephemeral port binding and I have connected 4  powered off virtual machines to this port group. Even 4 VM's are connected but still Used Port is showing as "0" because VM's are not powered on.


Once I powered on 3 virtual machines, It allocates the one port for each virtual machines with the Port ID.


Finally I have powered-on all my 4 virtual Machines, Usage is showing as below

Ports Used: 4
Ports Free: 0
Ports Capacity:4

Port capacity is showing as 4 because i have connected 4 powered on virtual machines. If i add another 10 powered on virtual machines, then my port capacity will be increased to total of  14 ports (10 for newly added VM's and 4 for existing VM's)


Thats's it. I believe this is informative for you. Thanks for Reading!!!. Be Social and share it in social media if you feel worth sharing it.

vSphere Distributed Switch Part 15 - Configuring dvPortGroup Advanced Settings

$
0
0
This will be a Simple post talks about the dvPortGroup Advanced settings. In this entire distributed switch series, I will be covering latest features and options available as part of vSphere 5.5. Lot of People would have been familiar with managing vSphere distributed switches using vSphere windows Client but you need to switch yourself to familiar with vSphere web client because from the next release of vSphere, No more vSphere windows client. It will be only vSphere web client. One more reason to use vSphere web client for this Series of post is all the new features available as part of vSphere 5.5 is only available through the vSphere Web Client.


Let's Back to your topic.Below are the option available as part of dvPortGroup Advanced settings. Two Major settings available as part of advanced settings are "Configure Reset at Disconnect" and  "Override Port Policies"

Configure Reset at Disconnect:

Select Either Enabled or Disabled form the drop down option. If you have selected Enabled then  per-dvport level settings will be discarded when a dvport is disconnected from a Virtual Machine. Basically port settings will reset when it is disconnected form a VM.

Override Port Policies:

Override Port Polices can be used to specify whether it is allowed or not allowed to override the dvportGroup policies by per-port level policies.You can individually configure override port policies for the below list of policies either by selecting Allowed or Disallowed to override.
  • Block Ports
  • Traffic Shaping 
  • Vendor Configuration
  • VLAN
  • Uplink Teaming
  • Network I/O Control
  • Security Policy
  • NetFlow
  • Traffic Filtering and Marking
We will discuss in deep about each individual policies in upcoming post in this dvswitch series. I hope this is informative for you. Thanks for Reading!!!. Be Social and share it in Social media , if you feel worth sharing it.

vSphere Distributed Switch Part 16 - Configuring dvPortGroup Security Settings

$
0
0
In this Post, I am going to explain in detail about the Security settings of dvPortGroup. Which works in exact way in both Standard and distributed switch. Only difference in the security settings between the standard switch and distributed switch is its default settings against the security policy.

Default Security Settings for all the below 3 settings (Promiscuous mode, MAC address changes & Forged Transmits is set to Reject)  in distributed Virtual Switch.

Promiscuous mode = Reject
 MAC address changes = Reject
 Forged Transmits = Reject


Default Security Settings of Standard Switch will be different than the dvswitch setting. In standard Switch, Below are the default settings:

Promiscuous mode = Reject
 MAC address changes = Accept
 Forged Transmits = Accept

Promiscuous Mode

Accept: If you set dvportgroup Security setting (Promiscuous mode to Accept), Virtual Machine adapter connect to this port group, will receive all frames passed on the switch in compliance with the VLAN policy of the port. This settings can only be useful in Firewalls, Intrusion detection systems and also in Packet capturing software. You can run packet capturing software like wireshark on the Guest operating system of the virtual machine connected to the port group with Promiscuous mode is set to Accept to capture the frames passing on that switch for network troubleshooting and analysis.

Reject: If you set dvportgroup Security setting (Promiscuous mode to Reject), Virtual Machine adapter will not receiving frames which is send for other virtual machines. By default, Promiscuous mode is set to reject. Don't set it to Accept unless and until it is required. Enabling promiscuous mode without any prominent use will create a unnecessary load on the virtual machines.

MAC Address Changes

MAC address is a unique number assigned to networking components like Network adapters. Each virtual machine will be assigned with atleast one virtual network adapter (vNIC). each vNIC will be assigned with a MAC address when VM powers on first time. MAC address of the Virtual network adapter will be saved in the virtual machine configuration file (.VMX).which will be stored in the virtual machine directory on your datastore. The MAC address which is saved in .VMX file aslo termed as Initial address.


 Usually this initial address will be copied by the Guest operating system to the network adapters as effective address unless you have bind some other MAC address at Guest OS level. Binding MAC address at Guest OS level will be useful when performing the P2V migration of the physical server in which installed application license is bind to the MAC address of physical host. This application will not work with other MAC address. In that case ,you can manually assign MAC address to network adapter inside the Guest operating system.


Runtime address is the address which is viewed by a port on the virtual switch. Runtime address will be same as the effective address which is assigned by Guest operating system.

Accept: If you set MAC Address Changes policy to accept and the guest operating system changes the MAC address of a  virtual network adapter other than the address specified in the .VMX (virtual machine configuration file)(Initial address), The switch allows the  inbound frames to pass with the new address.  In other terms, If initial address is not same the effective address,this policy allows the frames to pass the switch if this security policy is set as Accept.

Reject: If you set MAC Address changes to Reject and the Guest operating system changes the MAC address of the virtual network adapter other than the address specified in the .VMX file (Initial address), the switch drops all the inbound frames to that virtual machine adapter In other terms,. If initial address is not same the effective address,it does not allow incoming traffic to the VM.

Forged Transmits

Forged Transmits works as same as the MAC address changes policy. Only difference is it works on Outgoing traffic whereas MAC address changes works on Incoming traffic

Accept: If the Forged Transmits is set to Accept, Switch does not perform any security filtering and permits all the outbound frames from the virtual machine network adapter even if the source MAC address is different from the one saved in virtual machine configuration file (.VMX)

Reject: If the Forged Transmits is set to Reject, Switch drops any outbound frames from the virtual machine network adapter, if the source MAC address is different from the one saved in virtual machine configuration file.

I hope this is informative for you. Thanks for Reading!!!. Be Social and share it in social media, if you feel worth sharing it.

vSphere Distributed Switch Part 17 - Configuring dvPortGroup Traffic Shaping Policies

$
0
0
Traffic shaping is a method to regulate the network data transfer to obtain certain level of network performance and quality of service (QOS). It allows you to prioritize the network packet of most important traffic as compared to leased important traffic. Below are major scenarios in which traffic shaping plays a major role

  • Let's say you have Time sensitive data like Credit card gateway servers, which should be given more priority as compared to internal production environment. Production traffic should be given more priority than your development traffic. This can be achieved by traffic shaping by limiting the traffic for development and production environment as compared to the network of credit card gateway servers.
  • If your are the ISP provider, then you may need to shape the traffic on your customer based on bandwidth plan  or based on the support contract they have with your company.

Traffic Without Traffic Shaping


Traffic With Traffic Shaping

Graphic Thanks to linebroker.co.uk

I hope you have understood about the necessity of traffic shaping. In this post, I am going to explain about the VMware's Traffic shaping policies. Which can be configured at standard switch, Standard Port Group, Distributed PortGroup and Distributed port.The main difference between the traffic shaping policy on Standard Switch and Distributed switch is ESX/ESXi host shapes outbound traffic traffic on Standard switches whereas  both Incoming and outgoing traffic shaping can be achieved using vSphere distributed switches.

Standard Switch = Outgoing Traffic Shaping (Egress Traffic Shaping)


Distributed Switch = Incoming + Outgoing Traffic shaping (Ingress + Egress Traffic Shaping)

Average Bandwidth:

This will be specified in Kbit/s. This option controls the number of bits per second to allow across a port,averaged over time. Specified value is the allowed average load on the PortGroup.

Peak Bandwidth:

This will be specified in Kbit/s. This option controls the maximum number of bits per second to allow across a portGroup .Value Specified in the peak bandwidth option is maximum value in Kbit/s that portGroup can handle. Peak bandwidth should never be smaller than the average bandwidth.

Burst Size:

This will be specified in KB. This is Maximum number of bytes to allow in a burst. Let's say, If you have configured Burst size parameter, Port Group might gain the burst bonus if it is not at all using all its allocated bandwidth on the port Group. During Peak time, When the same port group needs more bandwidth than value specified in the Average bandwidth. It will be allowed temporarily to transmit data at higher speed if port group has burst bonus. It is nothing but the factor which defines how long the bandwidth can exceed the average.

Excellent Diagram from LucD explaining the Traffic Shaping policies.


I believe This is informative for you. Thanks for Reading !!!. Be Social and Share it in social media if you feel worth sharing it.

vSphere Distributed Switch Part 18 - Configuring dVPortGrouP VLAN Policy

$
0
0


In this post i am going to explain how to configure VLAN policy at distributed port Group. This VLAN ploicy can also be configured at distributed port, Uplink PortGroup and Uplink Port level.  I have explained different types of VLAN's available with distributed portGroup along with the detailed explanation about different types of VLAN tagging like External Switch Tagging(EST), Virtual Switch Tagging (VST) and Virtual Guest Tagging (VGT).

VLAN type = None:

Configure VLAN type as None, If you are not using VLAN's or In case of External switch Tagging. I have explained about External switch tagging in my one of the blog post " VLAN Tagging : VST,EST & VGT on VMware vSphere". For better understanding i am recollecting the concepts of VLAN tagging here.


External Switch Tagging (EST)
1  In EST, ESX host doesn't see any vlan tags and does not handle any VLAN tagging.
2  All the tagging operation is done by physical switch and virtual switch is not aware about that.
3  Number of physical nics = no of VLANs connected to ESX
4.Port groups on the Virtual switch of ESX server need not to be configured with the VLAN number or configure VLAN ID 0 (if it is not native VLAN)
5  Count of NICS and cable connected to ESX is more as compared to VST approach.
6  The physical switch port connecting the uplink from the ESX should be configured as Access port assigned to specific VLAN.
7  virtual machine network Packet is delivered to physical switch without any tagging operation performed by the virtual switch.

Below are the examples of External Switch tagging. Each Port group is not tagged with VLAN iD.

VLAN type = VLAN

Tag your network traffic with the VLAN ID. Enter the number between 1 and 4094 for the Virtual Switch Tagging (VST) and Type VLAN number as 4095 for Virtual Guest Tagging(VGT)


 Virtual Switch Tagging (VST)

1. VST uses 802.1q VLAN trunks and tagged traffic.
2 VLAN tagging for all packets is performed by the Virtual Switch before leaving the ESX/ESXI host
3 Port groups on the Virtual switch of ESX server should be configured with VLAN ID (1-4094)
4 vSwitch responsibility is  to strip off the vlan tag and send packet to virtual machine in corresponding port group.
5 Reduces the number of Physical nics on the server by running all the VLANs over one physical nic. Better solution would be keep 2 nics for redundancy.
6.Reduces number of cables from ESX server to physical switch.
7 The physical switch port connecting the uplink from the ESX should be configured as Trunk port.
8 virtual machine network Packet is delivered to vSwitch and before it is sent to physical switch the packet is tagged with vlan id according to the port group membership of originating virtual machine.


Virtual Guest Tagging (VGT)

1. you must install 8021.Q VLAN trunking driver inside virtual machine guest operating system.
2 All the VLAN tagging is performed by the virtual machine with use of trunking driver in the guest.
3 VLAN tags are understandable only between the virtual machine and external switch when frames are passed to/from virtual switches.
4 Virtual Switch will not be involved or aware of this operation. vSwitch only forwards the packets from Virtual machine to physical switch and will not perform any operation.
5 Port group of the virtual machine should be configured with VLAN ID 4095
6 The physical switch port connecting the uplink from the ESX should be configured as Trunk port


VLAN Type = VLAN Trunking

Configure the VLAN ID within the VLAN trunk range. Multiple ranges and individual VLANs can be used by entering as comma-separated list. This option should be with Virtual Guest Tagging (VGT)


VLAN Type = Private VLAN

Associate the PortGroup traffic with a private VLAN. Private VLAN can only be created on the distributed switch. I will explain how to create PVLAN and uses cases of three different types of VLANs in my upcoming posts.


Below is comparison table for the people who want a comparison of different VLAN tagging types under single table


 I hope this is informative for you. Thanks for Reading!!!. Be Social and share it in social media. If you feel, Worth sharing it.

New VCP certfication :VCP550 based on vSphere 5.5 is available Now

$
0
0
It is been a great news that VMware have release new VCP certification VCP550 on January 22 2014. which is based out of vSphere 5.5.  We have already been testing and implementing lot of new features of vSphere 5.5 in our production and lab environment. It would be nice that you have a new certification which test your skills on vSphere 5.5. Let's get ready  for VCP (VMware Certified Professional) 550 (VCP550).

One more thing to notice is Even if you appear for VCP510(exam based on vSphere 5.0/5.1) or VCP 550 (exam based on vSphere 5.5), You will earn the certification called "VCP5-DCV"(VMware Certified Professional 5- Data Center Virtualization). It is upto to you to choose which version you want to test and proof your skills.


Your Certification can be achieved in Simple 3 Steps

1. Attend a mandatory VMware Authorized course

2. Gain hands-on experience with vSphere 5

3. Appear and pass the VCP5-DCV (VCP510 or VCP550) exam.

To appear for the certification VCP5-DCV based on VCP550, you need to first get authorization for the exam using the link Request for Authorization for VCP550. Review your details in the authorization form and click on submit to submit the request for authorization for this exam.
  • Allow up to 15 minutes for your authorization request to be processed 
  • You will receive an email with your authorization information from VMware within in the next hour.
  • Go to Pearson VUE testing site to schedule your exam.
  • Login using the name and Candidate ID.

Below is the overview from the Exam blue Print of VCP5-DCV (VCP 550)  Download the exam blue print for VCP5-DCV (VCP550)  for detailed items covered in each objective.

Section 1 – Plan, Install, Configure and Upgrade vCenter Server and VMware ESXi
Objective 1.1 – Identify and Explain vSphere Architecture and Solutions
Objective 1.2 -- Install and Configure vCenter Server
Objective 1.3 – Install and Configure VMware ESXi
Objective 1.4 – Plan and Perform Upgrades of vCenter Server and VMware ESXi
Objective 1.5 –Secure vCenter Server and ESXi

Section 2 – Plan and Configure vSphere Networking
Objective 2.1 – Configure vSphere Standard Switches
Objective 2.2 – Configure vSphere Distributed Switches
Objective 2.3 – Configure vSS and vDS Policies

Section 3 – Plan and Configure vSphere Storage
Objective 3.1 – Configure Shared Storage for vSphere
Objective 3.2 – Create and Configure VMFS and NFS Datastores

Section 4 – Deploy and Administer Virtual Machines and vApps
Objective 4.1 – Create and Deploy Virtual Machines
Objective 4.2 – Create and Deploy vApps
Objective 4.3 – Manage Virtual Machine Clones and Templates
Objective 4.4 – Administer Virtual Machines and vApps

Section 5 – Establish and Maintain Service Levels
Objective 5.1 – Create and Configure VMware Clusters
Objective 5.2 – Plan and Implement VMware Fault Tolerance
Objective 5.3 – Create and Administer Resource Pools
Objective 5.4 – Migrate Virtual Machines
Objective 5.5 – Backup and Restore Virtual Machines
Objective 5.6 – Patch and Update ESXi and Virtual Machines

Section 6 – Perform Basic Troubleshooting
Objective 6.1 – Perform Basic Troubleshooting for ESXi Hosts
Objective 6.2 – Perform Basic vSphere Network Troubleshooting
Objective 6.3 – Perform Basic vSphere Storage Troubleshooting
Objective 6.4 – Perform Basic Troubleshooting for HA/DRS Clusters and vMotion/Storage vMotion

Section 7 – Monitor a vSphere Implementation
Objective 7.1 – Monitor ESXi, vCenter Server and Virtual Machines
Objective 7.2 – Create and Administer vCenter Server Alarms
Objective 7.3 – Install, Configure and Administer vCenter Operations Manager

I hope this is informative for you. Let's ready to test our skills in vSphere 5.5. Be Social and Share it in Social media if you feel it is worth sharing it.

VMTurbo Released Operations Manager 4.5 with Storage and Fabric Control Module

$
0
0
First of all before going to talk about VMTurbo Operation Manager, VMwareArena Welcomes VMTurbo as a new Sponsor. On Jan 28,2014 -VMTurbo released its new version version of Operation manager which is Operations manager version 4.5. VMTurbo's Operation manager continuously analyzes the real-time performance, resource capacity, Service level priorities and System constraints across your virtualized environment to determine, implement and adjust resource configurations and workload placements. VMTurbo's Operations Manager support various virtualization platforms including VMware,Citrix, Microsoft and RedHat.

VMTurbo Operations Manager integrates with Microsoft VMM (SCVMM) which allows you to manage the inventory of Hyper-V hosts and VM's.


Below are the Few of the New features which are available as part of Operations Manager 4.5

VMTurbo Storage Control Module

Storage Control Module supports advanced features such as NetApp Clustered Data ONTAP (Cluster mode) and FlexPod. This Module helps users to solve their Storage Performance problems, Cost Challenges by enabling the efficient use of storage infrastructure by preventing unnecessary  storage provisioning.


VMTurbo Fabric Control Module

Fabric Control Module supports Cisco UCS fabric. which helps to identify the right amount of blades for the current workload in your environment so that, you can provision more or less as needed for your current workload. It helps your to reduce the hardware cost based on workload identified So, blades can be provisioned or decommissioned on demand. This Fabric Control Module also controls the number of Ports on the NICs which allows to provision the correct amount of bandwidth from the fabric interconnect. This Module simply ensures that your workloads get the perfect compute and network resources to get the reliable performance by utilizing the underlying blades and Ports


Apart from the above 2 New Modules, there are many key improvements to Operation Manger foundation features like Supply chain management, ROI Report, Workload summary, lot of reporting and capacity dashboard.


Download Your Free Trail of  VMTurbo Operation Manger 4.5 Now


I Hope this is informative for you. Thanks for Reading and Share it in Social media, if you feel Worth sharing it.
Viewing all 326 articles
Browse latest View live


Latest Images

<script src="https://jsc.adskeeper.com/r/s/rssing.com.1596347.js" async> </script>