Quantcast
Channel: VMware Arena
Viewing all 326 articles
Browse latest View live

Redhat Linux Virtual Machine file system become read-only

$
0
0
Redhat Linux virtual machine running in VMware platform continuously facing issue of file system becomes read only mode and avoids the write operations at file system level . It leads to the application downtime. We need to reboot the server always to fix the issues. This issue is caused due to the temporary disconnection to storage disks. As per Redhat article ,When a storage failure occurs at the VMware Hypervisor level, It may takes longer sometime than the actual SCSI timeout to expire. If the SCSI timeout occurs before the storage becomes available to esx host, which might make the linux file system to read only. If the failover occurs before the timeout, everything will continue as normal without any issue to virtual machines. This behavior was hugely experienced from Linux virtual machines but windows virtual machines will not go into read only mode.You may see filesystem retries (scsi bus resets) in windows event logs.

We may also see VMkernel logs a lot of SCSI reservation conflicts error, If storage is slow or any other underlying issue with Storage.

Jan 19 21:08:33 esx-server-xxx vmkernel: 401:11:11:15.287 cpu0:1043)WARNING: SCSI: 119: Failing I/O due to too many reservation conflicts
Jan  19 21:08:33 esx-server-xxx vmkernel: 401:11:11:15.287 cpu0:1043)WARNING: FS3: 4784: Reservation error: SCSI reservation conflict
Jan  19 21:08:34 esx-server-xxx vmkernel: 401:11:11:16.492 cpu0:1043)SCSI: vm 1043: 109: Sync CR at 64
Jan  19 21:08:35 esx-server-xxx vmkernel: 401:11:11:17.468 cpu0:1043)SCSI: vm 1043: 109: Sync CR at 48
Jan  19 21:08:36 esx-server-xxx vmkernel: 401:11:11:18.423 cpu2:1043)SCSI: vm 1043: 109: Sync CR at 32
Jan  19 21:08:37 esx-server-xxx vmkernel: 401:11:11:19.366 cpu0:1043)SCSI: vm 1043: 109: Sync CR at 16
Jan  19 21:08:38 esx-server-xxx vmkernel: 401:11:11:20.419 cpu0:1043)SCSI: vm 1043: 109: Sync CR at 0
Jan  19 21:08:38 esx-server-xxx vmkernel: 401:11:11:20.419 cpu0:1043)WARNING: SCSI: 119: Failing I/O due to too many reservation conflicts
Jan  19 21:08:38 esx-server-xxx vmkernel: 401:11:11:20.419 cpu0:1043)WARNING: FS3: 4784: Reservation error: SCSI reservation conflict

ESX uses SCSI reservations a locking mechanism to share a luns between ESX hosts. These reservations are released when any of the activity mentioned below is completed. VMkernel regularly monitors for any aged reservations and it tries to release the aged lock. If another ESX hosts is using the lun actively, it can try to reclaim the lun or to place another reservation.This scsi reservations are needed to prevent any data corruption in environment where storage luns are shared between multiple esx hosts. whenever ESX host tries to update VMFS metadata, it puts the SCSI reservations on it. When multiple hosts try to reserve the same lun at same time, a reservation conflict occurs. If the number of reservations conflicts is to big then ESX will fail the I/O.SCSI reservation errors can be a sign of san latency failures.

Resolution

Below Steps may or may not resolve your issue but definitely below are the steps which we need to perform in order to understand the root cause better. If you are continuously facing these behavior in Linux virtual machines, you can try the below steps  :

1. Verify VMware tools are up to date.
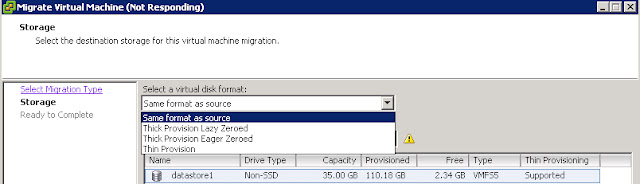
2. Migrate the affected virtual machine to other datastore and monitors the virtual machine. If issue doesn't reappears , It could be problem with the storage. Engage the storage vendor.
2.  Even after the storage migration, if issue reoccurs .Update the Linux kernel to the latest version
3. Increase the SCSI timeout of each disk presented from VMWare as per the Redhat Linux article.

Perform the above steps to few of the affected Linux virtual machines and continuously monitors the Virtual machines for the reoccurring of the issue. if the issue reoccurs, then follow the below steps:

1. Reboot the ESX server
2. Perform the LUN reset using the below command

    vmkfstools -L lunreset /vmfs/devices/disks/device_ID

3. Reboot the storage processor.

4. Delete the affected Datastore from ESX and also destroy the LUN from storage end. Recreate the array and present it to the ESX servers then create the new datastore and place the virtual machines on it and monitor the virtual machines.

Above mentioned steps are the initial steps for troubleshooting. Which may or may not fix your issue.Below are the list of article which discuss about the same behavior.

http://communities.vmware.com/thread/58081

http://kb.vmware.com/kb/51306

https://access.redhat.com/site/solutions/21374

http://kb.vmware.com/selfservice/microsites/search.do?language=en_US&cmd=displayKC&externalId=1005009

http://kb.vmware.com/selfservice/microsites/search.do?language=en_US&cmd=displayKC&externalId=1018675

http://www.ntpro.nl/blog/archives/1638-New-in-esxtop-SCSI-Reservation-Conflicts-per-second-Revisited.html

Thanks for Reading !!!!


VCP 5 -Practise Test1

VCP5-Practise Test 2

VCP 5 - Practise Test 3

VCP 5 Practise Test 4

50 % offer for VMware Certifications

$
0
0

It's been a definitely good news for the VMware aspirants who are looking to write the VMware certifications like VCP & VCAP. VMware Announces 50 % offer for the below mentioned list of VMware certifications. As per VMware mylearn post,  This offer is  only valid until 30 August 2013 and is applicable to Australia, New Zealand, China, Hong Kong, Taiwan, India, and Korea only. This offer has been provided to most of the latest versions of VMware certifications including VCP & VCAP certifications. Basically this kind of offers where only declared by VMware during VMworld sessions. It is really the right time to register for your certification now with this wonderful offer. Usually discounts are provided in voucher code but this offer only be availed by sending an email with the below information mentioned.


50% offer is only applicable to the below list of VMware certifications


  1. Infrastructure as a Service (IaaS)
  2. VCP5-Data Center Virtualization
  3. VCP-Cloud
  4. VCP5-Desktop
  5. VCAP5-Data Center Design
  6. VCAP5-Data Center Administration
  7. VCAP-Desktop Design

To avail this offer,  You need to send an email to  apjeducation@vmware.com with the subject header, PEXOT50  
with the below information in the email:

Name
Contact Tel
Company
Job Role
If you have plans to achieve VMware certification, please indicate the certification.

Why are you waiting for? Go ahead and book your slots for your favorite VMware certifications.Thanks for Reading !!!. 

Please Refer my below post for VCP Practise test


VMware vCenter Hardbeat Installation -Part1

VMware vCenter Heartbeat Installation - Part 2


VMware vCenter Heartbeat Installation - Part 3

VMware vCenter Heartbeat Installation - Part 4

Free White Paper : The Top 5 Barriers to Virtualization

$
0
0


Given the proven benefits of implementing a virtualized IT infrastructure, what hurdles are slowing down the virtualization adoption rate and keeping organizations from implementing the technology on production servers. This Paper provides the list of top 5 Barriers to the virtualization.


 Download your Free Copy of this White Paper

Sing-up with your details or Login with your Linkedin Account to Download..

Free White Paper :Consolidation Without Compromise

$
0
0

Discover a major motivation for organizations to embrace virtualization is the tremendous degree of consolidation it enables.Less infrastructure not only reduces equipment costs, it lowers the demand for precious data center resources such as power and cooling. It also helps to cut range of operational expenses and improve IT agility. Virtual Application Delivery Controllers (ADC) promise to extend the benefits of virtualization into the core of the networking infrastructure. Find out more about these platforms, and how they can help to improve the efficiency of your virtualized data center.


Download your Free copy this White Paper

Sing-up with your details or Login with your Linkedin Account


MAC Address Binding in VMware Virtual Machine

$
0
0
There are Many applications in which license keys are based on the MAC address of the Server. This can be easily achievable in Physical servers. MAC won't change frequently until there is no change with the server hardware.Achieving this in virtual Machine is bit tricky because there are many chances MAC address will change, if the location of the virtual machine changes or If you have a plan to convert a physical server to virtual server using P2V. In that scenarios, Virtual Machine MAC address will change and it will affect the application functionality due to license assignment with old MAC address. MAC address can be bind with the windows operating system using the below method.

1. Log in to your windows server and open up Network connection properties using ncpa.cpl or Open the Device Manager. Click Start > Control Panel > Administrative Tools > Computer Management > Device Manager > Expand Network adapter
-->


2. Right-click on your Virtual Network adapter and select properties.

3. Click on configure and select Advanced Tab

4. Select Locally Administered Address from the Properties.

5. Select the Value and Enter the  value for the MAC Address.


7. click on Ok to bind the MAC address to the Network adapter.

8. Restart the virtual Machine.

9. Ensure that MAC Address Changes & Forged Transmits are set to Accept in your Virtual Switch security policies.

Now we have bind the MAC address to the Virtual Machine Network adapter. It will be always assigned with the MAC Address. We not need to worry about any migrations which may change your MAC Address.

Thanks for Reading !!!!

Enable Change Block Tracking (CBT) for VMware Virtual Machine

$
0
0
Change Block Tracking (CBT) is a feature of VMware that helps to perform incremental backups for the virtual machines. There are many backup software's including VMware Data Recovery and HP data protector etc uses this technology to take incremental backups of the virtual machine.Change Block Tracking helps the virtual machines can track disk sectors that have changed.

Virtual disk blocks are tracked in the virtualization layer and virtual machines are not aware about this disk block tracking. When backup software perform the backup of the virtual machine, it will request the transfer of only the blocks that changed since the last incremental backup.
The CBT feature can be accessed by third-party backup applications as part of vStorage APIs. Backup applications can use the API to query the VMkernel to return the data block information that have changed since the last backup. Virtual Machine disk can be of any type thick or thin provisioned disk.

Prerequisites to Enable CBT on the virtual Machine

1. ESX/ESX host must be version 4.0 or later
2. VM hardware version should be 7 or later
3. All type of Virtual disk(Thick,thin and RDM virtual compatibility Mode) but RDM in Physical Compatibility mode is not supported.
4.No existing snapshot available for the virtual Machine
5.Virtual Machine should be in Power off state.


How to Enable Change Block Tracking for Virtual Machine

1. Connect to your ESX/ESXi host or vCenter server using vSphere Client
2.Select a virtual Machine which is in powered off state to enable CBT
3. Right-Click the virtual Machine and select Edit Settings
4. Click on Options  tab and Select General
5. Click on Configuration Parameters


6.Click Add row and Enter the Below value
      ctkEnabled = "TRUE" 


7. For each virtual disk in your virtual Machine, add the below entry

     scsix:x.ctkEnabled = "TRUE"

 SCSi#:#.ctkEnabled where # signs should be replaced with the controller and disk number of the disk. For example My Virtual Machine "win2k3-prod" has 2 virtual disk (VMDK) in the same controller. So i have to add the 2 entries which is matching to my controller number and disk number


scsi0:0.ctkEnabled = "TRUE"
scsi0:1.ctkEnabled = "TRUE"


8. Click Ok to enable the CBT for the virtual Machine.

Enable Drag and Drop in VMware Workstation

$
0
0
Nowadays lot of administrators have running their own lab environment within their laptop and desktop. VMware Workstation makes this feasible with cheap cost without need of dedicated system or OS to run the lab environment. We all are busy in testing lot of features in our VMware workstation lab environment. We may need to transfer lot of files or just need to copy and paste the quick commands from your laptop to your workstation virtual machine but when it is not possible we may need to manually type or  use some other operating system file transfer method to bring the file inside the VMware Workstation virtual Machine.

How do you feel, if your files or your command can be placed with simple drag and drop or just a copy paste between your laptop windows OS and your VMware Workstation windows virtual Machine? Life is Easy rite?. This posts explains you to enable copy/paste, Drag and Drop between your Laptop or desktop OS and your Workstation Virtual Machine Windows Guest OS. You can Drag and drop any individual files or folders.When you drag a file or folder from the Laptop or desktop to VMware Workstation virtual machine or vice versa , Workstation copies the file or folder to the location where you drop the file or folder.

Enable Copy/Paste & Drag and Drop for VMware Workstation Virtual Machine

1. Open your VMware Workstation
2. Select your Virtual Machine
3. Click Edit Virtual Machine settings
4.Click Option Tab and Select Guest Isolation
5. Select "Enable drag and drop" and "Enable Copy and Paste" check mark


6.Click Ok to apply the settings.

Now, you will be able to Copy/Paste, drag and drop the files between your host and virtual machine.

Thanks for Reading !!!!!

Convert VMware VMDK disk format Thin to Thick

$
0
0
Provisioning Virtual Machine with the given requirement is a simple task but if any requirement to change the configuration of provisioned virtual Machine in future would be bit complex task. Let's take an example you have been given a task to create a virtual Machine with one VMDK disk of thin provisioned format.You have completed the build as per the requirement. After few months or later, management wants an different requirement for the same VM. This time they want the provisioned virtual Machine disk to be converted to Thick provisioned.

Converting a virtual Machine disk format from thick to thin or thin to thick can be performed using the below methods. Both methods are applicable in different scenario. Change the disk format using storage vMotion if you have multiple datastores connected to your ESXi host and another option is to use Inflate option available from vSphere 5 to convert the disk format without the need of storage vMotion of the virtual Machines.


Convert disk format using Storage vMotion

1.Shut-down or power off the virtual Machine

2.Right-Click the virtual Machine and select Migrate

3.Select a datastore  to migrate the virtual machine other than the current datastore.

4.Select Thin provision virtual disk format from the drop-down option in select a virtual disk format


5.Click Next and Finish to complete the migration and disk format change.


Convert disk format using Inflate option 

1.Shut-down or power off the virtual Machine

2.Verify the current disk format of the virtual Machine by Right-click on the virtual machine- > Edit settings -> select the hardisk and verify the current disk format


3.Click on the summary tab of the virtual Machine

4. Right-click on the datastore and select Browse Datastore

5.Open the virtual Machine directory

6.Right-click the .VMDK file and select Inflate. It takes few minutes to completed the disk format change depend on the size of the disk


7.Verify the current disk format of the virtual Machine after the Inflate option completed successful by Right-click on the virtual machine- > Edit settings -> select the hardisk and verify the current disk format


Thanks for Reading !!!!

vSphere 5.1 -Features of VM Hardware Version 9

$
0
0
From vSphere 5.1 and with your VM hardware version 9, You Virtual Machines are More powerfull as like the high-end physical servers with more computing power. With the release of vSphere 5.1, You can upgrade or create your VM Hardware version to 9 to utilize the new features.Let's take a look at the new features availbale as part of VM  Hardware Version 9.

Features of VM hardware Version 9


1. Processor supports upto 64 vCPUs Per Virtual Machine which was 32 vCPU in vSphere 5.0

2.RAM supports upto 1 TB which is same as vSphere 5

3.Improved 3D Graphics supports which is suitable to run the graphics intensive applications like CAD, imaging in VMware virtual Machine

4. Reclaim Storage Space from the deleted files. This feature is only available for Vmware view. This can be achieved by creating VMDK format of SEsparce VMDK format.

5.Virtual CPU performance Counters - This new features enables to leverage the performnace countres from inside the Guest Operating system. 

6.Virtualized Hardware Virtualization(VHV) - this feature helps to run the workloads with better performance. It is improved virtualization of the CPU

7. VMware tools upgrade don't require reboot

   Upgrading to VMware Tools to version 5.1 requires Reboot

   Upgrading beyond VMware Tools version 5.1, Reboot is not required.

vSphere 5.1 - Understanding VMware Virtual Machine Compatibility

$
0
0
With release of vSphere 5.1, You will be able to create a virtual Machine with Hardware version 9. So that you can utilize the new features of VM hardware Version 9 . VM hardware version is named as VM compatibility in vSphere Web Client. When you are creating a Virtual Machine in vSphere Web client , You will be provided with the 4 options to create a Virtual Machine Compatibility.Below are the 4 Compatibility Levels. If you choose a VM hardware version 7, This virtual Machine can be run on the ESX 4, ESXi 5.0 and ESXi 5.1 but it cannot be run on the older version of ESX/ESXi hosts like 3.0 and 3.5.


ESX 3.x and later (VM version 4)

This Virtual Machine (VM version 4) is also compatible with ESXi 4.x, ESXi 5.0 and ESXi 5.1. Some Virtual Machine hardware features are unavailable with this option.


ESX 4.X and later (VM Version 7)

This Virtual Machine (VM version 7) is also compatible with ESXi 5.0 and ESXi 5.1. Some Virtual Machine hardware features are unavailable with this option.


ESX 5.0 and later (VM Version 8)

This Virtual Machine (VM version 8) is also compatible with  ESXi 5.1. Some Virtual Machine hardware features are unavailable with this option.


ESX 5.1 and later (VM version 9)

This Virtual Machine (VM version 9) provides the best performance and latest version features in ESXi 5.1

Thanks for Reading !!!!

vSphere 5.1 -Unable to create VM with Hardware Version 9 in vSphere Client

$
0
0
With the release of vSphere 5.1, You can create a virtual machine with hardware version 9 . You can create Virtual machine hardware version 9 in the ESXi 5.1 host. It is strange that i am unable to create a virtual machine with hardware version 9 in the ESXi 5.1 host when i am performing it via vSphere Client. Then Finally, I confirms that you can only create VM with hardware version 9 from vSphere web client. Below is the comparison of screenshot for virtual machine creation on the same ESXi 5.1 host from vSphere client and  also from vSphere Web client.


vSphere Client only gives the option create the virtual machine with below three VM hardware version

Virtual Machine Version:4
Virtual Machine Version:7
Virtual Machine Version:8


vSphere Web client gives the option to create the VM hardware version 9 on the same ESXi host.

ESX 3.x and later (VM Version 4)
ESX 4.x and later (VM Version 7)
ESX 5.x and later (VM Version 8)
ESX 5.x and later (VM Version 9)


If you don't have a vSphere Web client in your environment. As a workaround, you can create a virtual Machine with VM hardware version 8 and later you can upgrade the VM hardware to version 9 using vSphere client. vSphere client will not allow us to create VM hardware version 9 but it will allow us to upgrade the VM hardware version to 9.


Workaround

1. Create a virtual Machine with VM hardware version 8.

2. Once VM is created, Make sure VM is powered-off

3. Right-click the virtual Machine

4.Upgrade VM hardware and click Ok for the warning message

5. VM hardware upgrade will complete and verify the hardware version is upgraded to version 9 in vSphere client.


Thanks for Reading !!!!!

vSphere 5.1 -Scheduling Virtual Machine hardware Upgrade

$
0
0
With vSphere 5.1, Virtual Machine hardware version is referred as VM compatibility in vSphere Web Client. You can upgrade the VM compatibility from the older version to latest version that is VM hardware Version 9. In previous versions of vSphere, you need to get an decicated downtime to perform VM hardware upgrade.As of vSphere 5.1,You don't need to get an downtime for the virtual machine to perform the virtual machine hardware version upgrade.

With vSphere 5.1, You have option to schedule the hardware upgrade. If it is scheduled, The hardware upgrade to the selected version will be done during the next reboot of the virtual machine. Even you have additional control to perform the VM hardware version upgrade only during the only during normal guest shutdown. So that, you can make sure VM hardware was not upgraded during VM down due to some other issues.


Steps to schedule a VM compatibility upgrade from vSphere Web Client

1. Login to your vCenter server using vSphere Web Client

2. Browse towards your virtual Machine in the inventory

3.Right-click your VM and click on All vCenter Actions

4. Click on Compatibility and select "Schedule VM compatibility Upgrade"


5. Select the Compatibility version from the drop-down list to upgrade to

6. Select the check mark "only upgrade after normal Guest OS shutdown"


7.Click ok to schedule the upgrade.

The above step can also be performed via Virtual Machine Edit settings

Right-Click the VM -> Edit settings ->Virtual Hardware -> Upgrade


VM hardware upgrade will be completed during the VM next reboot.

Thanks for Reading !!!!!
Viewing all 326 articles
Browse latest View live


Latest Images

<script src="https://jsc.adskeeper.com/r/s/rssing.com.1596347.js" async> </script>