Quantcast
Channel: VMware Arena
Viewing all 326 articles
Browse latest View live

vSphere 5.5 - Virtual SAN (VSAN)

$
0
0
This post is going to give you the brief overview about the Virtual SAN (VSAN) feature available as part of vSphere 5.5. VSAN is the new VMware's storage solution  which is fully integrated with vSphere. It automatically aggregates the ESXi servers local disks and provide them as a  shared storage for the ESXi hosts participating in the VSAN cluster.. It is an object-based storage system and a platform for VM Storage Policies designed to simplify virtual machine storage placement decisions for vSphere administrators. VSAN is fully integrated with the vSphere features such as HA, DRS and VMware vMotion.


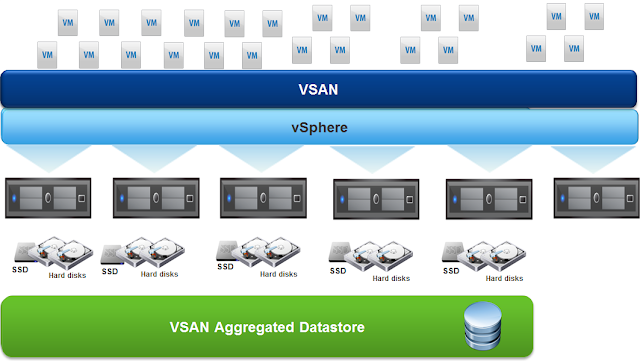
Graphic Thanks to Wahlnetwork.com

Typically all ESXi host participated in VSAN cluster will contribute disks to create a shared datastore which are presented to all hosts . Each ESXi host participating in the VSAN cluster will  require atleast one SSD and one magnetic disk. As of now beta release of VSAN enabled cluster is limited to 8 Hosts including the hosts which are not contributing the disks to VSAN datastore.


Below are the Some of the requirements to configure Virtual SAN (VSAN)

1.VMware vCenter Server version 5.5 is required to create VSAN.

2. Minimum 3 ESXi hosts which has local storage is required to create VSAN cluster

3.Each vSphere host participating in the VSAN cluster requires a disk controller. This can be a SAS/SATA host bus adapter (HBA) or a RAID controller.

4.Each vSphere host participating in the VSAN cluster must have at least one HDD and one SSD

5.Each vSphere host must have at least one network interface card (NIC) and VSAN is supported on both the VMware vSphere Distributed Switch(VDS) and the vSphere Standard Switch
(VSS)

6.VMkernel Port for VSAN communication must be created on each of the vSphere hosts to participate in the VSAN cluster.

Below is the excellent video from VMware for set up Virtual SAN (VSAN)


I believe this post is informative for you to understand vSphere 5.5 Virtual SAN (VSAN). Thanks for reading !!!

VMware Revert from Snapshot Error "Trust Relationship between Workstation and Domain Failed"

$
0
0
I hope this post will be really useful for the administrators who are playing up with the Homelab and development servers by testing the lot of new features. Usually In my lab environment, I will regularly take snapshot of my virtual machines running on ESXi hosts because it saves lot of time to restore to my working snapshots instead of troubleshooting the boot up issues by wasting time. Snapshots helps me to restore to my previous point which i have worked earlier day. Snapshots also helps me to restore to previous state of my working virtual machine incase if it is corrupted by any software installation.


Mostly i have faced an issue when restoring my windows domain machine to previous snapshot which was taken before 30 days. Why i am insisting the number 30 here. let me explain.By default every 30 days Active Directory server will change the machine key for  each its domain members.So when you restore the snapshot which is older than 30 days , trust relation between workstation and domains fails. In production environment, you may have follow the different steps by removing the server from domain and rejoin can be solution but in lab environment, security is not an important concern. The process of rejoin the lab servers to domain will be time consuming and it lead to waste your spare time which you are spending for your lab servers. Below is the fix for the issue. Please ensure the below steps are only recommended for test and development environment. Performing this step in production definitely will be a security issue

1. Login to your domain Controller Server

2.Select Start -> Administrative Tools -> Group Policy Management

3.In the Group Policy Management console, Right-click on your Default Domain Policy if you don't have any specific OU created for your Test and Development servers  and click on Edit


4.Browse towards Computer Configuration-> Windows Settings ->Security Settings ->Local Policies -> Security Options and select the policy Domain member:Maximum machine account password age and Edit the Policy. By default it is 30 days, Click on the check box Define this policy settings and type 999 which is the maximum allowed value.

Domain member:Maximum machine account password age and Edit the Policy  =999


5.Edit the policy Domain Member:Disable machine account password changes by selecting the check box Define this policy settings and select Enabled. By default ,which is Disabled.

Domain Member:Disable machine account password changes = Enabled


6.Along with above 2 group policy you may also restrict the machine account password changes using an another group policy "Computer Configuration-> Windows Settings ->Security Settings ->Local Policies -> Security Options" and Select Domain Controller:Refuse machine account password changes. Select the check box "Define this policy and Select Enabled. By default, which is disabled.

Domain Controller:Refuse machine account password changes = Enabled


7. Run the command “gpupdate /force” on all servers where the change is required to forcibly get updated with applied group policy.

All set.!!. You are unlocked from your Trust relation issue when restoring from the snapshot.I believe this is informative for you. Thanks for reading !!! 

Login to the query service failed error for Inventory Search after Upgrading to vCenter 5.1

$
0
0
A day has arrived to upgrade our vCenter server from vCenter 5.0 to vCenter 5.1. During Off hours, Upgrade went smoothly and we were happy to leave for the day without any issues. Next day morning, Proudly logged into my new upgrade vCenter server and going through my inventory. I have searched one of the Virtual Machines from my vCenter inventory. Entered the virtual Machine name in the search bar and hit Enter to get the search results and i was shocked by the below error message

Error when trying to sort : Login to query service failed: The underlying connection was closed: An unexpected error occurred on a send. Authentication failed because the remote party has closed the transport stream


I understood that this error message is only occurred when tried connecting to my vCenter server using vSphere client  installed on Windows 2003 server but i am not getting above error when i perform inventory search in Windows 2008 and above server versions.

This issue occurs due to increased security of the cipher strengths used by the VMware Management Web Services components. This change was introduced in vSphere 5.1. Host operating system where you are trying to connect to these components should support a higher cipher strength.

In windows Vista and Windows Server 2008, the proper cipher strengths are built into the operating system itself but for older version of windows operating systems, A Microsoft hotfix must be applied to the system to support the required cipher strengths

Download the hotfix (KB948963) and install on the System(windows 2003) from where you want to connect to vCenter server using vSphere client. Thats it. Now you are free to search to inventory objects using your vCenter server inventory search

.I hope this post is informative for all. This post written by referring the VMware KB article 2031053 . Thanks for Reading !!!

Upgrade VMware VM Hardware Version without losing Network settings

$
0
0
This post is  to share you with the tip to upgrade your virtual machine VM hardware version without losing the Network adapter static IP settings. I believe we are always almost in the work of doing P2v migration, v2v migration and Upgradation of ESX/ ESXi host to newer version  Upgrade from vSphere 5.0 to vSphere 5.1. May be sooner will be upgrade from vSphere 5.1 to vSphere 5.5. All the above mentioned tasks will provide us with the option of Virtual Machine VM hardware version to latest to utilize the new features available as part of the newer vSphere releases..

Mostly i have seen the problem that after upgrading the VM hardware version , we will lose network adapter IP settings and we have to manually reconfigure the network adapter settings including Static IP Address, DNS information. This  issue may occur because Virtual network card configured with the virtual machine is moved to a different position on the virtual PCI bus as part of VM hardware upgrade. The guest operating system treats this movement of existing virtual network card as new hardware device.

VMUpgradeHelper helps us to perform the VM upgrade version version to latest without losing the Network adapter settings .

VMUpgradeHelper service allows you to save the current virtual network adapter configuration to the registry  and also allows you to restore the previously saved network adapter configuration by overwriting the current configuration of Virtual network adapter.

VMUpgradeHelper saves and restores the following information's:

1.IPv4/IPv6 network address, Subnet masks,default gateway and cost metrics

2.DHCP state

3.DNS domain name, DNS search order list and Register this connection's address in DNS settings

NOTE: It will not take backup of Wins and NETBIOS settings.

Follow the below procedures to upgrade VM hardware version without losing network adapter settings

1. Login to the Virtual Machine with administrative credentials

2. Open the Command prompt and browse towards the installation location of VMware tools
(C:\Program Files\VMware\VMware Tools)

3.Save the network adapter configuration using one of the below command. VMUpgradeHeler tool will have .bat extension in the latest version of VMware tools and usage of the command which is same as .exe version.

VMUpgradeHelper.exe /s
VMUpgradeHelper.bat /s


The above command saves the network configuration into registry

HKEY_LOCAL_MACHINE\SOFTWARE\VMware, Inc.\VMware Tools\VMUpgradeHelper\Adapters\


4. Power off the Virtual Machine and Upgrade the VM hardware version. (Ensure that you have upgraded VMware tools to latest version before upgrading VM hardware version)


5,Power on the Virtual Machine and Login back with administrative credentials

6. Open the Command prompt and browse towards the installation location of VMware tools
(C:\Program Files\VMware\VMware Tools)

7.Execute the below command to restore the virtual machine network configuration

VMUpgradeHelper.exe /r
VMUpgradeHelper.bat /r


8,Verify the network settings are restore back and log off the virtual machine.

I hope this is informative for you. Thanks for reading !!!

Capture Network Traffic for ESXi host using TCPDUMP

$
0
0
This post explains you to capture the network traces of ESXi host using tcpdump utility.In most case during network issues or troubleshooting purposes, It might be useful to perform a tcpdump on the ESXi host. tcpdump-uw command is based on standard tcpdump utility. tcpdump command captures the network traces from the network interface perspective.

You may need decide first in which network interface you need to capture the network traces of ESXi host. Identify the list of VMkernel network adapters using the below command

esxcfg-vmknic -l


Capture default first 68 bytes using tcpdump

tcpdump-uw command with -i option  can be used to display the packets on the VMkernel interface. Let's choose vmk1 for our example.

tcpdump-uw -i vmk1


Capture entire packet using tcpdump

tcpdump and tcpdump-uw command capture only the first 68 bytes of data from a packet by default. To capture the entire packet, tcpdump-uw need to be used with -s option.

Value of 1514 for normal traffic

tcpdump-uw -i vmk1 -s 1514

Value of 9014 if jumbo frames are enabled.

tcpdump-uw -i vmk1 -s 9014 -B 9


Capture packets with filters using tcpdump

 TCP switch with tcpdump-uw command can be used to display only the TCP packtes on VMk1

tcpdump-uw -i vmk1 -s 1514 tcp

Host option can be used with tcpdump-uw command to see traffic to/from only a single IP address

tcpdump-uw -i vmk1 -s 1514 host 192.168.0.20


Capture packets with verbose option

-vvv option can be used with tcpdump-uw command to display all packets on the vmk1 with verbose detail

tcpdump-uw -i vmk1 -s 1514 -vvv


Save the tcpdump inpcap format for later analysis

Output of the  tcpdump command can be saved in Pcap format and it can be used later with wireshark to analyse. Save the output with filename.pcap

tcpdump-uw -i vmk1 -s 1514 -w esxihost1.pcap


Limiting the log files using tcpdump

You can limit the log files to a specific number during the tcpdump capture using -W option.

tcpdump-uw -i vmk1 -s 1514 -C 50M -W 5 -w /var/esxihost1-capture.pcap

Above command creates 5 trace files of size 5MB each. This settings helps you to avoid run out of space on ESXi host due to packet capture.

I believe this is informative for you. Thanks for reading!!!

Free E-book from Veeam Backup - What's new in Windows Server 2012 R2 Preview

$
0
0
We all are already aware about Veeam Backup which is an #1 backup for Virtual Machines either in VMware or Hyper-V. Veeam backup rules the world of Virtual Machine backup and they continuously developing the product in each version to provide a complete enterprise backup product for your virtual environment. They didn't stopped in that only. Veeam backup continuously contributing towards towards the virtualization community by offer lot of free stuffs including training videos, tutorials and Free e-books. Which helps lot of administrator's to learn virtualization concepts with free of cost.

I have already written many posts about the free stuffs provided by Veeam. Being an VMware admin, I loved the Free study guide offered by Veeam bakup called  VCP5-DCV and VCAP5-DCA study guide. Again Veeam backup came with an excellent Free e-book called What's new in Windows Server 2012 R2 Preview. 83 pages of free e-book written Mike Resseler, Veeam Product Strategy Specialist.


Download E-book  What's new in Windows Server 2012 R2 Preview


Windows Server 2012 hasn’t been out too long and its successor is already in preview mode . While
many people say that this is just a service pack, it is a full featured R2 release . Windows Server 2012
R2 continues to build on the innovations that came with Windows Server 2012, and adds many
improvements and new features to Windows Server 2012 .This e-book will allow you to quickly discover the improvements and new features in Windows Server
2012 R2 Preview .

Below is the brief overview of chapters covered as part of this Free E-book.

Introduction
Chapter 1: File Services and Storage
Chapter 2: Networking
Chapter 3: Clustering
Chapter 4: Hyper-V
Chapter 6: Windows PowerShell
Chapter 7: Windows Deployment Services
Chapter 8: Directory services & security
Chapter 9: Features that are removed or deprecated
Chapter 10: Conclusion

I believe this is informative for you. Download the free e-books stuffs provided by Veeam backup and learn virtualization free of cost. Thanks for reading !!!

vSphere 5.5 - Upgrade to ESXi 5.5 via Command Line

$
0
0
vSphere 5.5 is publicly released and it is generally available to download for public. Ok, what would be the next step? Yes it is to evaluate the features of vSphere 5.5 by installing or Upgrading your ESXi 5.1 to ESXi 5.5. To help you on that, this post covers the step by step procedure to upgrade the ESXi 5.1 to ESXi 5.5 using command line.

You can upgrade to ESXi 5.5 hosts directly from ESXi 5.0 or ESXi 5.1 host and also in most cases you can migrate an ESX 4.x or upgrade ESXi 4.x host directly to ESXi 5.5.

The following ESX/ESXi 4.x and ESXi 5.0 versions are supported for upgrade to ESXi version 5.5:

ESX/ESXi 4.0.x (including all released updates and patches)
ESX/ESXi 4.1.x (including all released updates and patches)
ESXi 5.0.x (including all released updates and patches)
ESXi 5.1.x (including all released updates and patches)


We have already covered an another post Upgrade ESXi 5.1 to ESXi 5.5  inplace upgrade by attaching ISO image and perform step by step screen operations but this post covers the method of upgrading ESXi 5.5 to ESXi 5.5 via command line.

Procedure to upgrade from ESXi 5.1 to ESXi 5.5 via Command Line

1. Make sure your hardware and configuration is compatible to run ESXi 5.5. Verify your current ESXi version.


2 Migrate the Virtual Machines on the host to other ESXi host in the cluster using vMotion

3. Remove the SAN connections made to the host temporarily to avoid storage corruptions


5.Make sure your ESXi host have connection to internet to download and installer the ESXi 5.5 installer . If you are doing it directly via internet. (This post will cover this method of upgrade).

6.  Enable the Http client in ESXi firewall (outbound)using the below command

esxcli network firewall ruleset set -e true -r httpClient

7. Refresh the Firewall using the below command for the changes to take effect.

esxcli network firewall refresh

8. Verify the Http client is enabled on the firewall using the below command

esxcli network firewall ruleset list


9. Execute the below command to download and install the Update from VMware update site

esxcli software profile update -d https://hostupdate.vmware.com/software/VUM/PRODUCTION/main/vmw-depot-index.xml -p ESXi-5.5.0-1331820-standard


9. Upgrade process will take some time based on the speed of your internet and Once it is done You will get the below message

The Update Completed Successfully. but the system needs to be rebooted for the changes to be effective.
Reboot Required :true

10. Reboot the ESXi host and verify the upgarde version using the belwo command
vmware -l


That's it. !!! I believe this is informative for you.Thanks for reading !!!

How to Make your USB Flash drive Bootable

$
0
0
This post may be not related to VMware technology but it is really needed for the server admins and Datacenter technicians because there are many server models which will not come inbuild with CD/DVD drive. There are many situations like Upgrade, Repair or during troubleshooting situation in which you need boot your Server or Laptop  into Operation system installation image and you may run into trouble during the troubleshooting situation if your server or System don't have CD/DVD drive.

Below methods will guide you to how to make your USB flash drive bootable

1. First Download the UNettbootin installer for your Operating system
2. Keep your  Installer ISO image on your local drive
3.Attach you USB flash drive in your desktop/Laptop
4. Double-click on the downloaded UNetbootin.exe executable file


5.Once UNetbootin wizard is opened, Select the USB Drive under Type and select the Drive letter for the connected USB Flash drive.


6.Select ISO in the Diskimage drop-down and click on Browse button. As VMware Admin, I will always hold Some of the ESXi installer in my system . So i have selected my ESXi 5.1 ISO and click Open to attach the ISO image to UNetbootin. Click on OK to start the process.


7.It takes few minutes to complete the process to change your USB flash drive as bootable media.


After the all 4 steps below steps completed

A.Download Files
B.Extracting and copying files
C. Installing Bootloader
D. Installation complete

8.Attach your USB Flash drive to your server and boot the server using USB drive.. If you are trying to boot the Virtual Machine using  USB in Workstation. Follow the steps "Boot from a USB Flash Drive in VMware Workstation"

Thats it !!! You are now ready for your server upgrade or troubleshooting using your USB flash drive Thanks for Reading !!!

InfraDog Setup Part1 - Signup & Install InfraDog Mobile Application

$
0
0
InfraDog Server Admin for VMware really looks like a magic app for me. It allows you to manage and monitor your VMware environment just from your Android or IOS mobile phone with simple touches. I have already written an post about  the review of InfraDog app . This post i am going to explain you the step by step procedures which you need to follow to get this app ready to manage and monitor your VMware environment.

First Step is to signup for the Infradog account and Enter the below details and click on Create an account.


Once you have created an account. You will receive an email with the link to Infradog Registration confirmation. Click on the link received in your email inbox and Login with your email address and password which you have specified in the above step.


Once you have logged , You will be provided with the Getting started page which contains Video tutorial and software downloads.


Click on Either Download IOS App or Download Android APP based on your mobile phone. I have android phone So i have clicked on Download Android APP. It will redirect to to google play and which allows me to download the app for my android phone with the use of your google account and automatically installation will start on your android phone.


 Let me explain you the remaining steps in my upcoming posts.Thanks for Reading !!!

InfraDog Setup Part 2 - Install InfraDog Management Point on Windows

$
0
0
In our previous post InfraDog Setup Part1 - Signup & Install InfraDog Mobile Application, we have seen how to download and install Infradog Andriod app for your mobile. Next step will be be installation of Infradog Management point on your windows servers.In the download page, Click on Download either 32 bit or 64 bit Management point installer


Start the installation of Infradog Management point by double click on the InfraDog Management point installer. Follow the step by step Wizard instructions to complete the installation of Infradog Management point installation


Accept the End-User License Agreement and Click on Next


 Verify the Installation location for Infradog Management point and click on Next


 Click on Install to start the installation


 Select the checkbook Launch InfraDog Management Console and Click on Finsih


Once InfraDog Management Console is Opened, Login with your InfraDog Email account which you have specified in part 1 and enter the password . Click on Ok.


Once the Activation is Sucess, You will be provided with the Option to Add Local Computer to Managemenet point or Add Remote Devices to manage the devices from your Infradog Mobile application.Click on Close If you don't want to add any servers at this time.


I will explain you the step by step procedure to add ESXi host into Infradog Management point in Part3. Thanks for Reading !!!

InfraDog Setup Part 3 - Push VMware vCenter & ESXi host into your Mobile

$
0
0
In our Previous post  InfraDog Setup Part 2 - Install InfraDog Management Point on Windows, We have seen the step by step procedure to download and install InfraDog Management point installation on Windows. Now We have Installed Infradog app on Android Mobile and InfraDog Management point. Next step will be adding servers into Management point to be managed from your Mobile.

1. Open your InfraDog Management Console. Select VMware vCenter & Host in the left pane and Click on Add vCenter or Hosts


2.Select the check box VMware vCenter/Host and Click on Add button


3. Enter the vCenter or ESXi  hostname along with administrative credentials and click on Ok.


Click on Discover Now button and It will Discover the host. Once it is Discovered. Click o tab Push to Mobile 


Click on Yes to Confirm the selected Computers to push to Mobile.


Now, You can See the Push Status as Successful, once it is successfully pushed into your Android Mobile. 


Even you will receive an Email with the Server name if any of the Server is added to Management point.


We are done with the installations and also pushed our ESXi host into Mobile. Next step would be Using the Infradog Mobile app to Manage your VMware environment using your Android Phone. We will see how to use InfraDog app from your Android Phone in part 4.

InfraDog Setup Part 4 - Manage your VMware Environment from your Mobile

$
0
0
In our previous post "InfraDog Setup Part 3 - Push VMware vCenter & ESXi host into your Mobile", We have seen step by step procedure to push VMware vCenter and ESXi hosts into Mobile. Next step would be managing your VMware environment host and Virtual machines using InfraDog mobile app either from your IOS or Android phone.


Launch the InfraDog App from your Phone and Login with the InfraDog account.


Once You have logged in to your InfraDog account, You will be able to see the Windows servers, vCenter and ESXi host which was pushed into your mobile using InfraDog Management Console.


I Can see the ESXi host called " esxi-node1.lab.com" which was pushed into Mobile in my previous post "InfraDog Setup Part 3 - Push VMware vCenter & ESXi host into your Mobile"


Once i have selected the ESXi host called "esxi-node1.lab.com, I can see the System information like Build version, memory and CPU Configurations about that ESXi host


Even you can see the Number of Virtual machine running on the ESXi host . you will be able to Restart , shutdown and  even place your ESXi host into maintenance mode using InfraDog Mobileapp.


You can see the status of each virtual machines running on that esxi host "esxi-node1.lab.com. You can even perform individual task on each virtual machine by just placing your finger on  on that VM.


I have Select the virtual Machine called Win8. You will be able to see the status of the VM along with Uptime and all system related information (CPU, Memory, Storage usage, IP address, DNS name).


You will be able to Poweron , Powerofff, Reset and Migrate (vMotion) that VM to other host, if you have pushed your vCenter server into your mobile.


You can even take Console of your Virtual Machine. In the below screenshot, I took the console of My Windows 8 Virtual Machine.


If any of the host or server is down. You can monitor the status of your environment as similar to the below view.


If any servers went down in your environment, you will receive the InfraDog alert both on your Mobile and also to your configured Email address.


Really cool isn't it. I hope You will definitely feel the benefit of this app. Don't wait. Signup immediately and start managing your VMware environment just with your single finger. I hope this is informative for you. Thanks for Reading !!!

InfraDog Setup Part 5 - Manage vSphere 5.5 environment from your SmartPhone

$
0
0
I am ended up with upgrading my vSphere environment to vSphere 5.5. It was real nice experience upgrading my environment to the latest vSphere release and I can play around now with all new vSphere features. I didn't even noticed the alert which popped up on my mobile during my ESXi host upgrade stating that My ESXi host is not reachable from InfraDog . It was real awesome application which regularly notifies me with each host status in my environment.

Today i have completed my vSphere 5.5 upgrade and added my vCenter 5.5 and ESXi hosts which are managed by my vCenter server as part of InfraDog management. Let me explain you how to add your vCenter server to management point and push that into Mobile and also Manage it from your Mobile.


1. Open your InfraDog Management Console. Select VMware vCenter & Host in the left pane and Click on Add vCenter or Hosts


2..Select the check box VMware vCenter/Host and Click on Add button. Enter the vCenter name  hostname along with administrative credentials and click on Ok.


3. It detects the vCenter server along with the ESXi hosts managed under the vCenter 5.5. Select the checkbox for vCenter and click on Push to Mobile


Once it is pushed to mobile, I can see my ESXi hosts which are manged by my vCenter server.

Note down my vCenter and ESXi host version. It is vCenter 5.5.0 and ESXi 5.5.0. It is just awesome.

Thats it. I hope this is informative for you. Thanks for reading !!!

InfraDog - Perform VMware vMotion when you are travelling to your Picnic Spot

$
0
0
Think about this situation. you have a planned for a  picnic during the weekend and You have promised to your family about this outing  but your Boss asked you to perform a VMware vMotion of virtual machines in your VMware environment. Even you told about your outing plan but your boss is not agreed  due to resource scarcity. What you will do? You may have to carry your laptop along with your portable internet connection to the outing and perform the migration activity along with your family. Your family or kids will definitely don't like this. Another option is to cancel the outing plan and reschedule it to other weekend.

InfraDog will help you to perform VMware vMotion from your Mobile phone just in simple clicks. I have tested it my environment. Which is really awesome. I felt it is really faster and can be done within few simple touches. InfradDog did a Magic with this product. Let me explain you the step by step procedure how to perform vMotion from your  Andriod or IOS Mobile.

In Your Mobile Phone, Login to InfraDog application. Read my blog posts to understand  how to install and manage your VMware Environment form Mobile.

I can see my vCenter Server called vCenter 5 and ESXi hosts managed under my vCenter server. Touch any of the ESXi host. I have selected 192.168.0.125 host.


It will displays the information about that ESXi host. Touch on Virtual Machines. There are 4 virtual machines running on this ESXi host "192.168.0.125".


Below are the 4 virtual Machines running on the ESXi host "192.168.0.125" Touch on any of the Virtual machine to manage it. I have selected "Prod-FileServer" which is in powered on state.


To Migrate the Virtual Machine "Prod-FileServer" using vMotion from one host to another host. Touch on Migrate.


Select the destination host to migrate the virtual Machine "Prod-FileServer". I have selected the destination  ESXi host as "192.168.0.135" Currently VM is running on the first ESXi host which is 192.168.0.125.

Touch the Play button to start the vMotion of the virtual machine.

You can see the vMotion activity of the virtual machine "Prod-FileServer" is in progress under Recent tasks in vSphere Client


vMotion migration is completed successfully. Click on Ok.


You can see the vMotion activity of the virtual machine "Prod-FileServer" is in completed state under Recent tasks in vSphere 


This is really excellent app which allows you to perform vMotion simply within few touches from your mobile. I think this is informative for you. Why are you waiting?  Start downloading Infradog ServerAdmin app. Which makes your admin tasks real simple. Thanks for Reading !!!

InfraDog- Hot Add/Hot Plug of Memory and CPU from your Mobile

$
0
0
I have almost wrote lot of posts about the InfraDog Server Mobile admin application. Which helps you to manage and monitor your VMware environment from your Android and ISO mobile in an efficient way. you can even perform VMware vMotion from your mobile. In addition to that, InfraDog server mobile admin allows you to hot add and hot plug CPU and Memory of the virtual machine, when virtual machine is up and running. This can be done from your mobile.

Memory/CPU hot add/ plug feature should be enabled on the virtual machine and also your guest operating system should support of adding CPU and Memory on the fly.


Choose one of the virtual to increase the memory. I have selected the VM "Prod-Fileserver".


Touch on the virtual machine memory usage and configuration option


Edit the virtual machine memory value as per the requirement and touch on save option


Now you can see memory of the virtual machine is changed to 3 GB from 2 GB. It is really cool.


Thats it. we are done with the job in just few touches. I hope this is informative for you. Thanks for reading.

vSphere 5.5 Upgrade Part 1 - Understanding vSphere 5.5 Upgrade Methods

$
0
0
As we are Already aware about the vSphere 5.5 release and what would be next step is just to upgrade your existing vSphere environment to vSphere 5.5 and start utilizing the advanced features of  latest vSphere release. vCenter Server Versions 5.1 and later version require vCenter Single sign-on and vCenter Inventory Service components. In this Upgrade series, i am going to explain your step by step procedure for upgrading each components of vSphere environment from vSphere 5.1 to vSphere 5.5.

There are two type of Install or Upgrade Method
1.Simple Install
2.Custom Install

Simple Install option allows you to Install or Upgrade vCenter Server  including other components like vCenter Single Sign-on, vSphere Web Client and Inventory Service on a Single host machine. You can use Simple Install option to upgrade vCenter Server if you have a version 4.x, 5.0.x, or 5.1.x.

Custom Install Option can be used to Upgrade vCenter and other components separately to customize the location and configuration of each components.


vCenter 5.5  Install or Upgrade should be performed in the below order
1.vCenter Single Sign-on
2.vSphere Web Client
3.vCenter Inventory Service
4.vCenter Server

To Understand the vSphere 5.5 Upgrade process. I have explained the Upgrade Process in step by step procedure. I will cover the upgrade process in the below series of posts.

vSphere 5.5 Upgrade Series

vSphere 5.5 Upgrade Part 14 - Different Methods to access vSphere Environment

Let's start the countdown of the vSphere upgrades. I will be covering the each parts in upcoming posts. I believe this post is going to be informative for you. Thanks for Reading !!!!

vSphere 5.5 Upgrade Part 2 - Understanding the Hardware and software requirements for vSphere 5.5

$
0
0
It is very important to understand the Hardware and software requirement before going further with the system or software upgrade. This post will helps you to understand the Hardware and software pre-requisites for vSphere 5.5. In this post i have covered , All the requirements including Hardware requirement, Database interoperability matrixes and how to verify the Hardware compatibility guide to understand that your existing server hardware to capable to run vSphere 5.5.

Below table contains the Minimum hardware requirements for Simple Install or Upgrade options.Simple Install option allows you to Install or Upgrade vCenter Server  including other components like vCenter Single Sign-on, vSphere Web Client and Inventory Service on a Single host machine

Minimum Hardware Requirement for Simple Install
Processor
Intel or AMD processor with two or more
logical cores each with a speed of 2 GHZ
Memory
12 GB
Disk Storage
40- 60 GB of free disk space
Network Speed
1 GBPS

Below table contains the Minimum hardware requirements for  various vSphere  components when using Custom Install or Upgrade options. Custom Install Option can be used to Upgrade vCenter and other components separately to customize the location and configuration of each components.

Minimum Required
of vSphere Component
Processor
Memory
Disk Storage
Network
Speed
vCenter Single Sign-on
Intel or AMD processor with two or more logical cores each with a speed of 2 GHZ
3 GB
2 GB
1 GBps
vCenter Inventory Service
Intel or AMD processor with two or more logical cores each with a speed of 2 GHZ
3 GB
Small inventor:
low activity rate: 5GB
high activity rate: 15GB
Large inventory:
low activity rate: 15GB
high activity rate: 40-60GB
1 GBps
vSphere Web Client
2.00 GHz processor with 4 cores

At least 2GB
2 GB
1 GBps
vCenter Server upto 50 Hosts and
 50 Powered-on VM's
2 Cores CPU (64-Bit CPU)
2.0GHz or faster Intel 64 or AMD 64 processor.
4 GB
5 GB
1 GBps
vCenter Server upto 300 Hosts and
 3000 Powered-on VM's
4 Cores CPU (64-Bit CPU)
2.0GHz or faster Intel 64 or AMD 64 processor.
8 GB
10 GB
1 GBps
vCenter Server upto 1000 Hosts and
 10,000 Powered-on VM's
8 Cores CPU (64-Bit CPU)
2.0GHz or faster Intel 64 or AMD 64 processor.
16 GB
10 GB
1 GBps


Verify the Database Requirement for the vCenter Database

You can verify whether your existing vCenter database is compatible with vSphere 5.5 or not using the VMware Product Interoperability Matrixes.

1.Select the Radio button "Solution/Database Interoperability"

2. Under Select a VMware Product, Select VMware vCenter Server and Select the Version from the drop-down.

3. Select the Database version of your existing vCenter server and click on Add

4. If your Selected Database version is marked with Green tick Mark, Then your database version will be supported for vCenter 5.5 installation or Upgrade.


Verifying the Upgrade path for your vCenter Upgrade

1.Select the Radio button "Solution Upgrade Path"

2. Select VMware vCenter Server from the Select a product drop-down

3. You can verify that your existing vCenter version is supported to upgrade to vCenter 5.5 or not. and If you Hover over the Green tick mark. You will get a note about the upgrade methods.


Verifying your Hardware Compatibility

You can verify your Hardware Model is supported to install or upgrade to ESXi version 5.5 using VMware Compatibility Guide

1. Select a Product version, Partner Name and System Type as per your choice

2. You can even select the  vSphere Features which you like to verify whether it is supported in that hardware or not. Optionally you can even select the additional criteria like Sockets, Memory etc

3. Click on Update and View Results 


4. You will get the results with partner name  and Server Model which suits your above search along with the  release of vSphere which is supported on that hardware.


I hope  this is informative for you to understand the pre-requistires for Upgrading to vSphere 5.5 Thansk for Reading !!!!

vSphere 5.5 Upgrade Series

vSphere 5.5 Upgrade Part 3 - Download VMware vSphere 5.5

$
0
0
The time has arrived now to download your hot VMware vSphere 5.5 software and it is available to download for public from 22-Sep-2013. Download the vSphere 5.5 software by login with your VMware account and make your internet busy for next couple of days for the vSphere 5.5 downloads.

Download the below list of vSphere 5.5 software using the VMware's donwload page. Login with your My VMware Login if you have an existing account or register one to start your downloads.


Customers who have purchased VMware vSphere 5.5 can donwlaod their relevant installation package based on the License purchased otherwise download and try your evaluation for 60 days to play around with vSphere 5.5

Essentials

VMware ESXi 5.5.0
VMware vCenter Server 5.5.0
VMware vCenter Operations Manager Foundation 5.7.2

Essentials Plus

VMware ESXi 5.5.0
VMware vCenter Server 5.5.0
VMware vSphere Replication 5.5
VMware vSphere Data Protection 5.5.1
VMware vCloud Networking and Security 5.5.0
VMware vCenter Operations Manager Foundation 5.7.2

Standard

VMware ESXi 5.5.0
VMware vCenter Server 5.5.0
VMware vSphere Replication 5.5
VMware vSphere Data Protection 5.5.1
VMware vCenter Orchestrator Appliance 5.5.0
VMware vCloud Networking and Security 5.5.0
VMware vCenter Operations Manager Foundation 5.7.2

Enterprise

VMware vCenter Server 5.5.0
VMware ESXi 5.5.0
VMware vSphere Replication 5.5
VMware vSphere Data Protection 5.5.1s
VMware vCenter Orchestrator Appliance 5.5.0
VMware vCloud Networking and Security 5.5.0
VMware vCenter Operations Manager Foundation 5.7.2
VMware vSphere Big Data Extensions 1.0

Enterprise Plus

VMware ESXi 5.5.0
VMware vCenter Server 5.5.0
VMware vSphere Replication 5.5
VMware vSphere Data Protection 5.5.1
VMware vCenter Orchestrator Appliance 5.5.0
Cisco Nexus 1000V Virtual Ethernet Modules for vSphere 5.5.0
VMware vCloud Networking and Security 5.5.0
VMware vCenter Operations Manager Foundation 5.7.2
VMware vSphere Big Data Extensions 1.0
VMware vSphere App HA 1.0.0

vSphere Desktop

VMware ESXi 5.5.0
VMware vCenter Server 5.5.0
VMware vSphere Replication 5.5
VMware vSphere Data Protection 5.5.1
VMware vCenter Orchestrator Appliance 5.5.0
Cisco Nexus 1000V Virtual Ethernet Modules for vSphere 5.5.0
VMware vCloud Networking and Security 5.5.0
VMware vCenter Operations Manager Foundation 5.7.2
VMware vSphere Big Data Extensions 1.0
VMware vSphere App HA 1.0.0

I hope this is informative for you. Download and play with new vSphere 5.5 from today.. Thanks for reading !!!!

vSphere 5.5 Upgrade Series

vSphere 5.5 Upgrade Part 4 - Taking Backup of existing vCenter server Database and Certificates

$
0
0
Taking backup before performing any activity is really an important tasks for administrators. Applying the same logic here. Taking backup of vCenter server database and SSL certificates will be an important tasks before you are starting your vCenter server upgrade. This will help you to restore to your old configuration incase of the failed upgrade.This would be purely an Database administrator task but as a VMware administrator, It is our responsibility to ensure that vCenter server database has been backed up. So, I want to give a head's up for the procedure to find the SQL database server and Instance name. Later take a backup of your vCenter server SQL Database.

To identify the SQL server name and Database Instance Name of your vCenter server database. Login to your vCenter server

1. Goto Control Panel and ODBC Connector

2. Click on System DSN tab and Identify the Data source for your vCenter Server and click on Configure


3. You will find the SQL server name under the Server option and click on Next


4. You can find the Database Name for your vCenter server Database. Note the Database Name and Click on Cancel


5. Login to your SQL Database using Microsoft SQL Management Studio and Identify the Database for your vCenter server.

Download SQL Management Studio  2005 and 2008

6.Right-click on your vCenter Server Database and Select Tasks -> Backup


7.Note down the Location for the Database Backup or You can add your custom location for your vCenter server Database location. Click on Ok.


After few minutes, Your backup will complete. You can see the message once Database backup is completed.similar to below once 


It is also important to backup the vCenter Server SSL certificates before your upgrade. Below is the location of the SSL certificates on the vCenter server.

Windows 2003: %ALLUSERSPROFILE%\Application Data\VMware\VMware VirtualCenter\SSL

Windows 2008: %ALLUSERSPROFILE%\VMware\VMware VirtualCenter\SSL


Apart from that, You can take a backup of Sysprep files from the below location

Windows 2003: %ALLUSERSPROFILE%\Application Data\VMware\VMware VirtualCenter\sysprep

Windows 2008: %ALLUSERSPROFILE%\VMware\VMware VirtualCenter\sysprep

That's it. We are done with vCenter server database backup and we are ready for Upgrade procedures. I hope this is informative for you. Thanks for Reading !!!

vSphere 5.5 Upgrade Part 5 - Upgrading vCenter Single Sign-on

$
0
0
First Step in Upgrading vSphere 5.1 to vSphere 5.5 is to upgrade the vCenter Single Sign-on. This post will helps you understand the step by step upgrade procedure of vCenter Single Sign-on 5.5. vSphere 5.5 SSO architecture has been restrctured from the scratch as compared to previous version of SSO.The new  SSO 5.5 architecture is based on a multi-master model where each instance is automatically kept up to date with it peers via builtin replication. You can create sites to provide logical groupings of registered resources that maybe geographical or organizational separate as well as support for multiple tenants.

Below are the key improvements and changes made with the vCenter Single Sign-on 5.5 as compared to previous versions.

1. Dependency on the external Database has been removed

2. Single Sign-on is now supports multi-master Model and it will be aware about sites. You will have ability to define sites. Sites typically your physicla dat center locations.

3. Replication between SSO is built-in and automatic

4. No More Admin@System-Domain.  SSO administrator account is chnaged to Administrator@vSphere.local  in SSO 5.5. Password for Administrator@vSphere.local  can be defined during the Install or Upgrade of SSO.


Graphic Thanks to VMware.com

Procedure to upgrade vCenter Single Sign-on 5.1 to Single Sign-on 5.1

Attach the vCenter installer CD and start the Autorun.exe. Under Custom Install, Select vCenter Single Sign-on and click on Install


You will get the warning  about SSL certificate. My SSL certificate is not expired. Let's continue the upgrade by click on Ok.


Installer Detects my earlier version of vCenter Single Sign-on is already installed on this system. Which is version 5.1 . It will be upgrade to vCenter Single Sign-on 5.5.0. Click on Next


Read the license agreement and Select the Check box "I accept the terms in the License Agreement" .Click on Next


Installer will detects the System Information. Review the information and click on Next


There are Three types of Upgrade mode for the vCenter Single Sign-on:

First existing vCenter Single Sign-on Server : This option will Install or upgrade your first vCenter Single Sign-on Server

An additional existing vCenter Single Sign-on server in the existing site: This option is to upgrade an additional vCenter single Sign-on in an existing site. 

An additional existing vCenter Sigle Sign-on with a new site: This option is to upgrade an additional vCenter server Single Sign-on server and Create a new site. 

Select the Checkbox "First existing vCenter Single Sign-on Server" because I want to upgrade my existing SSO and click on Next


Type the New password for the SSO administrator account. Specify the password the User administrator@vsphere.local . vsphere.local is a new domain that is created by vCenter Single Sign-on.You can use the account adminstrator@vsphere.local to log in to vCenter Single Sign-on and vCenter server after the installation.


Keep the password complexity in Mind. The password must be at least eight characters long and must contain at least an upper case, a lower case, a digit and a special character. Click on Next

NOTE: The following characters are not supported in passwords: non-ASCII characters, semicolon (;), double quotation mark ("), single quotation mark ('), circumflex (^), and backslash (\)


In the vCenter Single Sign-on Configure Site Page, Enter the SSO Site name. I have left  the default site name "Default-First-Site" since it is my lab environment. Click on Next.


Review the vCenter  Single Sign-on installation location. If you want to change the default location, Click on Change and select the destination location. Click on Next


Review the vCenter Single Sign-on information and Install options. Click on Install.


It will take few minutes to complete the SSO upgrade. Once it is completed, Click on Finish.


Thats it. We are done and vCenter Single Sign-on is upgrade to SSO 5.5. Lets perform the remaining steps in our upcoming posts. I hope this is informative for you. Thanks for Reading !!!....

vSphere 5.5 Upgrade Series

Viewing all 326 articles
Browse latest View live


<script src="https://jsc.adskeeper.com/r/s/rssing.com.1596347.js" async> </script>