Quantcast
Channel: VMware Arena
Viewing all 326 articles
Browse latest View live

vSphere 5.5 Upgrade Part 6 - Upgrading vSphere Web Client

$
0
0
Upgrading vSphere Web client from 5.1 to 5.5 is the Second step in vSphere 5.5 upgrade process followed by vCenter Single Sign-on upgrade. The vSphere Web Client allows you to connect to a vCenter server to manage your vSphere environment through a web browser. This post will cover the step by step procedure to  upgrade vSphere web client from version 5.1 to vSphere webclient 5.5.

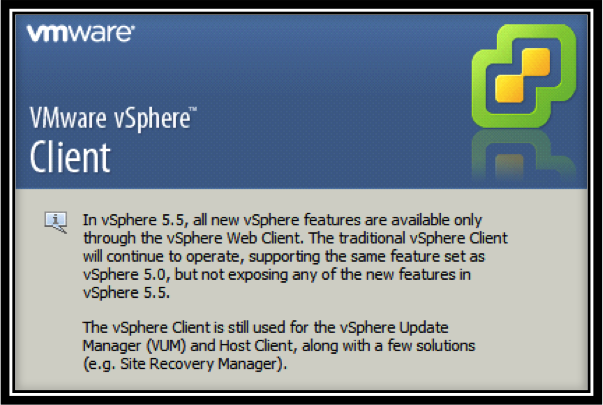
VMware is pushing us to use vSphere web client instead of windows vSphere client. All the new features of vSphere 5.5 can only be performed using vSphere web client and it will not be available in the vSphere windows client. Most of the vSphere tasks can now be performed using web client.


Procedure to Upgrade vSphere Web client 5.1 to vSphere Web client 5.5

Attach the vCenter server Installer CD and run the Autorun.exe . From the Installer, Select the vSphere Web Client and Click on Install


Select the Language from the drop-down for the installer.


Installer will detect the existing version of vSphere web client and it will be upgrade  the previous version to version 5.5. Click on Next


Read the License Agreement and select the checkbox "I accept the terms in the license agreement". Click on Next


Review the port number information (HTTP and HTTPS port) for the vSphere web client and click on Next


Enter the SSO administrative password which we have mentioned during the Step1 Upgrading vCenter Single Sign-on.and verify the lookup Service URL. Click on Next.


Click on Accept to accept the SSO Lookup service leaf certificate and Click on Install to start the vSphere Web client t upgrade. It will take few minutes to complete the upgrade.


Click on Finish,once installation is completed.


Allow a few minutes for all services to load before accessing the vSphere webclient for the first time.


To access the vSphere web client, Open up your web browser and type the Below URL

https://vSphere_Web_Client_host_name_or_IP:9443/vsphere-client  

Login with administrator@vsphere.local to access the vSphere web client.


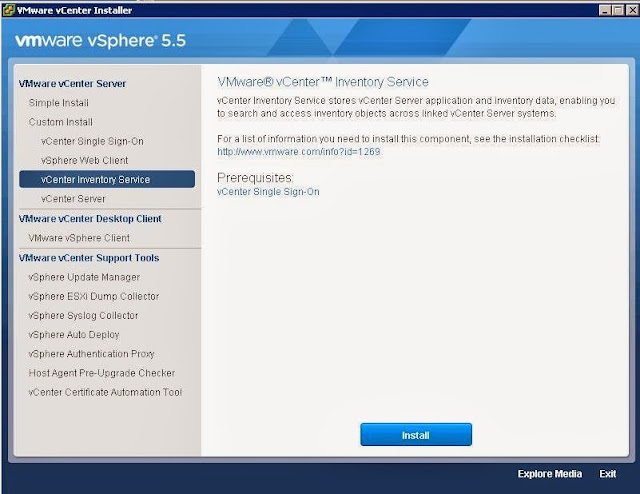
Thats it. We are done with the upgrade of vSphere Web Client to version 5.5. I hope this is informative for you. We will see the step by step procedure to upgrade vCenter Inventory service in next part.Thanks for Reading !!!

vSphere 5.5 Upgrade Series


vSphere 5.5 Upgrade Part 7 - Configuring vCenter Single Sign-on

$
0
0
We are done with upgrading vCenter Single sign-on and vSphere web client. Next step would be configuring vCenter single sign-on. In vSphere 5.5 , Active Directory identity source is not automatically added So we need to add Active Directory domain to authenticate with domain-based accounts.

Login to the vSphere web client, Click on Administration from the left pane.

https://vSphere_Web_Client_host_name_or_IP:9443/vsphere-client  


Under Single Sign-On click Configuration. Click on Identity Sources and click on Add


Select Active directory(Integrated Windows Aunthentication) and enter your domain name. My domain name is lab.com. Click on Ok.


you can now see your domain under Identity Source.


you can delegate the permissions by adding users and groups from the
Active directory domain and assing permissions to them.


Select Users and Groups from the left pane, click on Groups tab. select any of the role from the above option and click on add under Group Members option.


Select your domain name from the drop down and select the users and groups which you want to assign permissions and click on Add.


Now delegated user account will be able to login to vsphere web client with their domain credentials.


Thats it. we are done with adding identity source for the vCenter single sing-on. I hope this is informative for you. Thanks for reading !!!

vSphere 5.5 Upgrade Part 8 - Upgrading vCenter Inventory Service

$
0
0
The Next step after upgrading Single Sign-on and Web client is upgrading vCenter Inventory Service. vCenter Inventory service stores vCenter server application and inventory data. Which enables you to search and access inventory objects across linked vCenter Server systems. vCenter Inventory service stores all the custom tags used within the vCenter Web client. Which will also acts also as a proxy or like a cache for the web client.

From the VMware vCenter Installer, Select vCenter Inventory Service under Custom Install and click on Install


Select the Language for the Installer from the drop down and click on OK.


Installer will detect the earlier version of vCenter Inventory service and it will be upgraded to vCenter Inventory Service to 5.5


Read the End user License Agreement and click on "I accept the terms in the license agreement" and click on Next.


Select the checkbox "Keep my existing database" to retain your existing data in the vCenter Inventory service and click on Next.


Enter the Fully Domain name for the vCenter Inventory Service local system and click on Next.


Review the Port numbers for the vCenter Inventory service and click on Next


Select the Inventory Size which suits your environment and click on Next


Enter the password for the SSO administrator account and click on Next


Click on Install to start the vCenter Inventory Service installation.


Once installation is completed, Click on Finish.


I hope this is informative for me. Thanks for Reading !!!

vSphere 5.5 Upgrade Part 9 - Upgrading vCenter Server

$
0
0
After upgrading vCenter single sing-on, web client and Inventory service, Next step would be upgrading your vCenter server. I am going to explain you step by step procedure for upgrading your vCenter server from version 5.1 to 5.5. It is a straight process and I am going to use Custom Install Method to upgrade my vCenter server from 5.1 to 5.5.

As usual, Attach the vCenter Installation CD and start Autorun.exe. Select vCenter Server under Custom Install and Click on Install


Select the Language for the vCenter server installation from the drop-down menu and click on Ok,


Installer will detect the earlier version of vCenter server installation and It will be upgraded to vCenter server 5.5. Click on Next


Accept the End User License Agreement and click on Next


Installer will detect the existing DSN information for the Database and Click on Next.


Installer will detect the exiting extensions which is registered with the vCenter server . Which needs to be upgrade to match with the vCenter 5.5. Click on Ok.


Select the Option Upgrade existing vCenter Server Database and click on Next. We have already taken the backup of vCenter server database and SSL certificates in part 4


Select one of the Options for the vCenter Agent Upgrade Method.This is my Lab environment vCenter server. So i have selected Automatic option which will automatically upgrade the vCenter agent on all the hosts in the vCenter server inventory


Enter the credentials information for the vCenter server service account information and click on Next.


Review the port information for the vCenter server and click on Next


Select the Inventory size from the below 3 options depend on your environment size and click on Next


Enter the SSO administrator username and Password and also verify the Lookup Service URL and clcik on Next


Review the vCenter Inventory Service Information and click on Next.


Select the Location where you want to install the vCenter server. If you want to install in custom location click on Change and browse the location. Click on Next.


In the Ready to Install the Program, Click on Install to begin the vCenter server Upgrade.


Once vCenter server Upgrade is completed and click on Finish to complete the upgrade process.


That's it. We are done with vCenter server upgrade. I believe this is informative for you. Thanks for Reading!!!

vSphere 5.5 Upgrade Series

vSphere 5.5 Upgrade Part 10 - Upgrading vCenter Update Manager

$
0
0
Once we are done with the upgrading all the pre-requisite components and vCenter to version 5.5 Next step would be upgrading other additional components like Update Manager to version 5.5. If your environment have vSphere Update Manager. It is necessary to upgrade Update Manager to work with vCenter 5.5 and Updated version of Update Manager will help us to upgrade our Hosts and VM to latest version of vSphere. This post going to explain you the step by step procedure to upgrade the Update Manager to version 5.5.


Attach the vCenter Installer CD/DVD to the Update Manager system and click Autorun.exe and Select vSphere Update Manager and click on Install


Select the Installer Language from the drop-down and Click on Ok.


Update Manager Installer will detect the earlier version of Update Manager and It will prompt you to Upgrade to version 5.5. Click on OK to proceed with this upgrade.


In welcome page of vSphere Update Manager Installation, Click on Next to continue with the installation.


Agree the End User License Agreement by selecting the check box " I accept the terms in the license agreement" and click on Next.


Read the support Information. Update Manager 5.5 will upgrade ESX/ESXi 4.x, 5.0 ,5.1 to ESXi 5.5. Yes. We need that for next steps. Click on Next.


Enter the IP Address/Name and administrative credentials for the vCenter server and click on Next.


It will automatically detect the existing update Manager DSN information.Review the information and click on Next. 


My Update Manager DSN "UM" points to an older version of Update Manager datbase which requires upgrading. Select the Checkbox Yes, I want to upgrade my Update Manager database. Please take a backup of Update Manager as specified in the post.Click on Next.


Select the Update Manager Name or IP address from the drop down.This should be identified on the network. Click on Next.


Click on Install to start the Update Manager upgrade process.


Click on Finish to complete the Installation.


Once Update Manager is Upgraded. It is necessary to Upgrade vSphere Update Manager Extension. It will allow us to utilize Update Manager features from the vCenter server.

Connect to your vCenter server using vSphere client and click on Plug-in Manager. Click on Donwload and Install for VMware vSphere Update Manager Extension. It will download the installer and Save it in local location.


Start the Update Manager plug-in installation and click on Next to continue with Update Manager Client upgrade.


Accept the License agreement and click on Next.


Setup will upgrade the Update Manager client to version 5.5. Click on Install.


Click on Finish to complete the Update Manager Client upgrade.


Thats it !!!. We are done with the Update Manager and Update Manager client upgrade to version 5.5. I hope this is informative for You. Thanks for Reading !!!

vSphere 5.5 Upgrade Series

vSphere 5.5 Upgrade Part 11 - Upgrade ESXi hosts using Update Manager

$
0
0
After we have upgraded update Manager to version 5.5. Next step will be upgrading your ESXi host to ESXi 5.5. We have already seen few posts upgrade ESXi to 5.5 using Command Line and Inplace upgrade of ESXi 5.5 but this post is going to explain you step by step procedure to upgrade your ESXi 5.5 host to ESXi 5.5 using Update Manager Upgrade baseline.

Connect to your vCenter server using vSphere client. Click on Solutions and Applications -> Update Manager. Click on ESXi Images Tab and Select "Import ESXi Image"


Click on Browse and browse towards the ESXi 5.5 ISO image from your system and click on Next


Import ESXi Image wizard will detect the ESXi 5.5 information and click on Next to complete the Import.


Create a New Baseline for ESXi host upgrade.Enter the name ,description and Select Host Upgrade under Host baselines and click on Next


Select the ESXi Image to be included as part of this Upgrade baseline and click on Next.


Review the information for this baseline and click on Finish.


Select the cluster or Host to attach the newly created Host upgrade Baseline. Select the Update Manager tab and click on Attach. Select the checkbox for the baseline to attach to the Host. I am attaching this host upgrade baseline to my ESXi 5.5 host 192.168.0.125. Click on Attach


Click on Scan to check the compliance for the Host against the attached baseline.


If the attached baseline is applicable to the selected Host, Click on Remediate and click on Next.


Accept the End user License Agreement for this ESXi 5.5 upgrade and click on Next.


Verify the Upgrade settings.Select the checkbox if you want to remove the installed third-party software that is incompatible with the upgrade, and continue with the remediation and click on Next..


Enter the Task name and description. If you want to perform this upgrade in later time,Select the checkbox At time and define the time. I am doing it with immediately option. Click on Next.


Specify the Host Remediation option as per your requirement and click on Next.


Specify the cluster Remediation options as per your requirement and click on Next.


Review the selected remediation settings and click on Finish to start the Upgrade process.


My ESXi host 192.168.0.125 was with version ESXi 5.1.0 before the upgrade.


Once Upgrade Baseline Remediation is completed, My Host 192.168.0.125 is upgraded to ESXi 5.5.


That's it. We are done with upgrading to ESXi 5.5 using Update Manager. I hope this is informative for you. Thanks for Reading !!!!

vSphere 5.5 Upgrade Series

vSphere 5.5 Upgrade Part 12- Upgrade VMware Tools on Virtual Machines

$
0
0
ESXi host has been upgraded to ESXi 5.5. So next step will be updating your VMware tools of your virtual machine to the latest version. This post is going to cover the need and Importance of VMware Tools and How to update VMware tools to latest version using Manual method not by using Update Manager. Since Each virtual machine need varies based upon the application requirement. Depend upon the criticality of VM and Maintenance window of the virtual Machine, You can upgrade the VMware tools of each VM independently using Manual upgrade Method.

VMware tools is very important for VMware virtual Machine. VMware tools provides:

  • Improves Video Resolution
  • Improves Color Depth
  • Improved Network adapter performance
  • Smooth Mouse Experience
  • Allow Copy and Paste and drag-and -drop files
  • Improves Sound
  • Provides the ability to take quiesced snapshots of Guest OS.

VMware Tools includes the below components:

1. VMware Device Drivers - Which provides the drivers for many virtual hardware's including Network adapters. Drivers provides smooth mouse operations, Improve sound, Graphic and performance of the virtual machine.

2. VMware User Process - Provides the ability to copy and paste text between VMware Remote console and Host Operating system. Improves Screen resolution.

3. VMware Services - Handles communication between the guest and host operating system.

Method to Upgrade VMware tools of Virtual Machine.

Once your ESXi host is upgraded to ESXi 5.5, You can see the Status of the VMware Tools of your virtual machine will report as Running (Out-of-date). It needs to upgraded to Latest version.


Connect to your vCenter Server using vSphere client or vSphere web Client. I have explained the procedure using vSphere client.

Right-Clcik on the Virtual Machine which you want to update the VMware Tools. Click on Guest and Select  Install/Upgrade VMware Tools


Select Interactive Tools Upgrade or Automatic Tools Upgrade. I would recommend to go with Automatic Tools Upgrade and click on OK,


In few seconds to Minutes, VMware tools will be upgraded to the Latest version.


Note down the VMware Tools status of the virtual Machine. It should be Running(Current)


Thats it. We are done with Upgrading VMware tools of virtual machines to the latest version. I hope this is informative for you. Thanks for Reading !!!!

vSphere 5.5 Upgrade Series

vSphere 5.5 Upgrade Part 13- Upgrade VM Hardware Version for Virtual Machines

$
0
0
Once we are done with upgrading VMware Tools on the Virtual Machine. Next step will be upgrading the VM hardware version to 10 to avail the latest features of vSphere 5.5. It is always recommended to upgrade VMware tools version to latest before upgrading the VM hardware version. Also I would recommend to take the snapshot of the virtual machine before you upgrade the VM hardware tools.

Features of Virtual Machine Hardware Version 10

  • Enablement for new CPU Architectures
  • LSI SAS support for  Oracle Solaris 11 operating system
  • Support for New  type of advanced host controller interface AHCI (Advanced  Host Controller Interface)
  • Virtual-SATA controller now supports both virtual disks and CD-ROM devices.
  • Support upto 4 SATA controllers with 30 devices per controller with total of 120 devices (was limit of 60 in vSPhere 5.1)


vSphere Releases
Hardware Version
Virtual Infrastructure 3.5
Version 4
vSphere 4.0
Version 7
vSphere 4.1
Version 7
vSphere 5.0
Version 8
vSphere 5.1
Version 9
vSphere 5.5
Version 10


Procedure to Upgrade VM hardware Version to Version 10

1. Upgrade the VMware Tools version to Latest If it is not updated. Ensure status of the VMware Tools is Up-to-Date.

2. Take the snapshot of the virtual Machine before proceed with upgrading the VM hardware Version.

3. Take a backup of Windows VM IP address information uisng VMUpgradeHelper. Read my blog post "Upgrade VMware VM Hardware Version without losing network settings"

4. Note down the VM version of your virtual machine before the hardware upgrade. It was vmx-09 and My ESXi host was with version ESXi 5.1.


5. Right-click the virtual machine and Select Upgrade Virtual Hardware


Read the Below warning and click on Yes to confirm the Virtual Machine Upgrade. This operation will cause the virtual hardware that your guest operating system runs on to change. It is an irreversible operation that will make your virtual machine incompatible with earlier version of VMware software products. It is strongly recommended that you make a backup copy of your disks before proceeding That's why I have suggested to take a snapshot of the.virtual machine before upgrading the VM hardware version. Click on Yes.


VM hardware version upgrade  task will complete in few seconds.


Once VM hardware version is completed, note down the VM version. It should be Vmx-10. All the features sets of VM hardware version 10 can only be utilized when accessing the vCenter from vSphere web client.


That's it. We are done with upgrading VM hardware version. I hope this is informative for you. Thanks for Reading !!!!.

vSphere 5.5 Upgrade Series


vSphere 5.5 Upgrade Part 14 - Different Methods to access vSphere Environment

$
0
0
Finally We have done with almost all the steps in upgrading to vSphere 5.5. It really important to perform each tasks in upgrade process in exact order as specified in this Upgrade process. Now, we need to understand the different methods to access the vSphere environment. It is just an simple post to explain various methods to access your vSphere environment.

You can access your vCenter Server using vSphere web client. vSphere web client can be accessed using the below URL

https://vSphere_Web_Client_host_name_or_IP:9443/vsphere-client  


Second Method is to install vSphere Windows client 5.5 and access the vCenter server and ESXi host directly. You can only use vSphere windows client to connect to your ESXi host. ESXi host cannot be accessed directly using vSphere web client. You can also use Putty to SSH into ESXi host.


In vSphere 5.5, all new vSphere features are available only through the vSphere web client. The traditional vSphere client will continue to operate, supporting the same features set as vSphere 5.0 bu tnot exposing any new features in vSphere 5.5.The vSphere client is still used for the vSphere Update Manager and Host client along with few solutions like Site Recovery Manager.

That's it. We are done with the update serier of vSphere 5.5. I hope this is informative for you. Thanks for Reading !!!!

vSphere 5.5 Upgrade Series

Veeam Backup and Replication v7 R2 Released

$
0
0
Veeam Backup is the #1 backup software for Virtualization products like VMware and Hyper-v. Veeam has released it is update called Veeam Backup and Replication v7 R2. Veeam backup is the first backup software which includes the support for vSphere 5.5 and Windows Server 2012 R2. Veeam Backup and Replication v7 R2 has lot of new features introduced along with the fixes for the existing issues reported in the previous release.Please confirm you are running version 7.0.0.690 or 7.0.0.715 prior to installing this patch. You can check this under Help | About in Veeam Backup & Replication console.After upgrading, your build will be version 7.0.0.764.


Below are the new features of the Veeam Backup and Replication v7 R2.

VMware

  • vSphere 5.5 support, including support for 62TB virtual disks and virtual hardware v10 virtual machines.
  • vCloud Director 5.5 support.
  • Support for Windows Server 2012 R2 and Windows 8.1 as guest virtual machines (VMs).
  • Added ability to limit maximum amount of active VM snapshots per datastore to prevent it from being overfilled with snapshot deltas. The default value of 4 active snapshots can be controlled with MaxSnapshotsPerDatastore (REG_DWORD) registry key.

Microsoft

  • Windows Server 2012 R2 Hyper-V and free Hyper-V Server 2012 R2 support, including support for Generation 2 virtual machines.
  • Support for Windows Server 2012 R2 and Windows 8.1 as guest virtual machines (VMs)
  • Support for System Center 2012 R2 Virtual Machine Manager (VMM)
  • Support for the installation of Veeam Backup & Replication and its components on Windows Server 2012 R2 and Windows 8.1.

Built-in WAN acceleration

  • Increased data processing performance up to 50% with hard drive based cache, and up to 3 times with SSD based cache. Multi-core CPU on source WAN accelerator is recommended to take full advantage of the enhanced data processing engine.

Replication

  • Added ability for source and target proxy servers to reconnect and resume replication when network connection between source and target site drops for a short period of time.

Tape

  • Added support for a number of enterprise-class tape libraries with partitioning functionality that allows presenting multiple tape library partitions to the same host.
  • Import/export slot interaction has been redesigned to add support for a number of IBM and Oracle tape libraries.

Application-aware processing

  • Added ability for application-aware processing logic to detect passive Microsoft Exchange DAG database present on the VM, and process it accordingly.
  • Added support for Exchange CCR clusters. 

User interface

  • User interface should now remember size and positions off the main window, as well as all panels and columns.
Along with the above new features supported , There are lot of fixes are also part of v7 R2. Please take a look at the issues fixed as part of this R2 release. I hope this will be informative for you. Thanks for Reading !!!!

How to Generate HP ADU Disk Report in ESXi host

$
0
0
You would have come across a lot of instances of hard disk failures of your physical servers. It is necessary to generate HP ADU (Array Diagnostics Report) on the HP server and send it to your hardware vendor to get it analysed and troubleshoot or replace the failed hard disk. It is really easy in Windows servers by just login to the server and run the ADU report  using the GUI but we need to know how to generate the ADU report for ESXi host hard disk failures. This post will guide you step by step procedure to generate HP ADU report in ESXi host using HPACUCLI utility which is part of  HP ESXi Utilities Offline bundle for VMware ESXi 5.

 HP ESXi Utilities Offline bundle for VMware ESXi 5 will be available as part of HP customized ESXi installer image but if it is not a HP customized ESXi image then you may need to download and install  HP ESXi Utilities Offline bundle for VMware ESXi 5. It downloads the HP ESXi Utilities Offline bundle Zip file.This ZIp file contains 3 different utilities HPONCFG , HPBOOTCFG and HPACUCLI utilities for remote online configuration of servers. 

HPONCFG can be used to set up and reconfigure the iLO (Integrated Lights-Out) management controller of a server.

HPBOOTCFG can be used to set up the boot configuration for the server. 

HPACUCLI can be used in the configuration of HP Smart Array controllers and attached storage

You can directly donwload HPACUCLI utility directly and Upload the VIB file into your ESXi host and execute the below command to install the HPACUCLI utility.

esxcli software vib install -f -v /tmp/hpacucli-9.40-12.0.vib 

Once it is installed. Browse towards the directory /opt/hp/hpacucli/bin and type the below command

 /opt/hp/hpacucli/bin # ./hpacucli


Execute the below command to save the ADU report on the /tmp with the filename called "report.zip"

 ctrl all diag file=/tmp/report.zip ris=on xml=on zip=on 


Thats it !!! we are done with generating ADU report for your ESXi host. Send it your hardware vendor to troubleshoot your disk failure issues. I hope this is informative for you. Thanks for Reading !!!!

How to Configure HP ILO from ESXi host

$
0
0
Configuration of HP ILO can be done using reboot of your HP server and Press <F8> to configure the ILO settings but you need a down time to your ESXi host and all the virtual machines running on it if it is a standalone host and no option to vMotion to other host. It is really a tough task to get downtime for your virtuali machines just for your ILO configurations like Reset ILO configuration, Reconfigure ILO IP address and reset ILO administrative password.

Now ILO configuration of ESXi host can easily be done without need of host restart using HP ESXi utilities.
HP ESXi Utilities Offline bundle for VMware ESXi 5 will be available as part of HP customized ESXi installer image but if it is not a HP customized ESXi image then you may need to download and install  HP ESXi Utilities Offline bundle for VMware ESXi 5. It downloads the HP ESXi Utilities Offline bundle Zip file.This ZIp file contains 3 different utilities HPONCFG , HPBOOTCFG and HPACUCLI utilities for remote online configuration of servers.

HPONCFG can be used to set up and reconfigure the iLO (Integrated Lights-Out) management controller of a server.
HPBOOTCFG can be used to set up the boot configuration for the server.
HPACUCLI can be used in the configuration of HP Smart Array controllers and attached storage

You can directly download  HPONCFG and  Upload the VIB file into your ESXi host and execute the below command to install the HPONCFG utility.

esxcli software vib install -f -v /tmp/hponcfg-04-00.10.vib

Once it is installed. Browse towards the directory /opt/hp/tools and execute  the below commands to perform the below operations. Below are the available help options for HPONCFG utility


Reset the ILO from ESXi host

Browse to /opt/hp/tools and execute the below command to reset the HP ILO configuration.

./hponcfg -r 


Export the ILO configuration of your ESXi host into file

Browse to /opt/hp/tools and execute the below command to export the ILO configuration into text file.

/opt/hp/tools # ./hponcfg -w /tmp/ilo-conf.txt


Configuring IP address for HP ILO from ESXi host

Edit the exported config file /tmp/ilo-conf.txt from above step and change the following IP address variables

vi ilo-conf.txt 

    <IP_ADDRESS VALUE = "192.168.0.55"/>
    <SUBNET_MASK VALUE = "255.255.255.0"/>
    <GATEWAY_IP_ADDRESS VALUE = "192.168.0.1"/>
    <DNS_NAME VALUE = "ESXi5-ILO"/>
    <PRIM_DNS_SERVER value = "192.168.0.20"/>
    <DHCP_ENABLE VALUE = "N"/>

Commit the updated IP address configuration from the file (ilo-conf.txt) to the ILO cofig  using th below command

./hponcfg -f /tmp/ilo-conf.txt

Thats it .You should be able to reach the ILO of the server using the IP address 192.168.0.55 now.

Reset the ILO administrator password from ESXi host

Create a file named reset_admin_pw.xml with the below info and add the new password in the password section:

<ribcl VERSION="2.0">
<login USER_LOGIN="Administrator" PASSWORD="YOUR-NEW-PASSWORD">
<user_INFO MODE="write">
<mod_USER USER_LOGIN="Administrator">
<password value="newpass"/>
</mod_USER>
</user_INFO>
</login>
</ribcl>

Commit the Updated administrator password information from the file (reset_admin_pw.xml) to ILO using the below command

 ./hponcfg -f reset_admin_pw.xml

That's it you should be able to login to ILO of your ESXi host using the password specified in the above xml file. I hope this is informative for you. Thanks for Reading !!!!

Verify the Expiry Date of vCenter server and ESXi host SSL certificates

$
0
0
This is simple and special post for me because it is my 200th Post. I am glad to reach the count of 200 in within 1 year and 6 months of period from the date i have started my blogging. It is not really an achievement as compared to other big fishes. I consider this as my beginning and a way lot to contribute to virtual community. This post helps to identify the way to verify the expiry date of your SSL certificates of vSphere components.  In the below example , I have explained the steps to identify the expiry date of the my vCenter certificates. It can be identified using the Openssl. Download the Openssl and place it in one of the directory in your server.  I have placed the Openssl files on the vCenter SSL folder to easily access the certificates.

To identify the validity of your vCenter certificate, execute the below command

openssl x509 -in rui.crt -noout -text

Verify the Validity Date for the SSL certificates

Not Before : Sep 10 10:27:33 2011 GMT
Not After : Sep 7 10:27:33 2021 GMT

Not After date is the expiry date of your SSL certificate. I hope this is informative for you. Thanks for Reading !!!!


VMware Tools for Nested ESXi

$
0
0
We have been installing and testing lot of stuffs on ESXi hosts in our home lab.  Providing individual hardware for each ESXi hosts in your lab is not affordable. So we arel running our ESXi hosts as a virtual machine on top of the physical ESXi host. Which is also termed as Nested ESXi. In simple terms, ESXi hosts running as a virtual machine on top of ESXi host is called as Nested ESXi host.  We are running the Nested ESXi host from long time and missing part is VMware tools for Nested ESXi host. VMware has released a new fling  which provides the VIB that you can install as a VMware tools on Nested ESXi host.


What is the Purpose of Installing VMware Tools on Nested ESX ?

  • VMware Tools for Nested ESXi provides Guest os information (IP ,Host name, etc) of the nested ESXi hypervisor
  • VMware tools allows your Nested ESXi VM to be cleanly restarted or shutdown when performing power operations
  • VMware tools supports Guest Operations API
  • VMware Tools executes scripts that help automate ESXi guest OS operations when the guest’s power state changes.

Installation Procedure


2. Upload the VIB file "esx-tools-for-esxi-9.7.0-0.0.00000.i386.vib" into your Nested ESXi host datastore

3.Install the VIB on the Nested ESXi host using the below command

esxcli software vib install -v /vmfs/volumes/[DATASTORE]/esx-tools-for-esxi-9.7.0-0.0.00000.i386.vib -f

4. Reboot your Nested ESXi host manually or using the below command after the VMware tools installation 

esxcli system shutdown reboot -r "Reboot for  VMware Tools Installation"

5. After the VMware tools is successfully installed on your Nested ESXi VM, you will be able to see the status of the VMware tools is Running(Current) and also it displays the Guest OS information


6. To uninstall the VMware Tools VIB, execute the below command

esxcli software vib remove -n esx-tools-for-esxi

Thats it. I hope this is informative for you. Thanks for Reading !!!!. Please share it in Social media if you feel worth sharing it .

Powershell Script to Collect Datastore Usage Report

$
0
0
In many situations, it is necessary to track the usage of datastore usage in our environment because if your datastore is full , it will cause a potential outage to your virtual machines in your environment. It is really in need of maintaining some threshold of free storage % always to avoid potential issues. This simple powershell script will helps you pull the usage and % of free space report of all the datastores in your vCenter server.


Enter your vCenter Server Name  and Specify the output file name as per your wish. Both items are marked in yellow in the below script.

============================================================================================

Connect-VIServer vCENTER_SERVERNAME
Function Percentcal {
    param(
    [parameter(Mandatory = $true)]
    [int]$InputNum1,
    [parameter(Mandatory = $true)]
    [int]$InputNum2)
    $InputNum1 / $InputNum2*100
}

$datastores = Get-Datastore | Sort Name
ForEach ($ds in $datastores)
{
    if (($ds.Name -match "Shared") -or ($ds.Name -match ""))
    {
        $PercentFree = Percentcal $ds.FreeSpaceMB $ds.CapacityMB
        $PercentFree = "{0:N2}" -f $PercentFree
        $ds | Add-Member -type NoteProperty -name PercentFree -value $PercentFree
    }
}
$datastores | Select Name,@{N="UsedSpaceGB";E={[Math]::Round(($_.ExtensionData.Summary.Capacity - $_.ExtensionData.Summary.FreeSpace)/1GB,0)}},@{N="TotalSpaceGB";E={[Math]::Round(($_.ExtensionData.Summary.Capacity)/1GB,0)}} ,PercentFree | Export-Csv c:\datastorereport.csv -NoTypeInformation

============================================================================================

Output of the above script will be similar to the below table. It will provide the Datastore name, UsedSpace in GB , TotalSpace in GB and % of free space on the datastore.

Name
UsedSpaceGB
TotalSpaceGB
PercentFree
Prod_Datastore_T1_001
674
676
0.42
Prod_Datastore_T1_002
253
256
1.24
Prod_Datastore_T2_001
491
500
1.7
Prod_Datastore_T2_002
359
367
2.07
Dev_Datastore_001
250
256
2.18
Lab_Datastore_001
661
676
2.24
ISO_Datastore_001
2342
2397
2.28

I hope this script will makes your job easy by pulling the datastore usage report as per need and produce it your management about your storage usage on your virtualization environment. I hope this if informative for you and thanks for reading!!!!

vSphere Distributed Switch Part 1 - Understanding the Architecture of Standard Switch and Distributed Switch

$
0
0
vSphere Standard Switches (vSS) provides network connectivity to hosts and virtual machines. Standard switch can bridge traffic internally between virtual machines in the same VLAN and also link to external networks. Standard switches uses physical Network adapters (NICs) of the ESXi hosts as uplink ports on the standard switch which helps the virtual machines to talk to the outside network. Virtual Machines have it s virtual network adapters (vNICs) that will connect to the port groups on the standard switches. Every port group can use one or more physical NICs of ESXi host attached to it to handle its network traffic.For the Port group with no physical NIC connected to it will allow virtual machines to communicate only with the virtual machines connected on the same port group and will not allow to communicate to external network.


In simple terms, vSphere Standard Switches need to be created on each individual hosts. For example, If you have 2 ESXi host in the cluster, All the port groups (for example Management, vMotion, Test environment and Production) needs to be created same as exact name on both the ESXi hosts for the vMotion to work between the ESXi hosts in the cluster.


vSphere Distributed Switch (vDS) provides centralized management and monitoring of the network configuration of all the ESXi hosts that are associated with the dvswitch. Distributed switch can be created and configured at vCenter server system level and all its settings are propagated to all the hosts that are associated with the switch. dvSwitch is designed to create a consistent switch configuration across every hosts in the datacenter. Network configuration and management for all the hosts that associated with the switch can be performed centralized on the vCenter server system. vDS is only available as part of vSphere Enterprise plus licensing and it’s not created by default.The dvswitch consists of two components, the control plane and the I/O or data plane. vSphere Distributed Switch is also referred as  vDS (vSphere Distributed Switch and dvs (Distributed virtual switch).


The Control plane

Control plane exists at vCenter server and It is responsible for managing and configuring the dvswitch  dvport groups,dvports, uplinks,VLANs,PVLANs and NIC teaming,etc. dvswitch is nothing but a configuration template used to configure the settings on each host which are connected to the dvswitch.


The Data Plane (I/O plane)

Data plane is hidden switch that exists on each host and it is responsible for forwarding the data packets to the relevant uplinks. Because of  this data plane (hidden switch created at each host) network communication continues to work even if your vCenter is down.


I hope this post helps you to understand the architecture of standard switch and distributed switch. Thanks for reading !!!!

vSphere Distributed Switch Part 2 - Understand How Virtual Machine Traffic Routes

$
0
0
This post helps you to understand  how the virtual machine traffic flows in different scenarios. I hope this post will really helps VMware learners to understand the basics of virtual networking and how the virtual machine communication will happen in different scenarios with other virtual machines.

VM's connected with Same vSwitch, same port group and VLAN 


VM1 and VM2 are connected to same vSwitch called "vSwitch1" ,same port group called Production and also same VLAN called VLAN 20 and also both are running in the same ESXi host called ESX1. Network traffic between these VM's (VM1 & VM2) does not go to physical NICs on the ESXi host and this frames also not forwarded to physical network like physical switch and router because VM's will communicate within the vSwitch and results in achieving the increased network speed and lesser network latency.


VM's connected with Same vSwitch, different port group and VLAN 

VM1 and VM2 are connected to same vSwitch called vSwitch1 but VM1 connected to the port group called TestDev and VM2 connected to a port group called Production and also both are running in the same ESXi host called ESX1. Network traffic between VM1 and VM2 goes via a physical NIC attached to vSwitch1 and then to a physical switch and then travels back to a physical NIC on vSwitch1 and then to VM2.


VM's connected with different vSwitch but same port group

VM1 connected to the virtual switch called vSwitch1 and VM2 connected to a virtual switch called vSwitch2 but both are connected to same port group called Production and both VM's are running in the same ESXi host called ESX1. Network traffic between VM1 and VM2 goes via a physical NIC on vSwitch1 and then to physical switch  and then travel backs to a physical NIC attached on the vSwitch2 and then it will reach VM2.


VM's Running on different ESX host and connected to different vSwicth and  portgroup 

VM1 is running on ESX host called ESX1 and connected to the virtual switch called vSwitch1 and portgroup called Production. VM2 is running on ESX host called ESX2 and connected to a virtual switch called vSwitch1 and port group called TestDev. Network traffic between VM1 and VM2 goes via a physical NIC on vSwitch1 on ESX1 and then to physical switch  and then travel backs to a physical NIC attached on the vSwitch1 on  ESX host and then it will reach VM2.


I hope this is informative for you. Thanks for Reading!!!!!

vSphere Distributed Switch Part 3 - Difference between Standard Switch and Distributed switch

$
0
0
I have been asked by lot of people during my training sessions about the difference's between standard and distributed switch. I decided it's the time to post the series of posts about distributed switch to help the readers to learn about distributed switch. In this post, I have explained the major differences about standard and distributed switch.


                             VS

Features
Standard Switch
Distributed Switch
Management
Standard switch needs to managed at each individual
host level
Provides centralized management and
 monitoring of the network configuration
 of all the ESXi hosts that are
associated with the dvswitch.
Licensing
Standard Switch is available for all
 Licensing Edition
Distributed switch is only available for
enterprise edition of licensing
Creation & configuration
Standard switch can be created and
 configured at ESX/ESXi host level
Distributed switch can be created and configured
 at the vCenter server level
Layer 2 Switch
Yes, can forward Layer 2 frames
VLAN segmentation
Yes
Yes
802.1Q tagging
Can use and understand 802.1q
VLAN tagging
Can use and understand 802.1q
VLAN tagging
NIC teaming
Yes, can utilize multiple uplink to
 form NIC teaming
Yes, can utilize multiple uplink to form
 NIC teaming
Outbound Traffic Shaping
Can be achieved using standard switch
Can be achieved using distributed switch
Inbound Traffic Shaping
Not available as part of standard
switches
Only possible at distributed switch
VM port blocking
Not available as part of standard
 switches
Only possible at distributed switch
Private VLAN
Not available
PVLAN can be created as part of dvswitch. 3 types of PVLAN(Promiscuous
Community and Isolated)
Load based Teaming
Not available
Can be achieved using distributed switch
Network vMotion
Not available
Can be achieved using distributed switch
Per Port policy setting
Policy can be applied at switch
and port group
Policy can be applied at switch, port group and even per port level
NetFlow
Not available
Yes
Port Mirroring
Not available
Yes

I hope this is informative for you. Thanks for reading !!!!

vSphere Distributed Switch Part 4 - How to Create vSphere Distributed Switch

$
0
0
This is a simple post in vSphere distributed switch post series. Due to the licensing limitation that distributed switch can only be created with enterprise plus license. Lot of people may not have a chance to work the distributed switches in their virtualization environment. This series of  post will help them to understand the lot of practical tasks to perform with distributed switch. This post will help you to understand step by step procedure to create distributed switch using vSphere web client.

You can access your vCenter Server using vSphere web client. vSphere web client can be accessed using the below URL

https://vSphere_Web_Client_host_name_or_IP:9443/vsphere-client

Once logged into the Web client, click on Distributed switch


Click on +  (Add) symbol to create the distributed switch.


Enter the name for your distributed switch. I have choose DSwitch-Production as the name and also select the location for the new distributed switch and click on Next. 


Select one of the Distributed Switch version from the below provided option and click on Next.


Distributed Switch 5.5.0 : This version of dvswitch is compatible with VMware ESXi version 5.5 and later. New features like Traffic filtering and Marking, and enhanced LACP support are available as part of this version.

Distributed Switch 5.1.0 : This version of dvswitch is compatible with VMware ESXi version 5.1 and later. New features like Management Network Rollback and Recovery, Health Check, Enhanced Port Mirroring and LACP are available as part of this version.

Distributed Switch 5.0.0 : This version of dvswitch is compatible with VMware ESXi version 5.0 and later. New features like User-defined network resource pools in Network I/O control, NetFlow, and Port Mirroring are available as part of this version.

Distributed Switch 4.1.0 : This version of dvswitch is compatible with VMware ESX version 4.1 and later. New features like Load-Based Teaming and Network I/O control are available as part of this version.

Distributed Switch 4.0 : This version of dvswitch is compatible with VMware ESX version 4.0 and later. The features supported by later distributed switch versions will not be available.

You will be able to upgrade the version of your dvswitch to latest version even after the dvswitch creation.


Specify the distributed switch settings like number of uplink ports, resource allocation and also select the check box
Create a default portgroup to create default port group as part of this dvswitch creation and click on Next.


Review the settings selected and  click on finish. You will be provided with the suggested next actions after the dvswitch creation.


Note down the Recent tasks for the completion of Create a vSphere Distributed Switch task. If it is completed then your dvswitch is created and ready to proceed with other tasks.


I hope this is informative for you to understand the steps to create distributed switch. Thanks for Reading!!!

vSphere Distributed Switch Part 5 - Adding ESXi host to Distributed Switch

$
0
0
Once the Distributed Switch is created, next step will be adding the ESXi hosts to the distributed switch to associate the hosts with the switch. This post explains you the step by step procedure to add the ESXi hosts to the distributed switch. In this complete series of posts, I have used only vSphere web client  to perform all the tasks because after vSphere 5.5, all the new features are only available when using vSphere web client.

Connect your vCenter server using vSphere web client. Click on Distributed Switches and Select your distributed switch in which you want to add ESXi hosts into it. In my case, My dvswitch is  "DSwitch-Production"

Click on Actions tab and Select Add and Manage Hosts


Click on Add hosts under the select task wizard and click on Next


Click on the + New hosts option and click on Next


Select the hosts from the list to add it to distributed switch and click on Ok. In my case, I am going to add the ESXi host called 192.168.0.125 to my distributed switch.


You can select any of the network adapter tasks to perform as part of this task. I have selected Manage Physical adapters task. This task will allow us to add the physical network adapters to the distributes switch ,assign adapters to the uplinks or remove the existing ones. Click on Next.


Select one or more  network adapters of the ESXi host (192.168.0.125) to assign it to the distributed switch as uplink. Select the network adapter from the list and click on Assign Uplink

I have selected  vmnic1 to assign as an uplink to my distributed switch.


Select the Uplink from the list for the selected network adapter (Eg, vmnic1). I have selected vmnic1 to assign as a uplink1 for distributed switch and clcik on Ok.


Once uplink is assigned, You will be able to see the vmnic1 adapter with the status of Assigned. Click on Next.


Review the impact of this configuration change and click on Next.


Review the settings selected and click on finish to add the ESXi host to the distributed switch.


Once the task is successfully completed. You will be able to see the hosts associated with your dvswitch (Dswitch-Production) under hosts option.


I hope this is informative for you. Thanks for Reading!!. Be social and share it to social media if you feel worth sharing it.

Viewing all 326 articles
Browse latest View live


<script src="https://jsc.adskeeper.com/r/s/rssing.com.1596347.js" async> </script>